
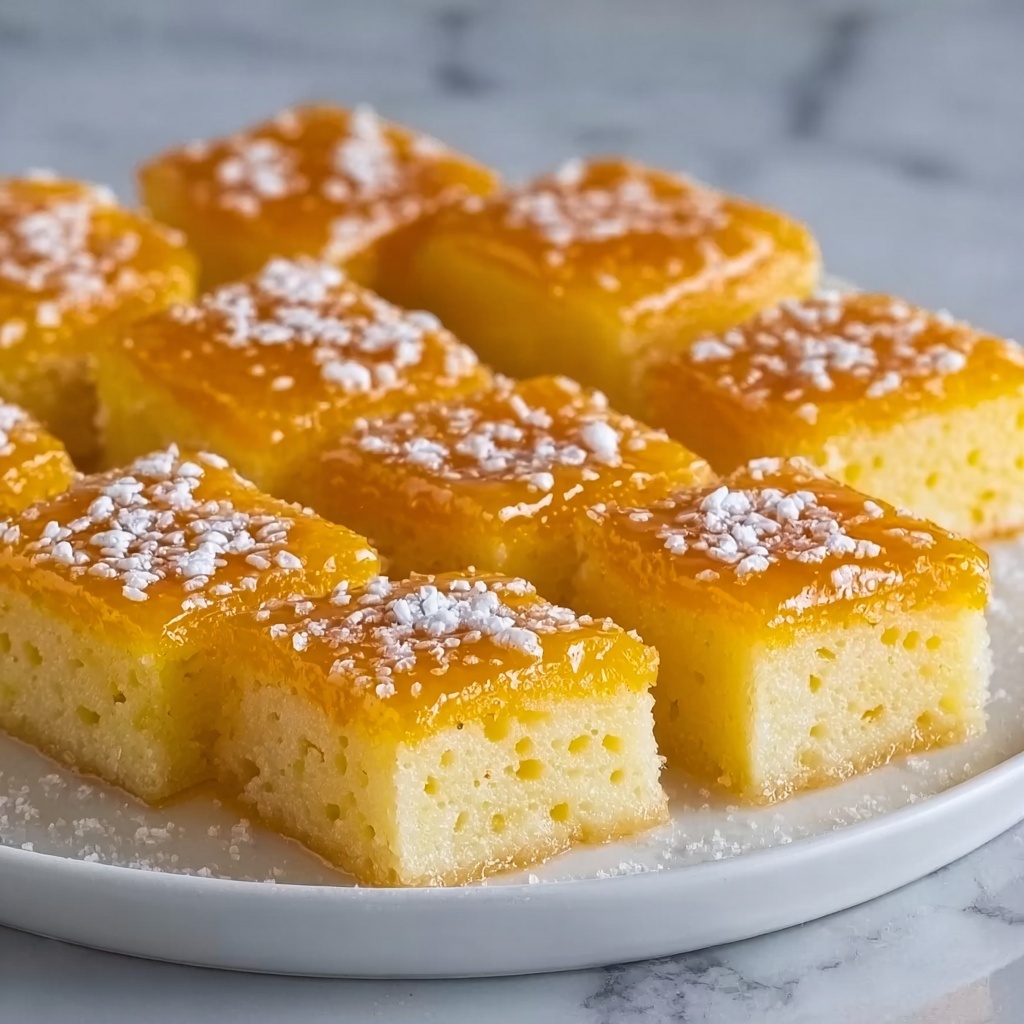
If you’re craving a delightful treat that perfectly balances chewy texture with rich, buttery sweetness, you absolutely have to try this Hawaiian Butter Mochi Recipe. This dessert is a beloved favorite from the islands, boasting the unique chewiness of mochiko flour combined with the tropical flair of coconut milk and real butter. It’s the kind of recipe that fills your kitchen with an irresistible aroma and has everyone asking for just one more square. Whether you’re a seasoned baker or just looking to explore something new, this Hawaiian Butter Mochi Recipe brings warmth, comfort, and a little island magic right to your table.
Ingredients You’ll Need
These ingredients are wonderfully simple but each one plays a vital role in creating the perfect Hawaiian Butter Mochi. From the chewy foundation given by sweet rice flour to the creamy richness from coconut milk and butter, every item contributes to that unique texture and mouthwatering flavor.
- Sweet rice flour (mochiko): The key to that signature chewy, sticky mochi texture that is simply addicting.
- Sugar: Adds sweetness to balance the richness of the butter and coconut milk.
- Baking powder: Provides a slight lift, keeping the mochi light and tender.
- Salt: Enhances all the flavors for a well-rounded taste.
- Unsalted butter, melted: Brings buttery richness that complements the coconut and adds moistness.
- Coconut milk: Imparts a luscious creaminess and subtle tropical flavor essential to Hawaiian style desserts.
- Eggs: Helps bind everything while contributing to the moist, tender crumb.
- Vanilla extract: Deepens the flavor with warm, comforting notes.
- Whole milk: Adds extra moisture and softens the batter for a perfect bake.
How to Make Hawaiian Butter Mochi Recipe
Step 1: Prepare Your Baking Pan and Oven
Start by preheating your oven to a cozy 350°F (175°C) and greasing a 9×9-inch baking pan or lining it with parchment paper. This crucial first step ensures your mochi slides right out after baking without any fuss.
Step 2: Combine the Dry Ingredients
In a medium bowl, whisk together the sweet rice flour, sugar, baking powder, and salt. Mixing them well here means your mochi will bake evenly and have just the right texture from start to finish.
Step 3: Mix the Wet Ingredients
In a separate bowl, beat the eggs until smooth. Then stir in the melted butter, coconut milk, vanilla extract, and whole milk. This blend of wet ingredients is what brings richness and moisture, creating that melt-in-your-mouth effect.
Step 4: Bring It All Together
Gradually add the dry ingredients into the wet mixture, stirring gently to combine until you have a smooth, cohesive batter. Avoid over-mixing to keep the texture tender and chewy.
Step 5: Bake Your Mochi to Perfection
Pour the batter into your prepared pan and smooth the surface with a spatula. Bake in the preheated oven for 50 to 55 minutes. You’ll know it’s done when the top turns a beautiful golden brown and a toothpick inserted in the center comes out clean.
Step 6: Cool and Slice
Patience here truly pays off—allow your mochi to cool completely before cutting it into squares. This step helps each piece hold its shape without falling apart and lets the flavors fully set. Then, enjoy each chewy, buttery square!
How to Serve Hawaiian Butter Mochi Recipe

Garnishes
For a little extra flair, sprinkle your mochi with toasted coconut flakes or a dusting of powdered sugar. You can also drizzle a bit of sweetened condensed milk over the top for added indulgence—each garnish complements the buttery coconut notes beautifully.
Side Dishes
This buttery mochi pairs wonderfully with fresh tropical fruits like pineapple, mango, or papaya. For a truly Hawaiian-themed experience, serve alongside aloha coffee or a light green tea to balance the richness.
Creative Ways to Present
Try cutting your mochi into small bite-sized pieces and serving it on a decorative platter with edible flowers or banana leaves for a festive touch. You can also layer mochi squares with fresh fruit and whipped cream to create a stunning layered dessert parfait.
Make Ahead and Storage
Storing Leftovers
Store your leftover Hawaiian Butter Mochi in an airtight container at room temperature for up to two days. For best texture, avoid refrigerating as this can make the mochi firm and less chewy.
Freezing
If you want to save it for longer, mochi freezes beautifully. Wrap individual squares tightly in plastic wrap and place them in a freezer-safe container or bag. When you’re ready, thaw at room temperature for several hours to bring back that ideal chewy texture.
Reheating
To enjoy your mochi warm, gently reheat it in the oven at 300°F (150°C) for about 10 minutes or microwave individual pieces for 15 to 20 seconds. This refreshes the buttery softness without drying it out.
FAQs
What is mochiko flour, and why is it used in this recipe?
Mochiko flour is finely ground sweet rice flour known for its sticky, chewy qualities. It’s essential to achieving the distinct texture of Hawaiian Butter Mochi that regular flour can’t replicate.
Can I substitute coconut milk with regular milk?
While you can use regular milk, coconut milk gives the mochi its characteristic tropical richness and subtle flavor. If you substitute, the texture will be similar, but you’ll miss out on that unique Hawaiian flair.
Is Hawaiian Butter Mochi Recipe gluten-free?
Yes! Since mochiko flour is made from sweet rice, this recipe is naturally gluten-free, making it a great dessert option for those avoiding gluten.
How chewy should the mochi be?
The beauty of this recipe lies in its delightfully chewy, almost gummy texture without being tough. It should be tender enough to bite easily but still have that satisfying bounce you expect from mochi.
Can I add flavors like chocolate or matcha to this recipe?
Absolutely! You can fold in ingredients like cocoa powder or matcha powder into the dry mix for a fun twist. Just be sure to adjust sweetness accordingly and keep the balance of wet to dry ingredients.
Final Thoughts
Now that you’ve got the full scoop on this Hawaiian Butter Mochi Recipe, you’re all set to bring a little island sunshine into your kitchen. It’s a dessert that’s impressive yet simple, with a texture and flavor combo that delights every time. Whether it’s a special occasion or just a sweet treat for yourself, this mochi will quickly become a cherished favorite. So, grab your ingredients, get baking, and enjoy every chewy, buttery bite!
Print
Hawaiian Butter Mochi Recipe
- Prep Time: 10 minutes
- Cook Time: 50-55 minutes
- Total Time: 1 hour 5 minutes
- Yield: 16 servings
- Category: Dessert
- Method: Baking
- Cuisine: Hawaiian
Description
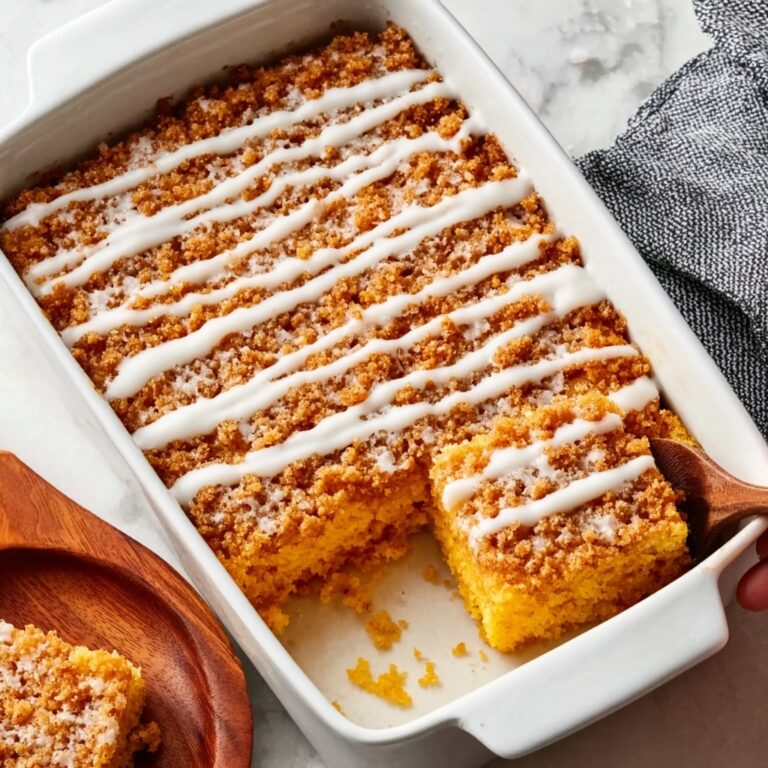
Hawaiian Butter Mochi is a chewy, buttery rice cake dessert with a golden brown crust and a soft, sticky interior made from sweet rice flour, coconut milk, and butter. This classic Hawaiian treat delivers a rich, satisfying texture and flavor perfect for sharing as a delightful snack or dessert.
Ingredients
Dry Ingredients
- 1 cup sweet rice flour (mochiko)
- 1 cup sugar
- 1 1/2 teaspoons baking powder
- 1/4 teaspoon salt
Wet Ingredients
- 1/2 cup unsalted butter, melted
- 1 cup coconut milk
- 2 large eggs
- 1 teaspoon vanilla extract
- 1/2 cup whole milk
Instructions
- Preheat Oven: Preheat your oven to 350°F (175°C). Grease a 9×9-inch baking pan or line it with parchment paper to prevent sticking and facilitate easy removal after baking.
- Mix Dry Ingredients: In a medium-sized bowl, whisk together the sweet rice flour, sugar, baking powder, and salt until evenly combined to ensure a uniform texture.
- Combine Wet Ingredients: In a separate bowl, beat the eggs until light. Stir in the melted butter, coconut milk, vanilla extract, and whole milk until the mixture is well combined and smooth.
- Mix Batter: Gradually pour the wet ingredients into the dry ingredients, mixing gently until the batter is smooth and free of lumps for the best texture.
- Prepare for Baking: Pour the batter into the prepared baking pan and smooth the top with a spatula to ensure even baking and a nice surface appearance.
- Bake: Bake in the preheated oven for 50-55 minutes, or until the top turns golden brown and a toothpick inserted into the center comes out clean, indicating it’s fully cooked.
- Cool and Serve: Allow the mochi to cool completely in the pan before slicing into squares. This cooling helps the mochi set and makes it easier to cut. Enjoy your delicious Hawaiian Butter Mochi!
Notes
- Make sure to use sweet rice flour (mochiko) specifically, as regular rice flour won’t produce the same chewy texture.
- Allowing the mochi to cool completely before slicing improves texture and prevents it from being too sticky to cut cleanly.
- You can line the baking pan with parchment paper for easier removal and less greasing.
- Use fresh eggs and good-quality coconut milk for the best flavor.
- This mochi is best enjoyed within a couple of days for optimal softness but can be stored covered at room temperature.

