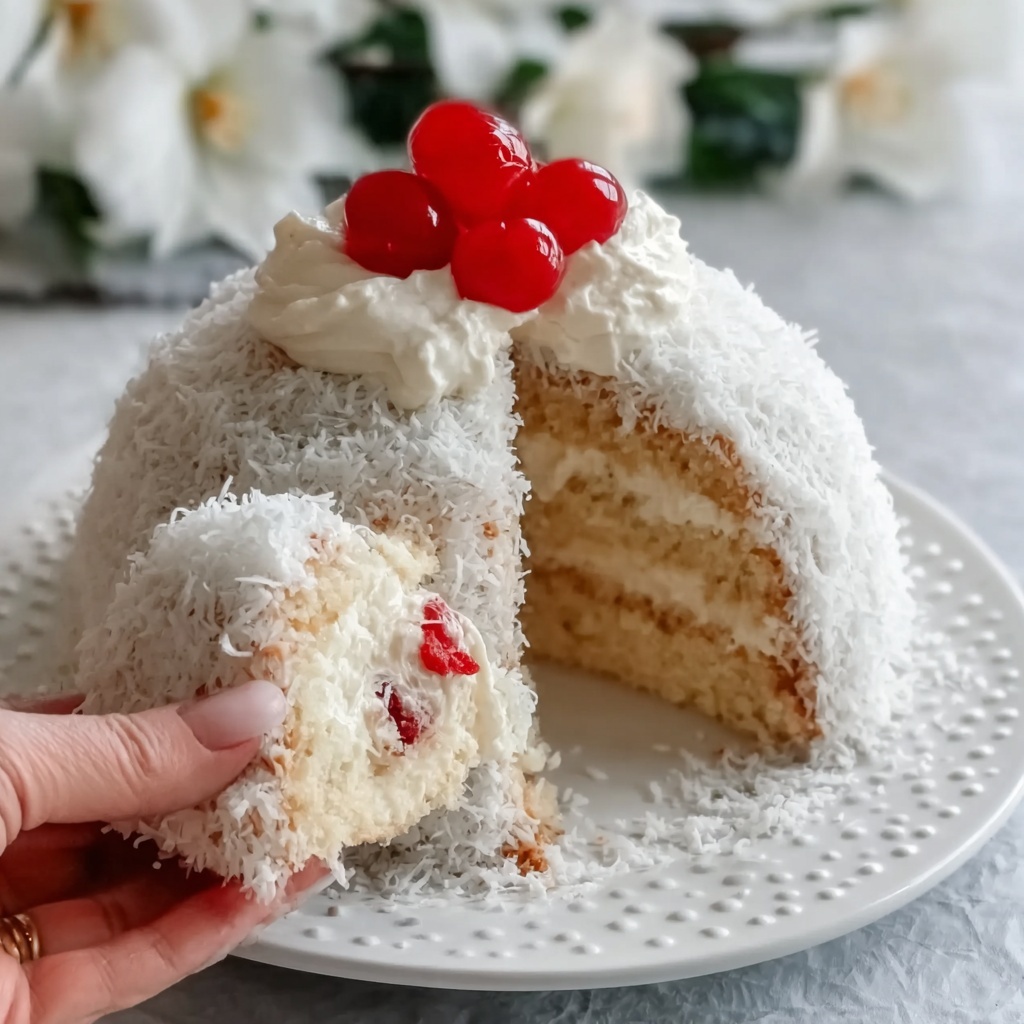
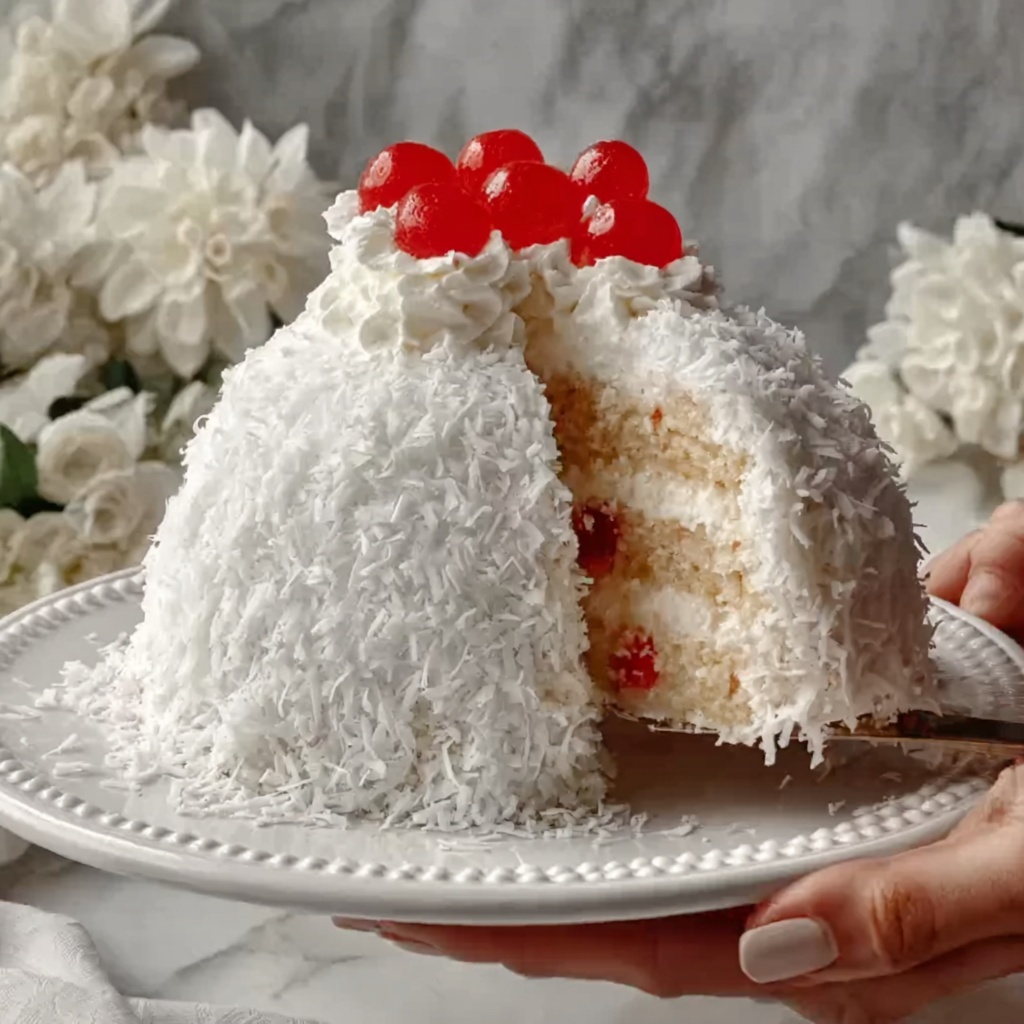
If you’re longing for a nostalgic dessert that feels like a warm hug from the past, this Old-Fashioned Snowball Cake Recipe is exactly what you need. Picture tender, fluffy vanilla layers wrapped in a cloud of whipped cream and covered completely in sweet shredded coconut—that’s the classic comfort of this cake. It’s elegant yet unpretentious, bringing back memories of family gatherings and festive celebrations. This delightful treat is sure to brighten any occasion with its melt-in-your-mouth texture and cozy flavors.
Ingredients You’ll Need
The magic of this Old-Fashioned Snowball Cake Recipe starts with simple, everyday ingredients that come together to create something truly special. Each one plays a vital role in building the cake’s soft crumb, creamy frosting, and snowy coconut exterior.
- All-purpose flour (2 ½ cups): Provides structure and a tender crumb when combined with leavening agents.
- Baking powder (2 ½ teaspoons): Gives the cake its wonderful rise and lightness.
- Salt (½ teaspoon): Enhances the flavors and balances sweetness.
- Unsalted butter, softened (1 cup): Adds richness and moisture for a melt-in-your-mouth texture.
- Granulated sugar (2 cups): Sweetens the cake perfectly without overpowering.
- Large eggs, room temperature (4): Bind ingredients and contribute to a fluffy texture.
- Vanilla extract (2 teaspoons, divided): Imparts a warm, aromatic sweetness that invites smiles.
- Almond extract (1 teaspoon): Adds a lovely delicate nuttiness that makes this cake memorable.
- Whole milk (1 cup): Keeps the batter smooth and moist.
- Heavy whipping cream (3 cups): Whipped into fluffy frosting that’s light as air.
- Powdered sugar (⅓ cup): Sweetens the whipped cream for a perfect topping.
- Sweetened shredded coconut (2 ½ cups): Creates the signature snowball effect with its snowy, chewy texture.
How to Make Old-Fashioned Snowball Cake Recipe
Step 1: Prep Your Pans and Oven
Start by heating your oven to 350°F (175°C). Grease and flour two 9-inch round cake pans, then line the bottoms with parchment paper to ensure your cakes release easily. Setting this up early keeps the process stress-free and guarantees beautifully shaped layers.
Step 2: Mix the Dry Ingredients
In a medium bowl, whisk together the all-purpose flour, baking powder, and salt. This simple step ensures the leavening agent and salt are evenly distributed, which helps your cake rise evenly and develop that perfect crumb texture.
Step 3: Cream the Butter and Sugar
Using a large bowl, beat the softened butter and granulated sugar until the mixture is light and fluffy, usually about 3 to 4 minutes. This aerates the batter, which is key to that tender, cloud-like texture we all love in an old-fashioned cake.
Step 4: Add the Eggs and Extracts
Beat in the eggs one at a time, making sure each is fully incorporated before adding the next. Stir in the vanilla and almond extracts next; their warm, inviting aroma transforms the batter into something truly special.
Step 5: Combine Dry and Wet Ingredients
Alternate adding the dry mixture and the whole milk to the buttery batter, starting and ending with the dry ingredients. Mix gently until just combined—overmixing can make the cake dense, so patience here will reward you.
Step 6: Bake the Cakes
Divide the batter evenly between your prepared pans and smooth the tops. Bake in your preheated oven for 25 to 30 minutes, or until a toothpick inserted in the center comes out clean. The kitchen will start smelling irresistible at this point!
Step 7: Cool Completely
Let the cakes cool in their pans for 10 minutes, then transfer them to a wire rack to cool entirely. This step is crucial for the whipped cream frosting to spread smoothly without melting.
Step 8: Whip the Frosting
In a chilled bowl, whip the heavy cream with powdered sugar and vanilla extract until stiff peaks form. This luscious whipped cream frosting adds lightness and balances the cake’s sweetness beautifully.
Step 9: Assemble the Cake
Place one cake layer on your serving plate and generously spread it with whipped cream. Top with the second cake layer and frost the top and sides evenly. This creamy layer is the perfect canvas for the final snowy touch.
Step 10: Add the Snowball Finish
Press sweetened shredded coconut onto all the frosted surfaces to cover the cake completely. Chill the cake for at least an hour to let everything set and the flavors meld together perfectly.
How to Serve Old-Fashioned Snowball Cake Recipe

Garnishes
While the classic shredded coconut is the star garnish here, you can add festive touches like edible silver pearls or a dusting of powdered sugar to make your cake even more magical. Fresh berries on the side add a pop of color and a tangy contrast that is hard to resist.
Side Dishes
This cake pairs beautifully with a cup of aromatic tea or rich coffee, making it ideal for afternoon gatherings. If you’re serving at a bigger dinner, consider fresh fruit salad or a light citrus sorbet to cleanse the palate between bites of rich cake.
Creative Ways to Present
For a fun twist, turn this Old-Fashioned Snowball Cake Recipe into cupcakes topped with coconut whipped cream and a sprinkle of toasted coconut flakes. You could also layer coconut flakes inside the cake for extra texture or drizzle with melted white chocolate for an indulgent touch.
Make Ahead and Storage
Storing Leftovers
Wrap your leftover cake tightly in plastic wrap or store it in an airtight container in the refrigerator. The whipped cream frosting makes refrigeration essential, and your cake will stay fresh for up to 3 days, perfect for enjoying over a few indulgent afternoons.
Freezing
You can freeze the unfrosted cake layers wrapped tightly in plastic wrap and then foil for up to 2 months. When ready to serve, thaw them overnight in the refrigerator, then assemble and frost with fresh whipped cream and coconut for the best flavor and texture.
Reheating
Because this cake is served chilled, reheating is not necessary. Instead, just let refrigerated leftovers sit at room temperature for 15-20 minutes before serving to bring out the flavors and soften the frosting just slightly.
FAQs
Can I use light whipping cream instead of heavy cream?
Heavy cream is key to achieving that stiff, fluffy whipped frosting. Light whipping cream has less fat and may not whip up as firmly, so it’s best to stick with heavy cream for this recipe.
Is it possible to make this cake dairy-free?
Yes, you can substitute the butter and milk with plant-based alternatives like vegan butter and almond milk, and use coconut cream for the frosting. The shredded coconut on the outside will still provide the classic look and flavor.
Can this cake be made a day ahead?
Definitely! In fact, making the cake layers a day ahead and chilling them before frosting helps with easier assembly. Just add the frosting and coconut the day you plan to serve for the freshest results.
Why is almond extract used in the recipe?
Almond extract adds a subtle, nutty warmth that complements vanilla beautifully and gives this cake its nostalgic, old-fashioned charm. It’s a small ingredient with a big impact on flavor.
How do I prevent the shredded coconut from falling off?
Press the shredded coconut firmly onto the whipped cream frosting right after spreading it, and then chill the cake to set. This helps the coconut stick well and keeps the outside looking snowy and perfect.
Final Thoughts
This Old-Fashioned Snowball Cake Recipe is more than just a dessert—it’s a joyful experience that unwraps treasured memories with each bite. Whether you’re celebrating a special occasion or simply want to bring a little sweetness into your day, this cake is an absolute winner. I can’t wait for you to make it your own and see the smiles it brings around your table!
Print
Old-Fashioned Snowball Cake Recipe
- Prep Time: 20 minutes
- Cook Time: 30 minutes
- Total Time: 1 hour 10 minutes
- Yield: 12 servings
- Category: Dessert
- Method: Baking
- Cuisine: American
- Diet: Vegetarian
Description
This Old-Fashioned Snowball Cake is a classic, rich, and fluffy layered cake perfect for any occasion. It features moist vanilla-almond cake layers with a luscious whipped cream frosting, generously coated in sweet shredded coconut for a snowy effect. The cake is baked to perfection, then chilled to set, creating a delightful texture and flavor combination that will impress your guests.
Ingredients
Cake
- 2 ½ cups all-purpose flour
- 2 ½ teaspoons baking powder
- ½ teaspoon salt
- 1 cup unsalted butter, softened
- 2 cups granulated sugar
- 4 large eggs, room temperature
- 1 teaspoon vanilla extract
- 1 teaspoon almond extract
- 1 cup whole milk
Whipped Cream Frosting
- 3 cups heavy whipping cream
- ⅓ cup powdered sugar
- 1 teaspoon vanilla extract
Topping
- 2 ½ cups sweetened shredded coconut
Instructions
- Preheat Oven and Prepare Pans: Preheat your oven to 350°F (175°C). Grease and flour two 9-inch round cake pans, then line the bottoms with parchment paper to ensure easy removal of the cake layers.
- Mix Dry Ingredients: In a medium bowl, whisk together the flour, baking powder, and salt to evenly distribute the leavening agents and salt.
- Cream Butter and Sugar: In a large bowl, use a mixer to beat the softened butter and granulated sugar together for 3-4 minutes until the mixture becomes light and fluffy, which helps with the cake’s texture.
- Add Eggs and Extracts: Add eggs one at a time to the butter-sugar mixture, beating well after each addition to incorporate air. Then mix in vanilla and almond extracts for flavor.
- Combine Wet and Dry Ingredients: Alternately add the flour mixture and milk to the batter, starting and ending with the dry ingredients. Mix just until combined to avoid overworking the batter and keeping the cake tender.
- Divide Batter and Bake: Evenly divide the batter between the prepared pans, smoothing the tops with a spatula. Bake for 25-30 minutes or until a toothpick inserted in the center comes out clean.
- Cool Cake Layers: Allow the cakes to cool in their pans for 10 minutes, then carefully transfer them to a wire rack to cool completely before frosting.
- Prepare Whipped Cream Frosting: In a chilled bowl, whip the heavy cream, powdered sugar, and vanilla extract together until stiff peaks form, ensuring a stable and creamy frosting.
- Assemble the Cake: Place one cake layer on your serving plate and spread a generous amount of whipped cream on top. Place the second layer on top and cover the entire cake with the remaining whipped cream frosting.
- Add Coconut Topping and Chill: Press shredded coconut evenly onto the frosting to cover the whole cake, creating the ‘snowball’ appearance. Chill the cake for at least 1 hour before serving to allow the frosting to set.
Notes
- Using room temperature eggs helps the batter blend more uniformly.
- Be careful not to overmix the batter once the dry ingredients are added to keep the cake tender and light.
- For best results, chill the bowl and beaters before whipping the cream to help it whip up faster and hold better.
- The cake is best served chilled but can be left at room temperature for 30 minutes before serving for softer texture.
- Store leftovers in the refrigerator covered tightly; consume within 2-3 days.


