
If you’re looking to add a heartfelt touch to your Valentine’s Day treats, you will absolutely adore making Teddy Bear Brownies: A Sweet Valentine’s Day Surprise Recipe. This delightful dessert combines the fudgy charm of rich chocolate brownies with the playful whimsy of adorable teddy bear-shaped cookies, all topped off with charming ruby chocolate hearts. Whether you’re baking for a loved one or just want to bring a smile to someone’s face, this recipe makes for an unforgettable, sweet surprise that blends taste, texture, and a pinch of romance perfectly.
Ingredients You’ll Need
Gathering the right ingredients is the key to baking these irresistible treats. Each component plays a crucial role, from the deep chocolate notes to the tender crumb of the brownies and the cozy crunch of the teddy bear cookies.
- 4 oz Dark Chocolate: Provides rich chocolate flavor; semi-sweet chocolate can be used as a substitute.
- 3/4 stick Unsalted Butter: Adds moisture and richness; use vegan butter for a dairy-free option.
- 2/3 cup Light Brown Sugar: Sweetens and keeps the brownies moist; coconut sugar works well as a substitute.
- 2 Eggs: Acts as a binder for structure; flax eggs can be substituted for a vegan alternative.
- 1 tsp Vanilla Extract: Enhances the sweetness and overall flavor.
- 1/2 cup All-Purpose Flour: Provides essential structure; substitute with a gluten-free flour blend for Teddy Bear Brownies.
- 1/4 cup Cocoa Powder: Intensifies the chocolate flavor.
- 1/2 tsp Salt: Balances sweetness and enhances flavors.
- 1/2 tsp Instant Espresso Powder: Optional; deepens the chocolate flavor if you enjoy a richer taste.
- 1/4 cup Quick Cooking Oats: Adds texture to the cookies; old-fashioned oats can work if blitzed in a food processor.
- 1 tsp Ground Flaxseed: A nutritious substitute for eggs, high in fiber.
- 2.5 tsp Water: Hydrates the flaxseed for the egg substitute.
- 1.5 tbsp Light Brown Sugar: Sweetens the cookie dough.
- 1/4 cup All-Purpose Flour: Contributes to the cookie structure; gluten-free options are available.
- 1 pinch Salt: Enhances flavor and balances sweetness.
- Ruby Chocolate Hearts: For a charming and colorful finishing touch.
How to Make Teddy Bear Brownies: A Sweet Valentine’s Day Surprise Recipe
Step 1: Preheat and Prepare Your Pan
Start by setting your oven to 350°F (180°C). Grease an 8×8 inch pan and line it with parchment paper to ensure your brownies come out perfectly without sticking. This preparation step is crucial to achieve those smooth edges and easy removal later.
Step 2: Melt Chocolate and Butter
Using a double boiler, gently melt the dark chocolate and butter together. Stir occasionally to create a velvety, fully melted blend. Let it cool slightly so it doesn’t scramble the eggs when mixed later, but keep it warm enough to stay liquid and smooth.
Step 3: Whip Eggs and Sugar
In a large mixing bowl, beat together the eggs and light brown sugar until the mixture becomes thick and pale. This airiness is key to giving the brownies a slight lift and tenderness that melts in your mouth.
Step 4: Combine Wet and Dry Ingredients
Pour the cooled chocolate mixture into the sugar and egg blend. Gently fold in the flour, cocoa powder, salt, and instant espresso powder if using. Stir just until everything comes together—overmixing can make your brownies dense instead of fudgy.
Step 5: Bake the Brownies
Pour the batter evenly into your prepared pan. Bake for around 20 minutes, keeping a close eye after 18 minutes. You want them set but with a moist center that is utterly irresistible. Allow the brownies to cool completely in the pan on a wire rack—that’s important for the assembly to come.
Step 6: Create Your Teddy Bear Cookies
Lower your oven temperature to 320°F (160°C). In a separate bowl, mix the oats, flour, ground flaxseed, light brown sugar, and a pinch of salt. Add the melted butter and water, stirring until a dough forms. Shape this dough into adorable teddy bear figures and place them on a parchment-lined baking sheet.
Step 7: Bake and Cool the Cookies
Bake the teddy bear cookies for about 25 minutes, or until they turn golden brown and hold their shape firm to the touch. Let them cool fully—that crunch paired with the brownie’s softness is pure magic.
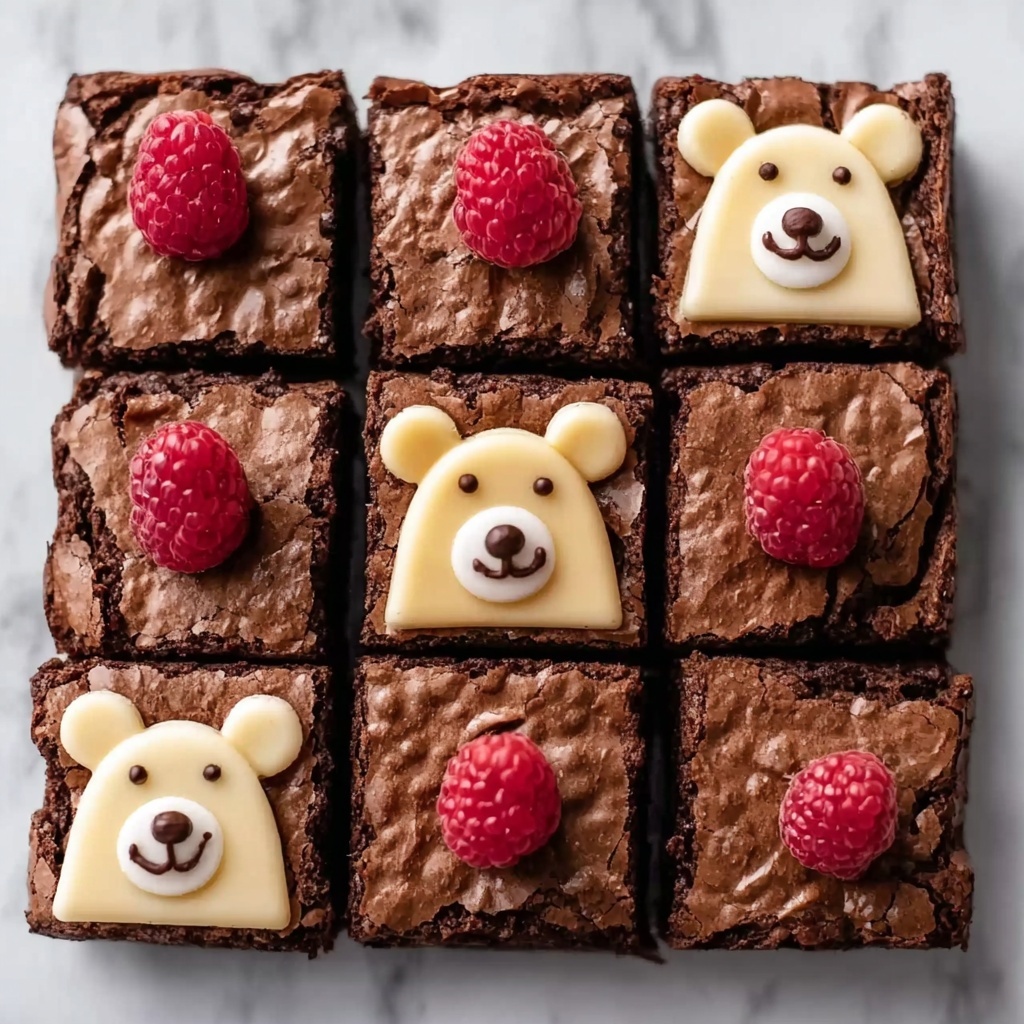
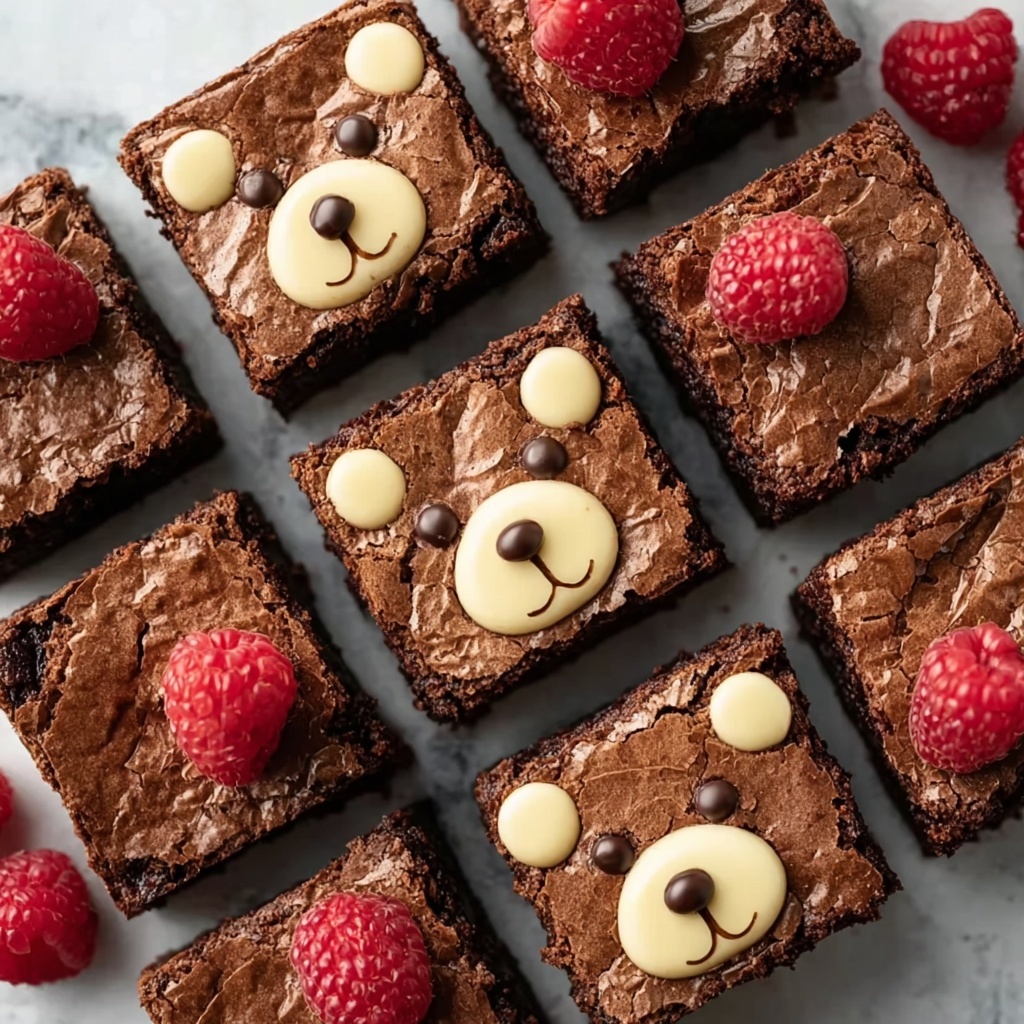
Step 8: Assemble Your Sweet Valentine’s Surprise
Use melted chocolate as edible glue to attach the teddy bear cookies onto the cooled brownies. Then decorate with the ruby chocolate hearts—adding that lovely pop of pink-red color that makes this Valentine’s treat even more special.
How to Serve Teddy Bear Brownies: A Sweet Valentine’s Day Surprise Recipe
Garnishes
A sprinkle of powdered sugar or a drizzle of white chocolate can elevate these treats even further. Fresh berries like raspberries or strawberries add a bright, juicy contrast to the richness, making the desserts as visually appealing as they are delicious.
Side Dishes
Serve the Teddy Bear Brownies with a scoop of vanilla ice cream or a dollop of whipped cream for a classic combination. For a cozy winter twist, pair them with a warm cup of spiced hot chocolate or your favorite coffee to bring out the chocolatey goodness.
Creative Ways to Present
Arrange the brownies on a festive Valentine’s platter surrounded by rose petals or edible flowers for an instant wow factor. Packaging individual brownies in clear cellophane bags tied with red ribbon also makes for heartfelt homemade gifts that will charm anyone lucky enough to receive them.
Make Ahead and Storage
Storing Leftovers
Store any leftover Teddy Bear Brownies in an airtight container at room temperature for up to three days. This keeps the cookies crisp and the brownies delightfully fresh, ready for whenever a sweet craving strikes.
Freezing
To keep these treats longer, wrap the brownies and teddy bear cookies separately in plastic wrap and foil, then freeze. They maintain their texture and flavor for up to two months. Thaw overnight in the refrigerator before assembling to avoid sogginess.
Reheating
If you want to enjoy warm Teddy Bear Brownies, lightly microwave a piece for 10 to 15 seconds or warm in a low-temperature oven. Just be cautious not to heat too long or you risk drying out that fudgy center and crisp cookie edges.
FAQs
Can I make these brownies without eggs?
Absolutely! You can substitute eggs with flax eggs made by mixing ground flaxseed with water, as mentioned in the ingredients. This keeps the brownies moist and structural without compromising flavor.
What if I don’t have ruby chocolate hearts?
No worries! You can decorate with any chocolate candies or even colored sugar sprinkles. Fresh fruit or edible glitter works beautifully too, adding unique personal touches to your Teddy Bear Brownies.
How do I get the perfect fudgy texture in the brownies?
Fudgy brownies come from the balance of fat (butter and chocolate) to flour, and baking just until set. Avoid overbaking to keep the interior moist and dense—test by inserting a toothpick that should come out with a few moist crumbs.
Can I prepare parts of this recipe in advance?
Yes! You can bake the brownies and teddy bear cookies a day ahead, store them separately, then assemble just before serving. This helps speeds things up and keeps the cookies crisp when served.
Is it possible to make this recipe gluten-free?
Definitely. Swap the all-purpose flour for a gluten-free flour blend that measures cup for cup, and ensure your oats are certified gluten-free. The texture might be slightly different but just as delicious!
Final Thoughts
Bringing the Teddy Bear Brownies: A Sweet Valentine’s Day Surprise Recipe to life is as rewarding as sharing it with loved ones. It’s a recipe filled with love, warmth, and a little bit of whimsy, perfect for making Valentine’s Day moments even sweeter. So gather your ingredients, dive into the process, and enjoy every bite of this charming homemade treat that’s sure to become a cherished favorite.
Print
Teddy Bear Brownies: A Sweet Valentine’s Day Surprise Recipe
- Prep Time: 30 minutes
- Cook Time: 45 minutes
- Total Time: 1 hour 15 minutes
- Yield: 12 servings
- Category: Dessert
- Method: Baking
- Cuisine: American
Description
Teddy Bear Brownies combine rich, fudgy chocolate brownies with adorable teddy bear-shaped cookies, creating a delightful Valentine’s Day treat. This recipe features a double bake method—first crafting moist, chocolatey brownies, then baking sweet, oat-enhanced teddy bear cookies. The final step assembles these components into charming, decorated desserts with ruby chocolate hearts, perfect for sharing with loved ones.
Ingredients
Brownies
- 4 oz Dark Chocolate
- 3/4 stick Unsalted Butter
- 2/3 cup Light Brown Sugar
- 2 Eggs
- 1 tsp Vanilla Extract
- 1/2 cup All-Purpose Flour
- 1/4 cup Cocoa Powder
- 1/2 tsp Salt
- 1/2 tsp Instant Espresso Powder (optional)
Teddy Bear Cookies
- 1/4 cup All-Purpose Flour
- 1/4 cup Quick Cooking Oats
- 1 tsp Ground Flaxseed
- 2.5 tsp Water
- 1.5 tbsp Light Brown Sugar
- 1 pinch Salt
- Unsalted Butter (amount sufficient for mixing the dough, estimate about 3 tbsp melted)
Decoration
- Ruby Chocolate Hearts
- Melted Chocolate (for attaching cookies to brownies)
Instructions
- Brownie Preparation: Preheat your oven to 350°F (180°C). Grease and line an 8×8 inch baking pan with parchment paper to prevent sticking.
- Melt Chocolate: Using a double boiler, melt the dark chocolate and butter together, stirring occasionally until smooth. Let it cool slightly to avoid cooking the eggs in the next step.
- Combine Eggs and Sugar: In a large bowl, beat the eggs and light brown sugar until the mixture becomes thick and pale, ensuring a light and airy texture.
- Mix Ingredients: Gently pour the cooled chocolate mixture into the egg and sugar blend. Stir to combine, then fold in the all-purpose flour, cocoa powder, salt, and optional instant espresso powder just until incorporated to avoid overmixing.
- Bake Brownies: Pour the batter evenly into the prepared pan and bake for approximately 20 minutes, until a toothpick inserted in the center comes out with moist crumbs.
- Cool Brownies: Remove from the oven and allow the brownies to cool completely in the pan on a wire rack to set properly before decorating.
- Teddy Bear Cookies Preparation: Reduce oven temperature to 320°F (160°C). In a separate bowl, mix together the all-purpose flour, oats, ground flaxseed, light brown sugar, and a pinch of salt.
- Form Dough: Incorporate melted butter and water into the dry ingredients, stirring until a firm dough forms. Shape the dough into teddy bear figures and place them on a parchment-lined baking sheet.
- Bake Cookies: Bake the teddy bear cookies for about 25 minutes or until they are golden brown and firm to the touch.
- Cool Cookies: Let the teddy bear cookies cool completely on a wire rack.
- Assembly: Melt additional chocolate to use as glue. Attach each teddy bear cookie onto the cooled brownies using the melted chocolate. Decorate the assembled treats with ruby chocolate hearts for a festive appearance.
Notes
- Use semi-sweet chocolate as a substitute if dark chocolate is unavailable.
- For a vegan option, substitute eggs with flax eggs made by mixing 1 tbsp ground flaxseed with 2.5 tbsp water per egg and use vegan butter.
- Gluten-free flour blends can replace all-purpose flour for gluten-free brownies and cookies.
- Instant espresso powder is optional but enhances the depth of chocolate flavor.
- Blitz old-fashioned oats in a food processor if quick cooking oats are not available.
- Ensure brownies are completely cooled before attaching teddy bear cookies to prevent melting.


