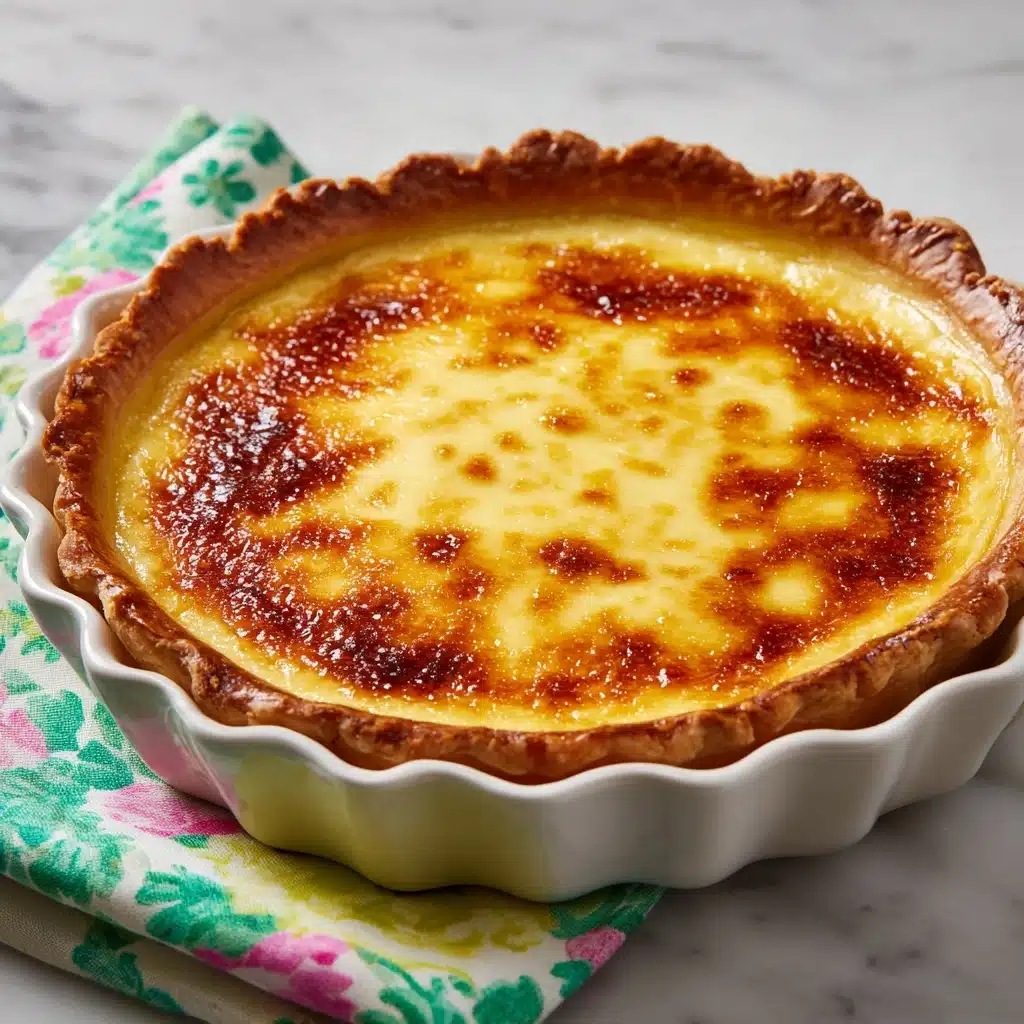
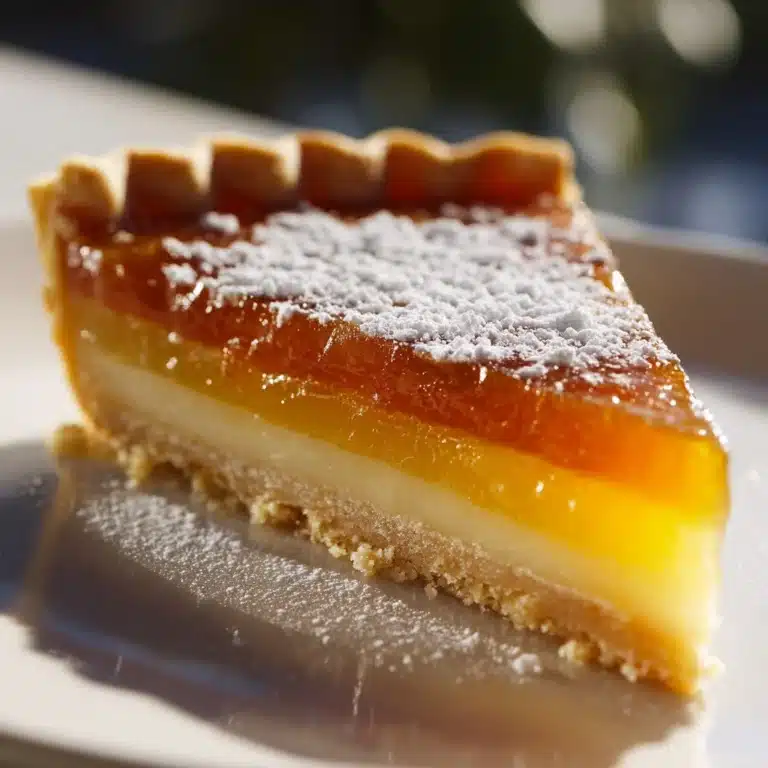
Water Pie Recipe
If you love uncovering nostalgic, soulful desserts from the past, the Water Pie Recipe is about to steal your heart. This extraordinary Depression-era pie is a sweet testament to the power of pantry staples: with just water, sugar, flour, butter, and a pie crust, you end up with a slice of silky, custard-like magic. Every bite is sweet, creamy, and beautifully simple, proving you don’t need fancy ingredients for a show-stopping treat. Whether you’re channeling a bit of history or craving comfort on a whim, this Water Pie Recipe has an irresistible old-fashioned charm you’ll want to revisit again and again.
Ingredients You’ll Need
The beauty of this Water Pie Recipe is how everyday items transform into something truly special. Each ingredient serves a purpose—bringing either creaminess, fragrance, or that essential homey feel to the pie. Pay attention to the quality and freshness, and you’ll taste the difference.
- Unbaked 9-inch pie crust: The crisp, golden base that holds the luscious filling together; ready-made or homemade both work beautifully.
- 1 ½ cups water: The unlikely star of this recipe, creating the pie’s unique custardy texture.
- 4 tablespoons all-purpose flour: Helps thicken the filling, giving that subtle pudding-like consistency.
- 1 cup granulated sugar: Adds just the right level of sweetness to contrast the mild creaminess.
- 5 tablespoons unsalted butter (sliced): Melts into rich, golden pools, creating a silky, flavorful layer on top.
- 1 teaspoon vanilla extract: Rounds out all the flavors with a warm, fragrant note you’ll love.
- Pinch of salt: Enhances the sweetness and brings perfect balance to each bite.
How to Make Water Pie Recipe
Step 1: Prepare the Pie Crust
Start by preheating your oven to 400°F (200°C). Gently fit your unbaked pie crust into a 9-inch pie dish, crimping the edges however you like for that extra homemade touch. Making sure your crust is well-placed can help avoid pesky leaks once the filling goes in.
Step 2: Add the Water
Slowly pour 1½ cups of water directly into your prepared pie crust. Don’t worry—it may look strange, but this step is essential for creating the Water Pie Recipe’s signature texture.
Step 3: Mix and Sprinkle the Dry Ingredients
In a separate small bowl, whisk together the flour, granulated sugar, and a pinch of salt. Then, evenly sprinkle this dry mixture over the water-filled crust. Whatever you do, resist the urge to stir! The magic of this pie is in the undisturbed layers.
Step 4: Top with Butter and Vanilla
Dot the top with slices of unsalted butter, spacing them out so each bite will be buttery and rich. Finally, drizzle the vanilla extract evenly over everything. The aroma while baking is worth the effort alone!
Step 5: Bake the Pie
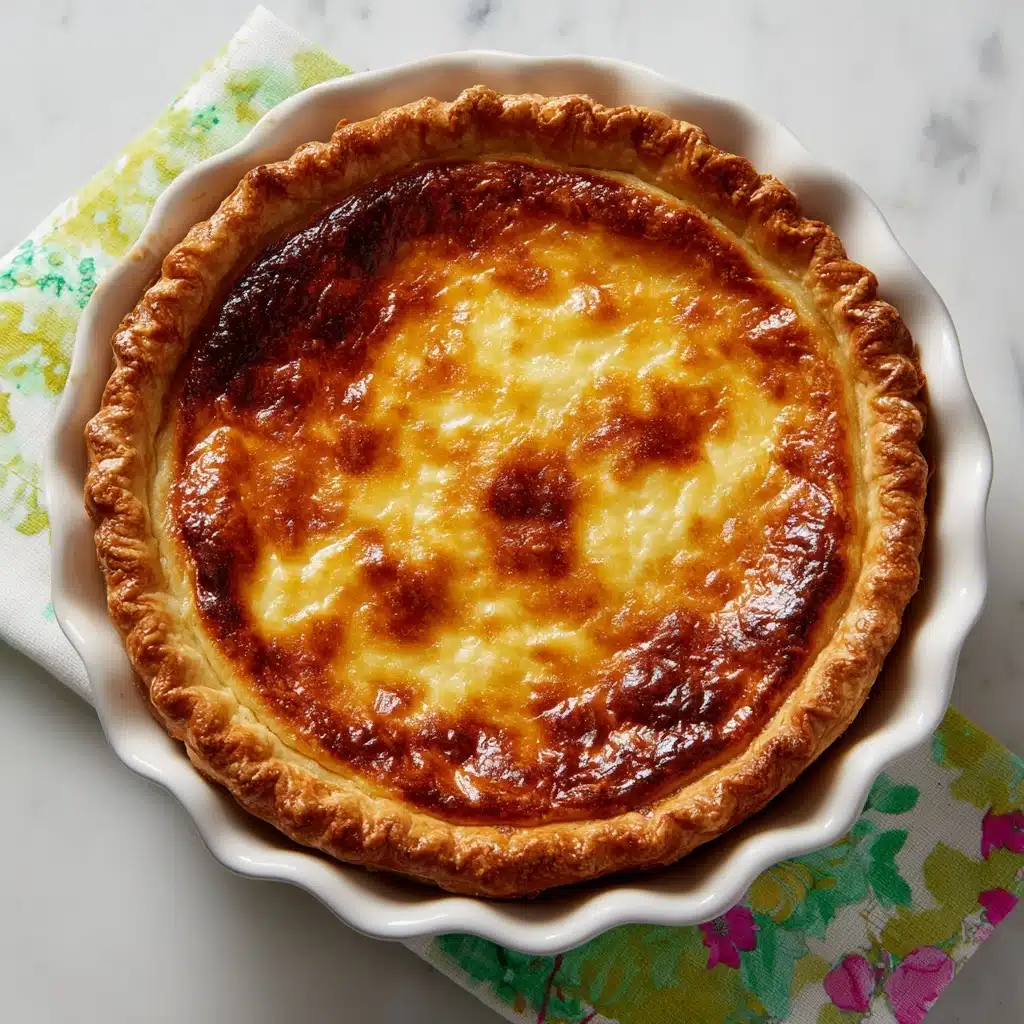
Place the pie on the oven’s center rack and bake at 400°F (200°C) for 30 minutes. Then, reduce the heat to 375°F (190°C) and continue baking for an additional 30 minutes. The Water Pie Recipe is done when the center looks set and the crust is golden.
Step 6: Cool and Chill
Let the pie cool completely at room temperature before moving it to the fridge for at least 2 hours. This chill time is crucial for the filling to fully set, making it easy to slice into perfect wedges.
How to Serve Water Pie Recipe
Garnishes
For a truly classic look, keep it simple with just a little dusting of powdered sugar or a light sprinkle of cinnamon on top. If you want an extra pop, add a dollop of freshly whipped cream just before serving. The simplicity of the Water Pie Recipe is perfect for letting those understated garnishes shine.
Side Dishes
Pairing this pie with a cup of hot tea or coffee is pure bliss. It also sits perfectly next to a fresh fruit salad—think strawberries or blueberries—to balance the sweetness with a burst of refreshing flavor.
Creative Ways to Present
Try cutting the Water Pie Recipe into small squares for a dessert tray at gatherings, or serve mini slices on vintage plates to honor the recipe’s old-fashioned roots. You can even present it with a scoop of vanilla ice cream for an extra indulgent twist!
Make Ahead and Storage
Storing Leftovers
Wrap any leftover Water Pie Recipe slices tightly in plastic wrap or store in an airtight container. Keep it in the refrigerator to maintain its smooth, custard-like texture for up to 3 days.
Freezing
You can freeze this pie! Simply wrap individual slices or the whole pie (tightly!) before placing in the freezer. Thaw overnight in the fridge; note that the filling may become slightly softer, but it’s still delicious.
Reheating
While Water Pie Recipe is best enjoyed cold or at room temperature, if you prefer it warm, gently heat individual slices in the microwave for about 10–15 seconds.
FAQs
Can I use a store-bought pie crust for Water Pie Recipe?
Absolutely! Both store-bought and homemade crusts work well. Just ensure the crust is unbaked when you start.
Why don’t you stir the ingredients together?
The magic of the Water Pie Recipe comes from allowing the dry ingredients to gently sink and thicken with the water as the pie bakes, creating distinct layers and that signature custardy middle.
Can I add other spices or flavorings?
Definitely—feel free to sprinkle a touch of cinnamon or nutmeg over the pie before baking. These bring a warm, aromatic twist that complements the classic flavor beautifully.
How do I know when the pie is done?
Your Water Pie Recipe is ready when the crust is golden and the center is set. A gentle jiggle in the center is okay, but it shouldn’t be liquidy. Cooling and chilling help the filling to firm up.
Is Water Pie Recipe suitable for vegetarians?
Yes, it is! As long as you use a vegetarian-friendly pie crust, this dessert is perfect for a vegetarian treat.
Final Thoughts
If you’ve been curious about baking outside the box, the Water Pie Recipe is the perfect place to start. It’s a show-stopping conversation starter with a fascinating history and a sweet reward at the end. Don’t be surprised if this clever, comforting pie becomes your go-to for special occasions—or any time you want to share a piece of the past, one slice at a time.
Print
Water Pie Recipe
- Total Time: 1 hour 10 minutes
- Yield: 8 slices 1x
- Diet: Vegetarian
Description
A nostalgic Water Pie recipe that harkens back to the Depression era when simple ingredients were turned into a delightful custard-like dessert. This vintage pie offers a taste of old-fashioned goodness with minimal effort.
Ingredients
Pie:
- 1 unbaked 9-inch pie crust
- 1 ½ cups water
Filling:
- 4 tablespoons all-purpose flour
- 1 cup granulated sugar
- 5 tablespoons unsalted butter, sliced
- 1 teaspoon vanilla extract
- Pinch of salt
Instructions
- Preheat oven: to 400°F (200°C).
- Prepare pie crust: Place the unbaked pie crust into a 9-inch pie dish and crimp the edges. Pour water into the crust.
- Mix dry ingredients: In a small bowl, whisk together flour, sugar, and salt. Sprinkle this mixture over the water without stirring.
- Add butter and vanilla: Place butter slices evenly on top and drizzle with vanilla extract.
- Bake: Bake at 400°F for 30 minutes, then reduce heat to 375°F and bake for another 30 minutes until set and golden brown.
- Cool and chill: Let the pie cool, then chill for at least 2 hours before serving.
Notes
- Water Pie is a vintage Depression-era dessert that transforms basic pantry staples into a custard-like delight.
- For a twist, sprinkle cinnamon or nutmeg over the top before baking.
- Prep Time: 10 minutes
- Cook Time: 60 minutes
- Category: Dessert
- Method: Baking
- Cuisine: American
Nutrition
- Serving Size: 1 slice
- Calories: 260
- Sugar: 24g
- Sodium: 110mg
- Fat: 12g
- Saturated Fat: 7g
- Unsaturated Fat: 4g
- Trans Fat: 0g
- Carbohydrates: 37g
- Fiber: 0g
- Protein: 1g
- Cholesterol: 25mg
