Chocolate Mousse Pie Recipe
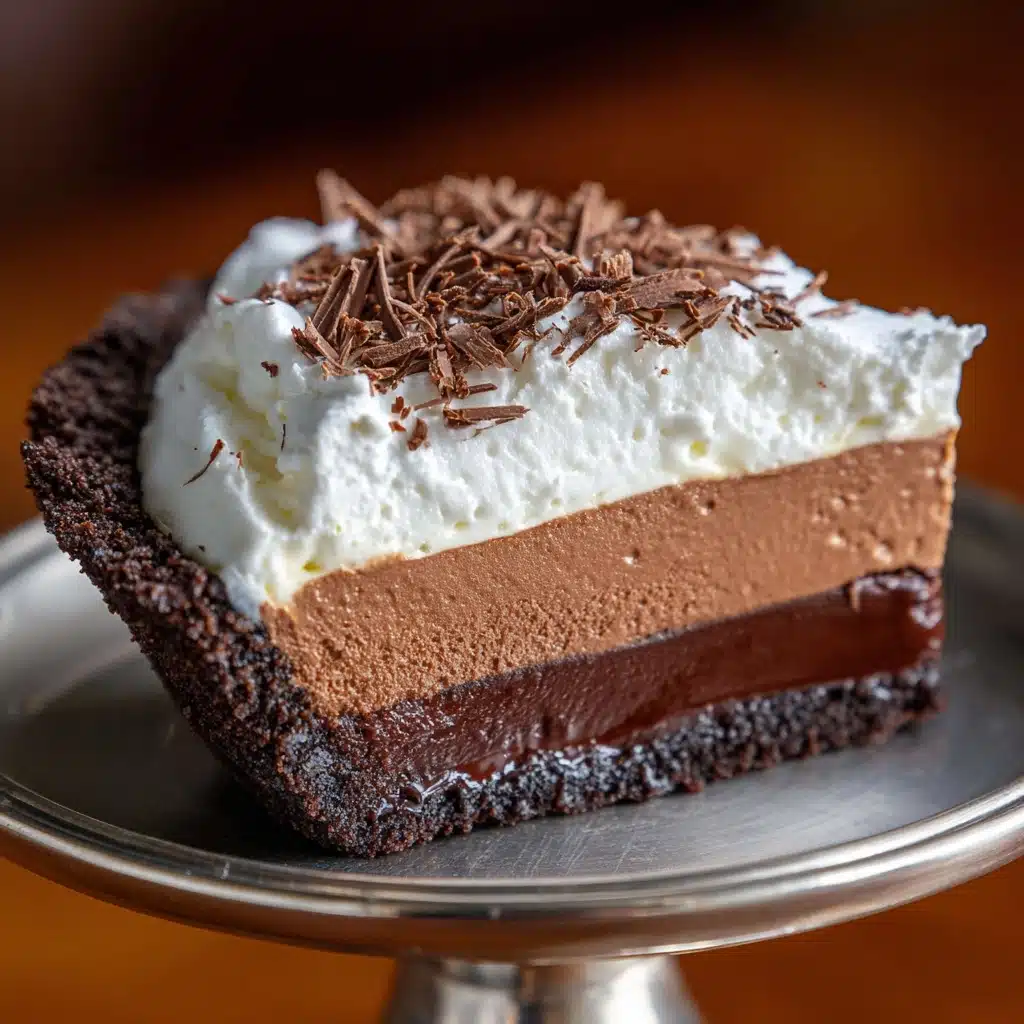
If you’re searching for a show-stopping dessert that’s as easy as it is irresistible, this Chocolate Mousse Pie Recipe is about to become your new go-to. Imagine a velvety, cloud-like chocolate mousse piled high in a rich chocolate cookie crust, all topped with a swoosh of whipped cream and a flourish of chocolate shavings. Whether you’re celebrating a special occasion or just craving something decadent, this pie delivers pure chocolate bliss with every bite. No oven required, and only a handful of ingredients stand between you and dessert perfection!
Ingredients You’ll Need
-
Crust
- 1 prepared chocolate cookie crust (9-inch)
Chocolate Mousse Filling
- 1 1/2 cups heavy whipping cream (cold)
- 1 cup semi-sweet chocolate chips
- 1/4 cup powdered sugar
- 1 teaspoon vanilla extract
Garnish (Optional)
- Chocolate shavings or whipped cream for garnish
How to Make Chocolate Mousse Pie Recipe
Step 1: Melt the Chocolate
Start by placing your semi-sweet chocolate chips in a microwave-safe bowl. Heat them in 30-second bursts, stirring between each session, until the chocolate is smooth and glossy. Let it cool slightly—this keeps the whipped cream from deflating and ensures the mousse stays airy and light in your Chocolate Mousse Pie Recipe.
Step 2: Whip the Cream
In a large mixing bowl, combine the cold heavy whipping cream, powdered sugar, and vanilla extract. Using a hand mixer or stand mixer, whip until soft peaks form. You’ll know it’s ready when the cream holds its shape but still looks pillowy. Set aside 1 cup of this whipped cream for your topping.
Step 3: Combine Chocolate and Cream
Now, gently fold the melted, cooled chocolate into the remaining whipped cream. Use a spatula and a light touch—folding rather than stirring keeps your mousse fluffy. Continue folding until the mixture is smooth, uniform, and deeply chocolatey. This is the heart of your Chocolate Mousse Pie Recipe.
Step 4: Fill the Crust
Transfer the chocolate mousse filling into the prepared chocolate cookie crust. Smooth the top using an offset spatula or the back of a spoon, creating swoops and swirls if you’re feeling fancy. This pie already looks tempting, but just wait until it sets!
Step 5: Chill and Set
Refrigerate your assembled pie for at least 4 hours, or until the mousse is firm and sliceable. This time is essential, allowing the flavors to meld and the mousse to become perfectly set. The anticipation is part of the experience with this Chocolate Mousse Pie Recipe!
Step 6: Garnish and Serve
Just before serving, top your pie with the reserved whipped cream. Sprinkle on chocolate shavings or extra cookie crumbs for a finishing flourish. The result? A dreamy, decadent dessert that looks like it came from a high-end bakery.
How to Serve Chocolate Mousse Pie Recipe

Garnishes
No Chocolate Mousse Pie Recipe is complete without a generous cloud of whipped cream and a sprinkling of chocolate shavings. If you’re feeling creative, try a dusting of cocoa powder, a few chocolate curls, or even a handful of fresh raspberries for a pop of color and tartness that pairs beautifully with the rich mousse.
Side Dishes
Since the pie is quite rich, serve it with light accompaniments like fresh berries, a simple fruit salad, or a cup of hot coffee or espresso. The slight bitterness of coffee contrasts the sweetness of the Chocolate Mousse Pie Recipe and helps cleanse the palate between bites.
Creative Ways to Present
For parties, try serving the mousse pie in individual cups or jars for easy, grab-and-go treats. You can also pipe the mousse into mini tart shells for a bite-sized version of the Chocolate Mousse Pie Recipe. Get playful with garnishes—think chocolate-dipped strawberries, edible gold leaf, or a drizzle of raspberry sauce for a dramatic and delicious presentation.
Make Ahead and Storage
Storing Leftovers
Cover any leftover Chocolate Mousse Pie Recipe tightly with plastic wrap or store in an airtight container. It’ll stay fresh in the refrigerator for up to 3 days, though it’s so good, you might not have leftovers for long! The crust may soften a bit, but the mousse remains deliciously creamy.
Freezing
You can freeze this Chocolate Mousse Pie Recipe for longer storage—just skip the whipped cream topping until you’re ready to serve. Wrap the pie (whole or in slices) tightly in plastic wrap and foil, then freeze for up to 1 month. Thaw overnight in the fridge, then add your garnish before serving.
Reheating
This dessert is best served chilled, so reheating isn’t necessary. If the pie is frozen, simply allow it to thaw in the refrigerator until it’s soft enough to slice. Adding freshly whipped cream or chocolate shavings after thawing will make it look and taste freshly made.
FAQs
Can I use a homemade crust for this Chocolate Mousse Pie Recipe?
Absolutely! While a store-bought chocolate cookie crust is a time-saver, making your own with crushed chocolate cookies and melted butter gives a delicious homemade touch. Just press the mixture into your pie pan and chill before filling.
Can I make this Chocolate Mousse Pie Recipe ahead of time?
Yes, and it’s actually better if you do! The pie needs at least four hours to set, so making it the day before is perfect. Just hold off on the whipped cream and garnishes until right before serving for the freshest presentation.
What kind of chocolate should I use?
This recipe calls for semi-sweet chocolate chips, but feel free to experiment. Bittersweet chocolate gives a more intense flavor, while milk chocolate makes for a sweeter, creamier mousse. Just pick your favorite and enjoy!
Can I use a dairy-free alternative?
You can! Substitute coconut cream for the heavy cream and use a dairy-free chocolate. The result is just as decadent and perfect for anyone avoiding dairy, making this Chocolate Mousse Pie Recipe wonderfully versatile.
Why is my mousse not setting?
If your mousse isn’t setting, it may be that the cream wasn’t whipped enough, or the chocolate was too warm when added. Make sure to whip the cream to soft peaks and let the chocolate cool before folding it in. Chilling for at least four hours is key for the perfect texture.
Final Thoughts
This Chocolate Mousse Pie Recipe is pure joy in pie form—simple enough for a weeknight, yet impressive enough for any celebration. If you’re a chocolate lover, you won’t be able to resist its silky-smooth filling and crunchy crust. Gather your ingredients, invite some friends, and treat yourself to a slice (or two) of happiness. You deserve it!
Print
Chocolate Mousse Pie Recipe
- Total Time: 4 hours 15 minutes
- Yield: 8 servings 1x
- Diet: Vegetarian
Description
A luscious and creamy no-bake Chocolate Mousse Pie featuring a smooth chocolate filling in a crisp cookie crust, topped with whipped cream and optional chocolate shavings. Perfect for an elegant dessert that is quick to prepare and sure to satisfy any chocolate lover’s cravings.
Ingredients
Crust
- 1 prepared chocolate cookie crust (9-inch)
Chocolate Mousse Filling
- 1 1/2 cups heavy whipping cream (cold)
- 1 cup semi-sweet chocolate chips
- 1/4 cup powdered sugar
- 1 teaspoon vanilla extract
Garnish (Optional)
- Chocolate shavings or whipped cream for garnish
Instructions
- Melt Chocolate: In a microwave-safe bowl, melt the chocolate chips in 30-second intervals, stirring between each, until smooth. Set aside to cool slightly to prevent curdling when combined with whipped cream.
- Whip Cream: In a large mixing bowl, whip the heavy cream with powdered sugar and vanilla extract until soft peaks form. This will provide the light and fluffy base of the mousse. Set aside 1 cup of the whipped cream for topping the pie later.
- Combine Chocolate and Cream: Gently fold the melted chocolate into the remaining whipped cream, combining carefully to preserve the airy texture. Continue folding until fully blended and smooth, creating a rich chocolate mousse.
- Assemble Pie: Pour the chocolate mousse into the prepared chocolate cookie crust and smooth the top for an even finish.
- Chill: Refrigerate the pie for at least 4 hours or until set, allowing the mousse to firm up and develop its creamy consistency.
- Finish and Serve: Just before serving, top the pie with the reserved whipped cream and garnish with chocolate shavings if desired for an attractive presentation and added texture.
Notes
- Use bittersweet chocolate for a richer, more intense chocolate flavor or milk chocolate for a sweeter, milder taste.
- Store-bought crusts offer great convenience, but you can also make your own crust using crushed chocolate cookies combined with melted butter for a homemade touch.
- Ensure the heavy cream is cold before whipping to achieve optimal volume and texture.
- If you prefer a firmer mousse, chilling overnight is recommended.
- Prep Time: 15 minutes
- Cook Time: 0 minutes
- Category: Dessert
- Method: No-Bake
- Cuisine: American
Nutrition
- Serving Size: 1 slice
- Calories: 410
- Sugar: 24g
- Sodium: 170mg
- Fat: 30g
- Saturated Fat: 18g
- Unsaturated Fat: 10g
- Trans Fat: 0g
- Carbohydrates: 30g
- Fiber: 2g
- Protein: 4g
- Cholesterol: 75mg


