
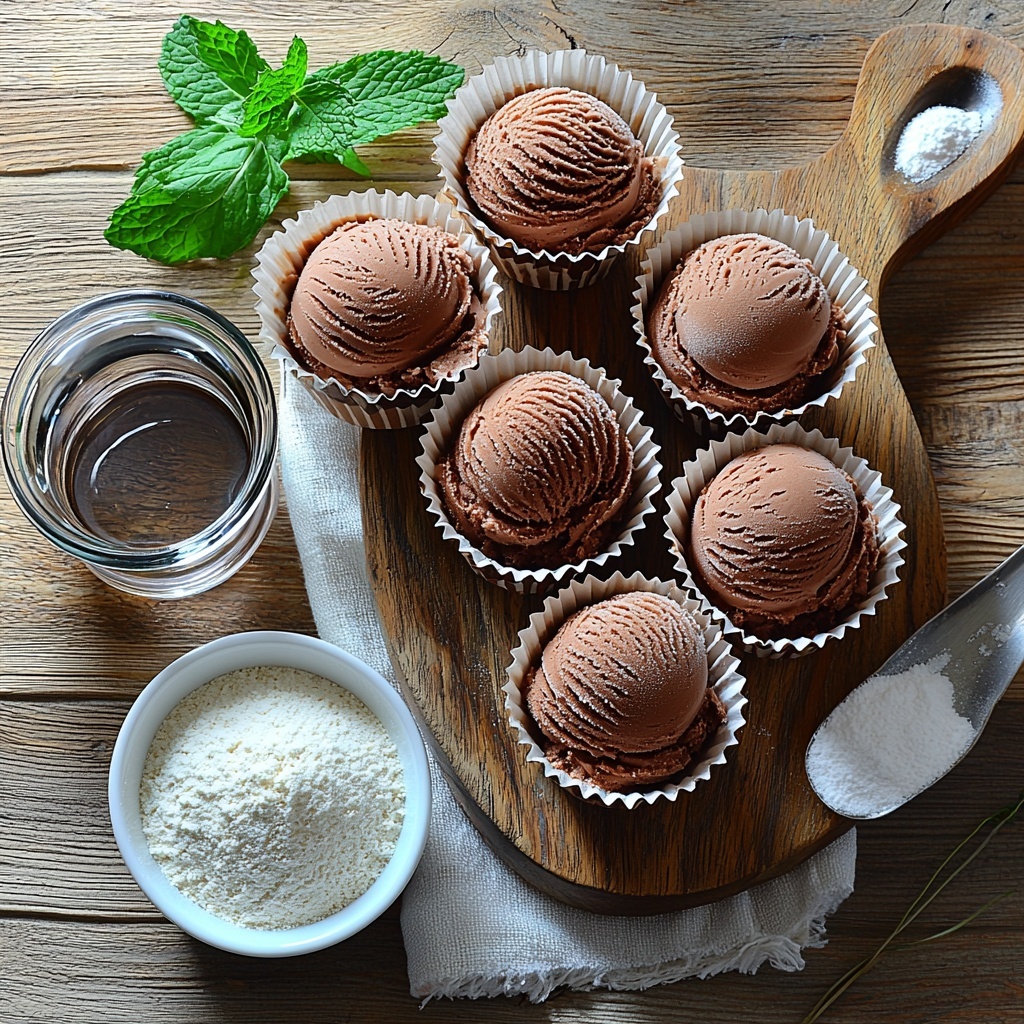
If you have a sweet tooth and a love for unique treats, you are going to adore this Decadent Chocolate Mochi Ice Cream You Can Make at Home Recipe. Imagine the soft, chewy texture of mochi seamlessly hugging rich, creamy chocolate ice cream—every bite is a delightful contrast of temperatures and textures that feels like a little celebration in your mouth. This recipe brings together simple pantry staples and your favorite chocolate ice cream, transforming them into an elegant homemade dessert that’s perfect for impressing guests or indulging on a cozy night in.
Ingredients You’ll Need
These ingredients are straightforward but crucial for achieving that perfect chewy yet tender mochi exterior and luscious chocolate interior. Each element plays a special role in the texture, flavor, and overall magic of this dessert.
- Glutinous rice flour: The key to that signature chewy mochi texture you can’t resist.
- Cocoa powder: Adds deep chocolate notes and a rich color to the mochi dough.
- Powdered sugar: Provides a touch of sweetness and smoothness to the mochi.
- Water: Helps bind the ingredients and create a smooth batter.
- Chocolate ice cream: Your star filling; pick your favorite brand or homemade batch for that creamy center.
- Cornstarch: Essential for dusting to prevent stickiness while handling the delicate mochi.
How to Make Decadent Chocolate Mochi Ice Cream You Can Make at Home Recipe
Step 1: Prepare the Ice Cream Scoops
Start by scooping the chocolate ice cream into six paper cups, each about one-third cup in size. This helps the ice cream hold shape and stay firm during assembly later. Pop the scoops into the freezer for about 30 minutes so they become extra solid and easier to wrap.
Step 2: Make the Mochi Batter
In a bowl, whisk together the glutinous rice flour, cocoa powder, and powdered sugar until well combined. Slowly add the water while stirring gently to create a silky-smooth mochi batter free of lumps. This careful mixing is key for a flawless texture once steamed.
Step 3: Steam the Mochi Dough
Prepare your steamer by wrapping the lid with a clean cloth to avoid drips falling onto the mochi. Pour the mochi batter into a heatproof dish and steam over medium heat for about 15 minutes. Once steamed, the mixture will turn translucent and sticky, signaling it’s ready to handle.
Step 4: Dust and Roll the Mochi
Generously dust a tray with cornstarch to keep things from sticking. Transfer the hot mochi dough onto it and sprinkle the top with more cornstarch. Using your hands or a rolling pin, gently roll the dough until it’s between 2 to 4 millimeters thick—this thinness allows the mochi to be tender yet strong enough to wrap the ice cream.
Step 5: Cut and Fill
Cut the rolled mochi into six squares, each roughly 15 centimeters by 15 centimeters. Carefully remove the ice cream scoops from their paper cups and set aside. Place one scoop in the center of each mochi square. Then, gather the edges of the dough around the ice cream, pinching gently to seal and trimming any excess dough for a neat, secure package.
Step 6: Freeze Until Firm
Wrap each mochi ice cream ball tightly in cling wrap to preserve freshness and moisture. Place them back in the freezer for at least one hour or until fully firmed up. This chilling step ensures your homemade treat holds its shape and texture perfectly when served.
How to Serve Decadent Chocolate Mochi Ice Cream You Can Make at Home Recipe
Garnishes
Enhance your presentation by dusting mochi with a light sprinkle of cocoa powder or powdered sugar right before serving. For a touch of elegance, a few fresh mint leaves or edible flowers add color and a refreshing aroma.
Side Dishes
Pair your mochi ice cream with fresh berries or a drizzle of raspberry sauce to brighten the richness. If you’re feeling bold, a small cup of matcha green tea provides a wonderful balance and a traditional Japanese complement to mochi desserts.
Creative Ways to Present
Try serving your mochi on individual decorative plates with a small scoop of whipped cream or a sprig of candied ginger. For parties, arrange several mochi balls on a tiered platter to make your dessert table pop. You can even gently warm them just slightly to soften the outer mochi before serving for an irresistible texture contrast.
Make Ahead and Storage
Storing Leftovers
If you have any mochi ice cream left, keep them tightly wrapped in cling film or in an airtight container. Stored properly in the freezer, they’ll maintain their flavor and texture for up to two weeks, so you can enjoy your creation later without any loss in quality.
Freezing
Make sure your mochi balls are frozen solid before transferring them into an airtight container to avoid freezer burn. Individual wrapping before freezing is key to preserving the texture and preventing them from sticking to each other.
Reheating
Unlike most desserts, mochi ice cream is best enjoyed straight from the freezer or thawed briefly at room temperature for a few minutes. Avoid microwaving or heating to protect the creamy ice cream center and chewy mochi exterior from becoming a melted mess.
FAQs
Can I use other ice cream flavors for this recipe?
Absolutely! While chocolate is classic and luscious, you can experiment with vanilla, green tea, strawberry, or even cookie dough. Just make sure the ice cream is firm enough to handle during wrapping.
What if I don’t have a steamer at home?
If a steamer isn’t available, you can improvise with a heatproof plate over a pot of boiling water, covered tightly with a lid or foil. The key is generating steam to cook the mochi dough evenly.
Why is cornstarch important for this recipe?
Cornstarch keeps the sticky mochi dough from clinging to surfaces and your hands, making it easier to work with. It also prevents the dough from sticking to itself when you wrap the ice cream scoops.
Can I make this recipe vegan?
Yes! Simply swap the chocolate ice cream for a dairy-free alternative and check that your powdered sugar is vegan-friendly. The mochi dough itself contains no animal products.
How long does it take to make this recipe from start to finish?
While the hands-on part is fairly quick, the freezing and chilling steps require patience. Overall, plan for about an hour and 45 minutes including preparation and freezing time to get perfect results.
Final Thoughts
Now that you know how to create this enchanting Decadent Chocolate Mochi Ice Cream You Can Make at Home Recipe, I encourage you to dive in and try it yourself. It’s such a rewarding dessert to make, bringing together fun textures and rich chocolate flavor in every bite. Plus, the smiles you’ll get when sharing this unique treat will make every step worth it!
Print
Decadent Chocolate Mochi Ice Cream You Can Make at Home Recipe
- Prep Time: 30 minutes
- Cook Time: 15 minutes
- Total Time: 1 hour 45 minutes
- Yield: 6 servings
- Category: Dessert
- Method: Steaming
- Cuisine: Japanese
Description
This Decadent Chocolate Mochi Ice Cream recipe combines chewy, soft mochi dough with creamy, rich chocolate ice cream to create a delightful frozen treat you can easily make at home. Using glutinous rice flour and cocoa powder, the mochi dough is steamed to perfect translucency, then wrapped around individual scoops of chocolate ice cream. After freezing, the dessert offers a satisfying blend of textures and flavors perfect for any occasion.
Ingredients
Mochi Dough
- 1 cup Glutinous rice flour
- 1/4 cup Cocoa powder
- 1/4 cup Powdered sugar
- 1 cup Water
- 1/4 cup Cornstarch (for dusting)
Filling
- 6 scoops Chocolate ice cream (about 1/3 cup each)
Instructions
- Preparation: Scoop the chocolate ice cream into six paper cups, each about 1/3 cup. Place the scoops in the freezer and chill for approximately 30 minutes until firm enough for wrapping.
- Mixing the Mochi Batter: In a bowl, combine the glutinous rice flour, cocoa powder, and powdered sugar. Gradually add the water while mixing to form a smooth, lump-free mochi batter.
- Steaming the Mochi: Prepare your steamer by wrapping the steamer lid with a cloth to prevent water from dripping onto the mochi. Pour the mochi mixture onto a heatproof dish or tray and steam it for about 15 minutes until the dough becomes translucent and sticky.
- Preparing Workspace: Dust a clean tray and your work surface generously with cornstarch to prevent sticking. Transfer the steamed mochi onto the tray and dust lightly with more cornstarch.
- Shaping the Mochi Dough: Roll out the mochi dough to a thickness of approximately 2-4 mm, ensuring it remains well-dusted to avoid stickiness. Cut the rolled dough into six squares, roughly 15cm by 15cm in size.
- Wrapping the Ice Cream: Carefully remove each chilled ice cream scoop from its paper cup. Place one scoop in the center of each mochi square. Gently gather the mochi dough around the ice cream, pinching the edges to seal tightly. Trim any excess dough for a neat finish.
- Wrapping and Freezing: Wrap each mochi ice cream ball individually in cling wrap to maintain shape and avoid freezer burn. Place the wrapped mochi ice cream in the freezer and chill for at least 1 hour to firm up before serving.
Notes
- Ensure the ice cream scoops are well-frozen before wrapping to prevent melting during assembly.
- Keep your hands and workspace dusted with cornstarch while handling mochi dough to avoid sticking.
- The cloth wrapped around the steamer lid prevents water condensation from dripping onto the mochi, ensuring a smooth texture.
- You can substitute chocolate ice cream with any flavor of your choice for a twist.
- Wrap and store mochi ice cream in the freezer; consume within 1 week for optimal taste and texture.

