
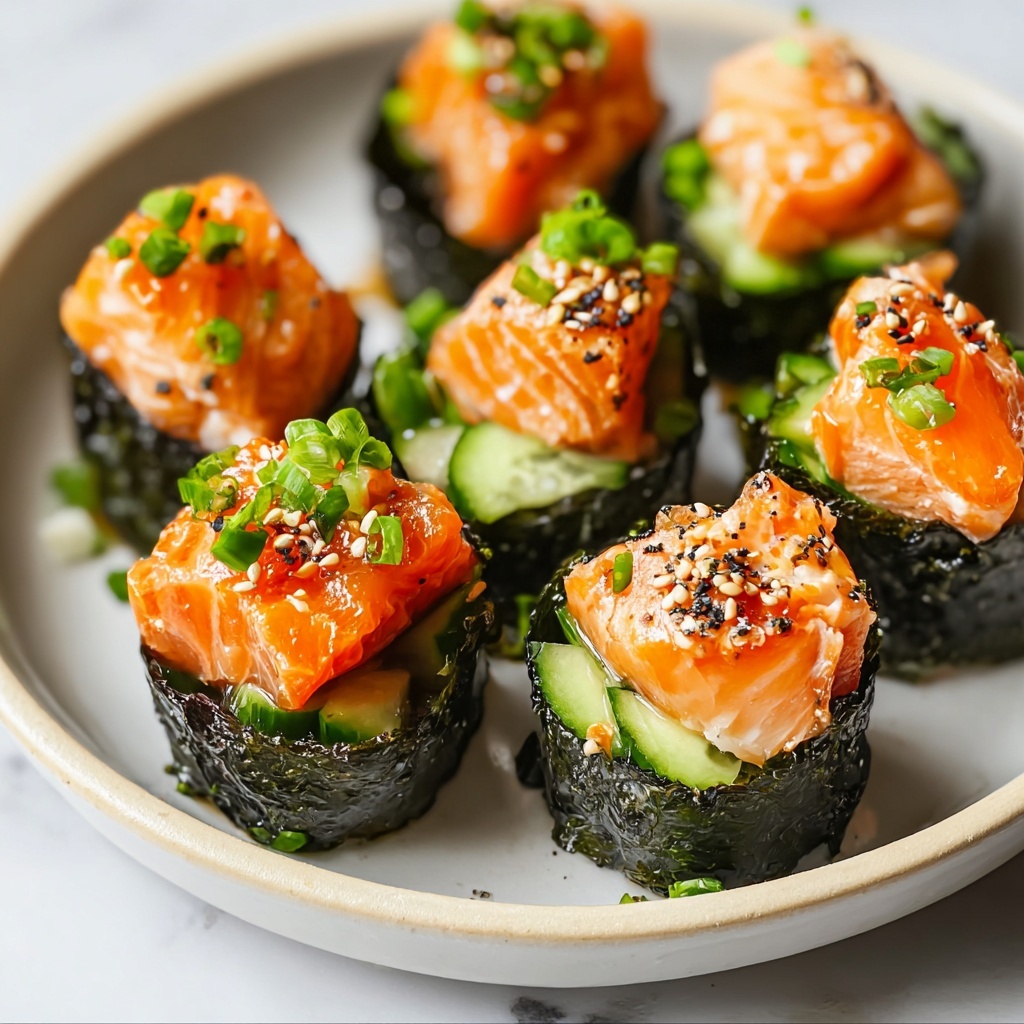
If you love the flavors of sushi but crave an easy, fun, and handheld twist, then the Baked Salmon Sushi Cups Recipe is about to become your new go-to. Imagine perfectly cooked sushi rice nestled inside crisp nori cups, topped with a luscious mixture of baked salmon kissed by tangy soy, creamy Kewpie mayo, and a hint of spicy sriracha. This recipe brings all the best sushi vibes into a delightful bite-sized snack that’s as impressive as it is simple to make. Whether you’re entertaining friends or treating yourself to something special, these sushi cups offer a unique way to enjoy classic sushi flavors with zero fuss and lots of flair.
Ingredients You’ll Need
This recipe relies on a handful of straightforward ingredients that each play a vital role in building flavor, texture, and color for your sushi cups. From the tender sushi rice to the rich salmon glaze, every component works together to elevate this dish from simple to sensational.
- Uncooked Sushi Rice: This forms the chewy foundation of your sushi cups and it’s essential to get the perfect sticky texture.
- Rice Vinegar: Adds the essential tanginess that brightens the sushi rice and balances sweetness.
- White Sugar: Balances the acidity of the vinegar for a harmonious and mellow sushi rice flavor.
- Salmon: The star ingredient providing a rich, flaky, and flavorful fish center.
- Light Soy Sauce: Offers a savory umami kick that deeply flavors the salmon.
- Kewpie Mayo: This creamy and subtly sweet mayo rounds out the salmon’s richness beautifully.
- Sriracha: Introduces a gentle heat that livens up the dish without overpowering it.
- Sesame Oil: Brings a toasty, nutty depth that enhances every bite.
- Nori Sheets: Serve as the crisp, sea-flavored vessels holding all the sushi goodness inside.
- Cooking Spray: Essential for greasing your muffin tin so those sushi cups come out intact and easy to enjoy.
- Green Onion: Adds fresh color and a mild onion flavor as a finishing touch.
- Furikake (optional): Adds a delightful crunch and burst of flavor that takes the sushi cups even higher.
How to Make Baked Salmon Sushi Cups Recipe
Step 1: Cook the Sushi Rice
Start by rinsing your uncooked sushi rice under cold water until it runs clear—this ensures your rice cooks fluffy without excess starch. Follow your package instructions closely for cooking, then while still warm, mix in a quick microwave-heated blend of rice vinegar and white sugar. This little step transforms plain rice into that classic sushi tangy-sweet base that holds the cups together.
Step 2: Preheat Your Oven
While the rice is cooking and cooling, preheat your oven to 400°F (200°C). A hot oven is key so that when your sushi cups go in, the salmon bakes perfectly and the nori crisps up just right, releasing amazing aromas that signal deliciousness is imminent.
Step 3: Prepare the Salmon Mixture
Dice the salmon into bite-sized cubes and toss gently but thoroughly in a bowl with light soy sauce, Kewpie mayo, sriracha, and sesame oil. Each ingredient infuses richness, spice, and depth into the fish, making every bite irresistibly flavorful. Let this mixture sit for a bit to let the flavors mingle before assembling your cups.
Step 4: Prepare Your Muffin Tin and Nori
Cut your nori sheets into squares that will fit snugly into the cups of your muffin tin. Lightly spray each muffin cup with cooking spray; this simple step helps prevent any sticking and ensures you can easily release your sushi cups after baking. Then, press the nori squares gently into each cup, forming little edible bowls ready to be filled.
Step 5: Assemble the Sushi Cups
Now for the fun part: scoop the sushi rice evenly onto the nori squares inside the muffin tin, pressing down lightly with the back of a spoon so the rice holds its shape. Then spoon a generous amount of the marinated salmon on top of each rice base. This layered approach maximizes texture and taste with every bite.
Step 6: Bake to Perfection
Place your muffin tin in the preheated oven and bake for about 15 minutes. In that time, the salmon will cook through beautifully and the tops will develop a gorgeous golden hue. The nori crisps up just enough to make each cup sturdy while maintaining that perfect sushi essence.
Step 7: Garnish and Serve
Once out of the oven, allow the cups to cool slightly for safer handling. Before serving, drizzle additional sriracha or Kewpie mayo, then sprinkle furikake and green onions over the top to add vibrant color, extra crunch, and even more layers of savory flavor. Serve these warm bites to delighted friends or family and watch them disappear fast!
How to Serve Baked Salmon Sushi Cups Recipe

Garnishes
Garnishing your sushi cups is where you can really let your creativity shine. A little sprinkle of furikake adds crunch and umami, while finely chopped green onion brings brightness and a pop of green. Additional drizzles of Kewpie mayo or sriracha amp up the creaminess and heat, making every bite dynamic and exciting.
Side Dishes
These sushi cups pair beautifully with light, fresh sides like a simple cucumber salad, edamame, or a crisp seaweed salad. Offering a small bowl of soy sauce or ponzu for dipping elevates the experience, encouraging you to savor the distinct flavors even more.
Creative Ways to Present
For a party or special occasion, try serving your Baked Salmon Sushi Cups on a wooden sushi platter garnished with fresh herbs and lemon wedges. You can also serve them alongside small dipping bowls or pair with sake or chilled green tea to create a full sushi celebration at home. Their compact size makes them ideal as appetizers or finger food too!
Make Ahead and Storage
Storing Leftovers
If you have leftover sushi cups, store them in an airtight container in the refrigerator. They keep well for up to two days, but for best texture and flavor, enjoy them sooner rather than later. Nori may soften over time, so reheating with care is important.
Freezing
This recipe is best enjoyed fresh, as freezing can affect the delicate texture of the rice and salmon. If needed, you can freeze the baked salmon mixture separately, then assemble and bake fresh sushi cups when ready to serve.
Reheating
To reheat, place leftover sushi cups in a low oven (around 300°F) for about 5-7 minutes to gently warm and crisp the nori again without drying out the salmon. Avoid microwaving as it tends to make the nori chewy and rice sticky.
FAQs
Can I use a different fish in this recipe?
Absolutely! While salmon is luscious and rich, you can substitute with cooked shrimp, crab, or even a firm white fish like tuna. Just adjust cooking times accordingly to ensure your fish is perfectly cooked.
Is it necessary to bake the sushi cups?
Baking helps meld the flavors, cooks the salmon gently, and crisps the nori just enough to hold the cups together. You could try serving without baking, but the texture and flavor won’t be quite the same.
Can I make this recipe vegetarian?
For a vegetarian version, swap the salmon with marinated and baked tofu or even roasted vegetables like mushrooms and bell peppers. Use vegetarian-friendly soy sauce and skip the fish-based garnishes.
What if I don’t have Kewpie mayo?
You can substitute with regular mayonnaise mixed with a little honey or sugar for sweetness. Kewpie mayo has a unique flavor, but this substitute will still give you creamy balance in the salmon mixture.
How spicy is this recipe?
The level of spice depends on how much sriracha you use—start with a teaspoon for a gentle kick and adjust to your taste. You can always serve extra sriracha on the side for those who love it hot.
Final Thoughts
I truly can’t recommend making the Baked Salmon Sushi Cups Recipe enough! It’s an approachable, delightful dish that brings sushi’s classic charm into a playful, approachable format. Serve it as an impressive appetizer or a fun snack and enjoy the compliments that surely follow. Give it a try, and I promise it will become a beloved staple in your kitchen’s recipe collection.
Print
Baked Salmon Sushi Cups Recipe
- Prep Time: 10 minutes
- Cook Time: 20 minutes
- Total Time: 30 minutes
- Yield: 4 servings
- Category: Appetizer
- Method: Baking
- Cuisine: Japanese
Description
Baked Salmon Sushi Cups are a delightful twist on traditional sushi, combining chewy sushi rice with a flavorful baked salmon topping. These easy-to-make sushi snacks are perfect as appetizers or light meals, featuring a harmonious blend of tangy rice vinegar, creamy Kewpie mayo, spicy sriracha, and aromatic sesame oil, all nestled in crispy nori cups.
Ingredients
Sushi Rice
- 1 cup Uncooked Sushi Rice
- 2 tablespoons Rice Vinegar
- 1 tablespoon White Sugar
Salmon Mixture
- 1 pound Salmon, cubed
- 2 tablespoons Light Soy Sauce
- 2 tablespoons Kewpie Mayo
- 1 teaspoon Sriracha
- 1 teaspoon Sesame Oil
Other
- 4 sheets Nori Sheets, cut into squares
- 1 can Cooking Spray
- 1 tablespoon Green Onion, chopped
- Furikake, to taste (optional)
Instructions
- Cook the sushi rice: Rinse the uncooked sushi rice under cold water until the water runs clear to remove excess starch. Cook the rice according to the package instructions. While the rice cooks, prepare a mixture of rice vinegar and sugar by heating it in the microwave until dissolved, then stir it into the cooked rice until well combined to flavor the rice with a delicate tangy sweetness.
- Preheat your oven: Set your oven to 400°F (200°C) to ensure it is hot and ready for baking the sushi cups once assembly is complete.
- Mix the salmon: In a mixing bowl, combine the cubed salmon with light soy sauce, Kewpie mayo, sriracha, and sesame oil. Stir gently to coat the salmon evenly and allow the flavors to meld by setting it aside briefly.
- Prepare the muffin tin: Cut the nori sheets into squares sized to fit your muffin tin cups. Lightly spray each muffin cup with cooking spray to prevent the sushi cups from sticking during baking.
- Assemble the sushi cups: Press a square of nori into each greased muffin cup. Spoon the prepared sushi rice onto the nori, pressing lightly with the back of a spoon to spread it evenly and form the base. Top each rice base with a generous portion of the salmon mixture, distributing it evenly to fill each cup.
- Bake to perfection: Place the muffin tin into the preheated oven and bake for approximately 15 minutes, or until the salmon is fully cooked and the tops turn golden brown, filling your kitchen with an irresistible aroma.
- Garnish and serve: Allow the sushi cups to cool slightly. Drizzle extra sriracha or Kewpie mayo on top if desired, then sprinkle with furikake and chopped green onions for added crunch, color, and flavor. Serve warm and enjoy your delicious baked salmon sushi cups!
Notes
- Make sure to rinse sushi rice thoroughly to achieve the perfect texture.
- If you prefer a milder flavor, adjust the amount of sriracha or omit it entirely.
- Furikake adds a wonderful crunch and savory flavor but can be omitted or substituted with toasted sesame seeds.
- Use fresh sushi-grade salmon for the best flavor and safety.
- To reduce sodium, use low-sodium soy sauce.

