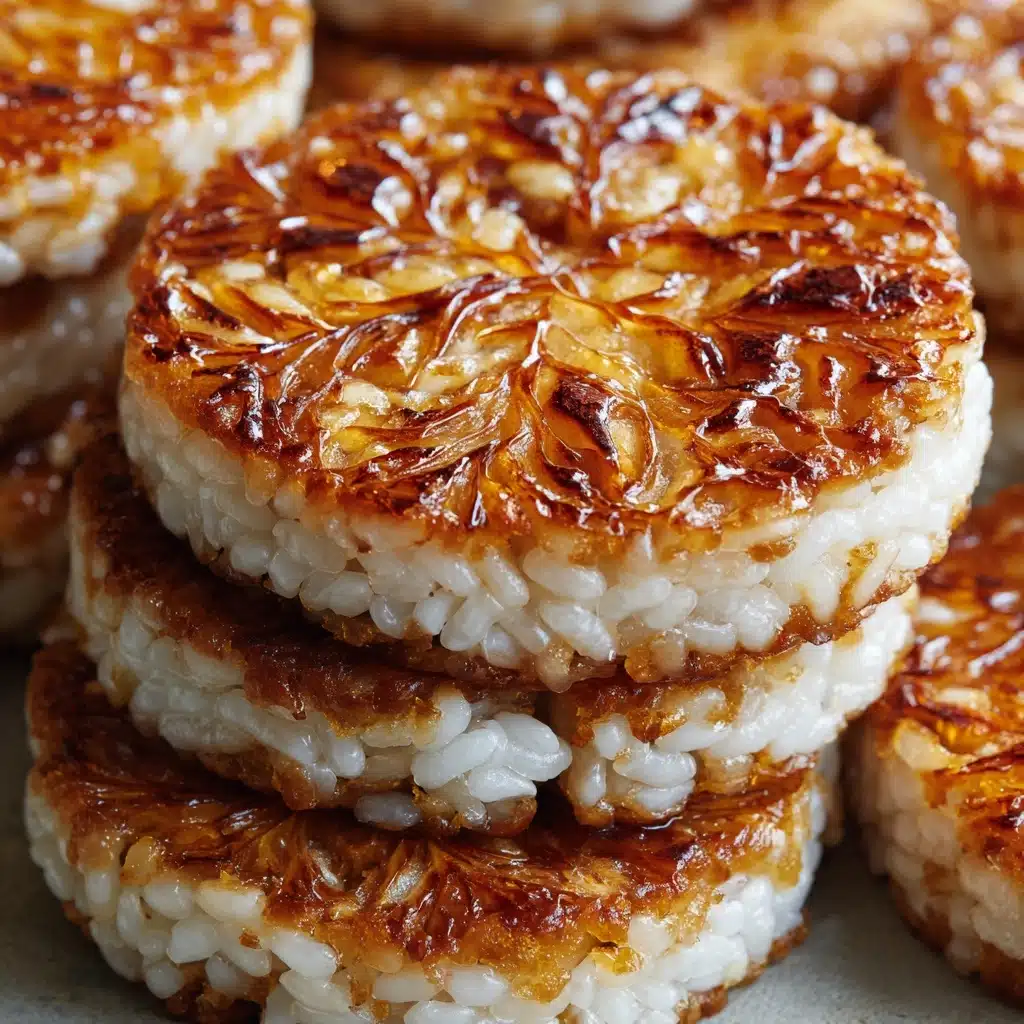
Bibingka Recipe
Bursting with the familiar warmth of traditional Filipino holiday gatherings, this Bibingka Recipe brings together soft, tender rice cake perfumed with banana leaves and topped with a glorious crown of salted egg, cheese, and creamy butter. If you’ve ever stood in line outside a church in December, lured by the dizzying aroma of freshly baked bibingka and smoky banana leaves, you know exactly how magical this treat can be. Here, we’ll take you step-by-step through making this beloved classic at home—easy enough for weeknight cravings, yet special enough to impress your family every single time.
Ingredients You’ll Need
Each ingredient in this Bibingka Recipe serves a unique purpose, delivering the right blend of softness, flavor, and that unmistakable holiday essence. Stick to these essentials for results that taste just like home!
- Rice flour: This creates the signature, delicate crumb essential for that moist, tender bibingka bite.
- All-purpose flour: Just a touch for structure, ensuring your cake holds together while staying light.
- Sugar: Adds a gentle sweetness that balances the richness of coconut and butter.
- Baking powder: The key to a fluffy, risen rice cake crumb—don’t skip this!
- Salt: Brings out the delicate flavors and tempers the sweetness just enough.
- Coconut milk: The star for creamy, fragrant richness that defines bibingka’s taste and aroma.
- Fresh milk: Keeps the texture extra soft and adds subtle creaminess.
- Eggs: For binding everything together and contributing decadence and color.
- Melted butter: Adds a luscious background of flavor—use good quality butter if you can!
- Banana leaves: Wilted and lined in your pans, they infuse the cake with a gentle, smoky perfume.
- Grated cheese: Gives salty contrast and gooey texture on every slice.
- Salted duck egg slices: For a classic, savory punch that makes this truly festive.
- Butter for topping: Melted over the hot cake for richness and a glossy finish.
- Grated coconut: Optional but highly recommended for a sweet, nutty finish.
How to Make Bibingka Recipe
Step 1: Prepare Your Pans and Banana Leaves
Preheat your oven to 375°F (190°C). While it heats, carefully wilt your banana leaves over an open flame or dry skillet until they’re pliable and fragrant—the aroma is truly irresistible and the color turns vibrant. Line your small round baking pans with the wilted banana leaves and give them a light greasing with butter to prevent sticking and add flavor.
Step 2: Combine the Dry Ingredients
In a large mixing bowl, whisk together the rice flour, all-purpose flour, sugar, baking powder, and salt. A fluffy, even dry mixture is the base for a tender Bibingka Recipe—it helps the cake bake up perfectly every time.
Step 3: Mix Wet Ingredients
Grab another bowl and whisk together the coconut milk, fresh milk, eggs, and melted butter until smooth. This luscious combination is what’ll give your rice cake that creamy richness and delightful yellow color.
Step 4: Bring the Batter Together
Pour that velvety wet mixture into your bowl of dry ingredients. Mix gently until just combined, making sure not to overwork the batter—a few lumps are perfectly fine. Overmixing can lead to a tougher cake, and we want our Bibingka Recipe soft and fluffy!
Step 5: Pour and Arrange Toppings
Scoop the batter into the prepared banana leaf pans, filling them about two-thirds full. Now comes the fun part—layer on slices of salted duck egg and a sprinkle of grated cheese across the top. This gives each cake a beautiful salty-sweet balance.
Step 6: Bake to Perfection
Place the pans in your preheated oven and bake for 25 to 30 minutes. You’ll know your Bibingka Recipe is ready when the tops are gently golden and a toothpick inserted in the center comes out clean.
Step 7: Butter and Serve
Fresh from the oven, brush each cake generously with more butter so it melts into every crevice. For the finishing touch, shower with grated coconut—or keep it simple, and let the cheese and egg shine. Serve these while they’re still perfectly warm!
How to Serve Bibingka Recipe

Garnishes
Classic bibingka truly shines with a generous topping of freshly grated coconut. For added decadence, you can fan out a few extra slices of salted duck egg and shower more grated cheese or dot with butter just before serving. The garnishes not only make the cakes look inviting but also add dreamy flavors and textures in every bite.
Side Dishes
Bibingka Recipe pairs beautifully with hot chocolate (tablea tsokolate), brewed coffee, or even salabat (ginger tea). For a festive Filipino breakfast, serve alongside other kakanin like puto bumbong, queso de bola, or sweet ham. The contrast of savory-sweet flavors is pure magic on the table.
Creative Ways to Present
Don’t be afraid to get playful! Try baking in cupcake tins for party-perfect mini bibingka, or stack individual rounds on a rustic wooden board for a striking dessert platter. If you’re feeling modern, pair bibingka wedges with coconut ice cream for a unique, show-stopping dessert your guests won’t forget.
Make Ahead and Storage
Storing Leftovers
Bibingka Recipe leftovers keep surprisingly well! Allow any extra cakes to cool completely, then wrap tightly in plastic wrap or seal in an airtight container. They’ll stay fresh at room temperature for about 24 hours, or in the fridge for up to three days.
Freezing
If you’d like to make bibingka in advance, simply wrap the fully cooled cakes individually in plastic wrap and then foil. Place them in a freezer-safe bag or container and store in the freezer for up to a month. Thaw overnight in the refrigerator before reheating.
Reheating
For that just-baked taste, reheat your Bibingka Recipe gently in a preheated oven at 325°F (165°C) for about 10 minutes, or until warmed through. You can also microwave individual portions for 20-30 seconds, but the oven helps restore that crisp edge and keeps the cake tender inside.
FAQs
Can I make this Bibingka Recipe gluten free?
Absolutely! Just replace the all-purpose flour with an equal amount of rice flour or use galapong (fermented rice batter) for an even more traditional, gluten-free version of bibingka.
Do I have to use banana leaves?
While banana leaves add authentic fragrance and presentation, you can bake bibingka in regular parchment-lined pans if you don’t have banana leaves. The flavor will still be fantastic, though you’ll miss out on that signature aroma.
What can I use instead of salted duck egg?
If you can’t find salted duck egg, try topping with just grated cheese, or toss in a few crumbles of feta for a similar salty-sweet twist. It won’t be exactly traditional, but it’ll still be delicious!
Can I make this Bibingka Recipe ahead for parties?
Yes! Bibingka keeps well at room temperature for several hours, and you can even freeze it ahead of time. Just warm them up in the oven before serving, and they’ll taste freshly baked.
Why is my bibingka not fluffy?
This usually happens if your baking powder isn’t fresh, or if you overmix the batter. Make sure your baking powder is active and mix the wet and dry ingredients just until combined for that perfect fluffy texture.
Final Thoughts
There’s nothing quite like sharing a fragrant, butter-glazed slice of bibingka with friends and family, especially when you’ve made it from scratch. This Bibingka Recipe is a true celebration of simple ingredients and cherished Filipino traditions—so gather your loved ones, bake up a batch, and savor every delicious bite!
Print
Bibingka Recipe
- Total Time: 45 minutes
- Yield: 4 servings 1x
- Diet: Non-Vegetarian
Description
Learn how to make delicious Bibingka, a Filipino rice cake traditionally enjoyed during Christmas. This recipe yields moist and flavorful cakes topped with salted duck eggs and cheese.
Ingredients
Dry Ingredients:
- 1 cup rice flour
- 1/2 cup all-purpose flour
- 3/4 cup sugar
- 1 tablespoon baking powder
- 1/4 teaspoon salt
Wet Ingredients:
- 3/4 cup coconut milk
- 1/4 cup fresh milk
- 3 large eggs
- 1/4 cup melted butter
- banana leaves (wilted and cut to fit pans)
- 1/4 cup grated cheese
- 1/4 cup salted duck egg slices
- butter for topping
- grated coconut for serving
Instructions
- Preheat and Prep: Preheat oven to 375°F (190°C) and line small round baking pans with greased banana leaves.
- Mix Dry Ingredients: Whisk rice flour, all-purpose flour, sugar, baking powder, and salt in a bowl.
- Combine Wet Ingredients: In another bowl, mix coconut milk, fresh milk, eggs, and melted butter until smooth.
- Combine Mixtures: Pour wet mixture into dry ingredients, mix until just combined.
- Bake: Fill pans two-thirds full, top with salted egg and cheese. Bake for 25-30 minutes until golden and a toothpick comes out clean.
- Finish: Brush with butter when hot. Serve warm, topped with grated coconut.
Notes
- You can make a gluten-free version by substituting all-purpose flour with more rice flour.
- For a traditional taste, use galapong (fermented rice batter) instead of rice flour.
- Prep Time: 15 minutes
- Cook Time: 30 minutes
- Category: Dessert
- Method: Baking
- Cuisine: Filipino
Nutrition
- Serving Size: 1 small cake
- Calories: 290
- Sugar: 14g
- Sodium: 240mg
- Fat: 13g
- Saturated Fat: 8g
- Unsaturated Fat: 4g
- Trans Fat: 0g
- Carbohydrates: 37g
- Fiber: 1g
- Protein: 5g
- Cholesterol: 65mg

