
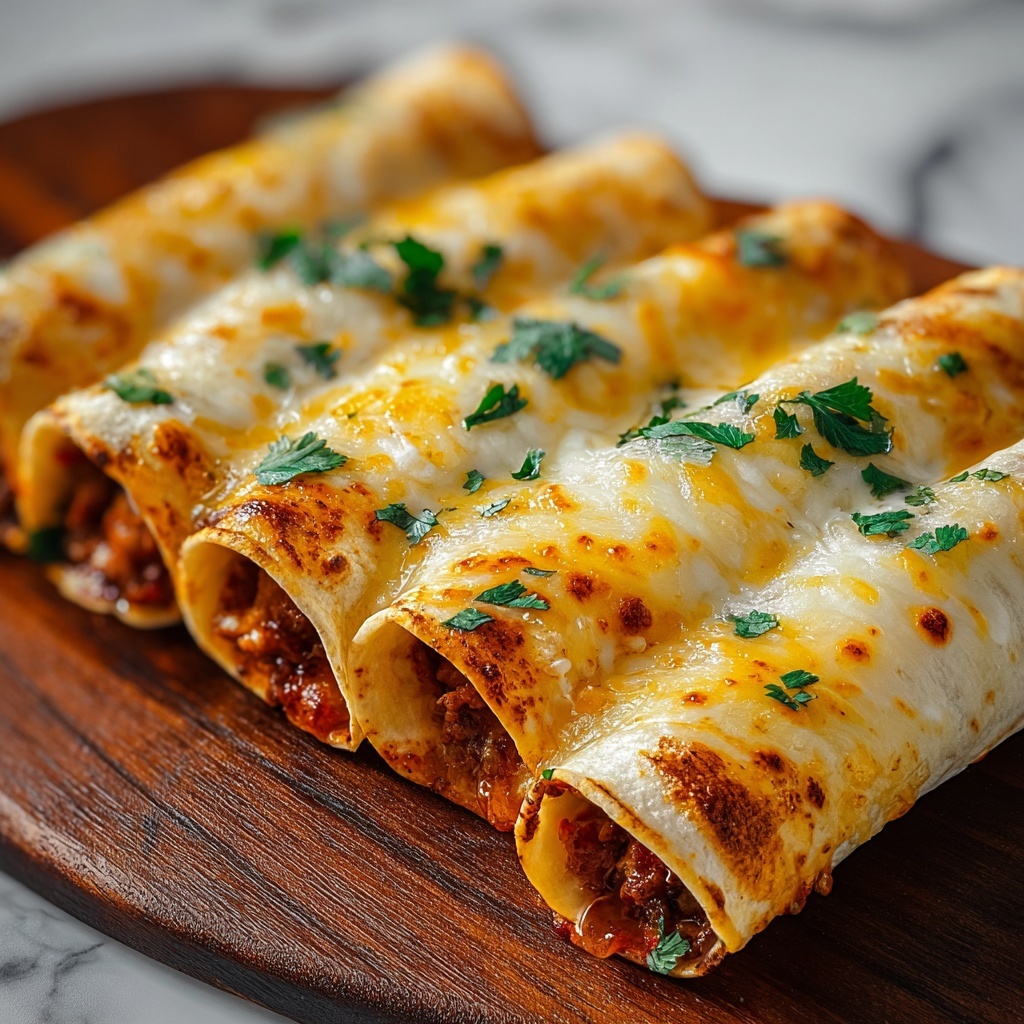
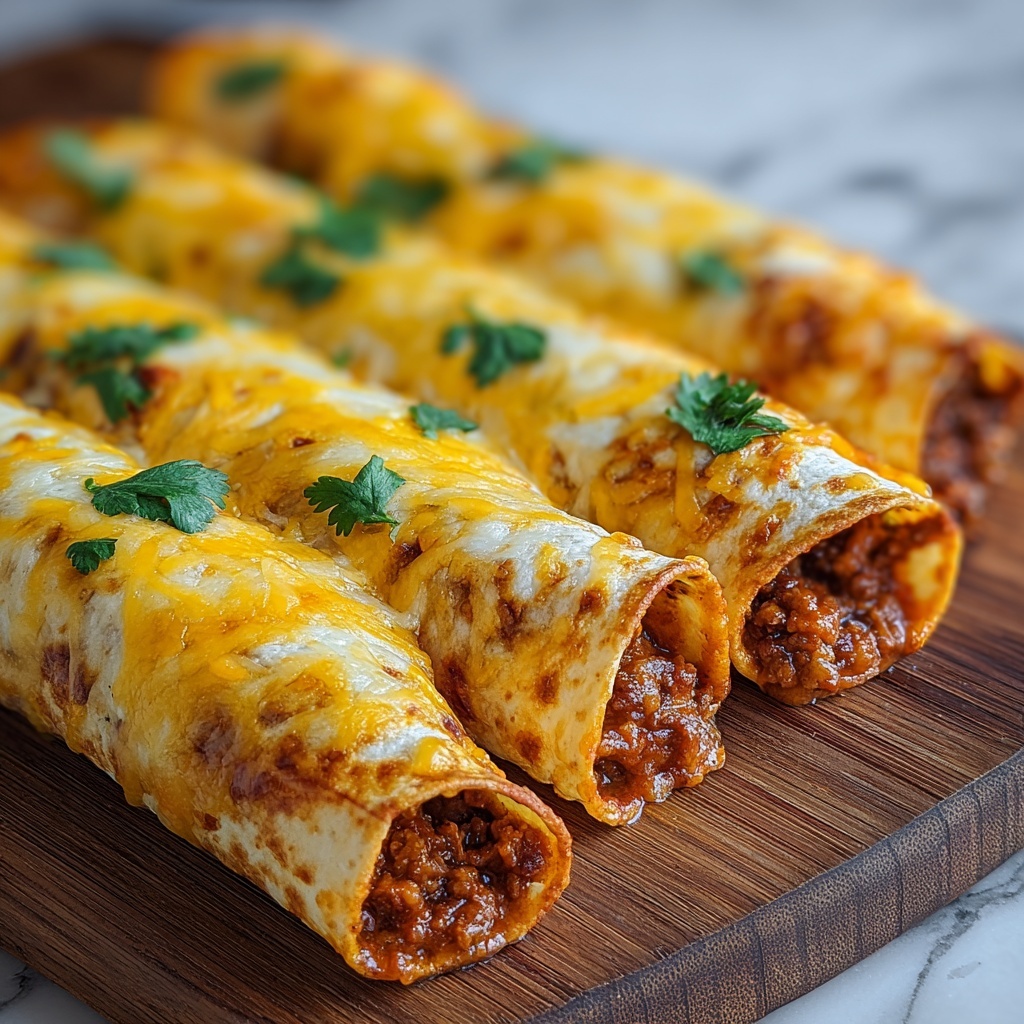
If you are looking for an irresistible snack that combines bold taco flavors with gooey cheese wrapped in golden, flaky dough, then you are in for a treat. Cheesy Taco Sticks: A Family Favorite Recipe brings together all the fun of a taco night but with a finger-food twist that everyone will love. These sticks are perfect for parties, game days, or just a cozy family dinner, delivering plenty of cheesy, savory goodness in every bite. Plus, they’re quick and easy, making them a go-to whenever you want something warm, satisfying, and delightfully fun to eat.
Ingredients You’ll Need
Getting the ingredients right is key to making the perfect Cheesy Taco Sticks: A Family Favorite Recipe. Each component plays a crucial role—pizza dough provides the golden, chewy base; seasoned meat adds the hearty, flavorful punch; and sharp cheddar cheese brings that melty, creamy finish that ties everything together.
- Refrigerated pizza dough: This pre-made dough saves time and gives a soft, slightly crispy crust when baked.
- Cooked ground beef or turkey: Use your preferred meat to keep the filling rich and protein-packed.
- Shredded cheddar cheese: Choose sharp or mild depending on your taste for that perfect cheesy melt.
- Taco seasoning: Adds the classic, zesty southwest flavor essential to any taco-inspired dish.
- Salsa: For serving alongside, it adds a fresh, tangy dip to complement the richness of the sticks.
How to Make Cheesy Taco Sticks: A Family Favorite Recipe
Step 1: Preheat the oven
Start by setting your oven to 375°F (190°C). Getting the oven properly preheated ensures your Cheesy Taco Sticks cook evenly, resulting in a crisp golden exterior while the cheese inside deliciously melts.
Step 2: Prepare the dough
Roll out the refrigerated pizza dough on a clean surface until it’s about 1/4 inch thick. Then carefully cut it into uniform strips—these will be the perfect size for wrapping your taco mixture and easy to hold while eating.
Step 3: Mix the meat filling
Combine your cooked ground beef or turkey with the taco seasoning until the meat is evenly coated with that classic spicy blend. This simple mix is the flavor powerhouse of the recipe, ensuring each stick bursts with taco goodness.
Step 4: Assemble the taco sticks
Place a spoonful of the seasoned meat onto each dough strip, followed by a sprinkle of shredded cheddar cheese. The key is to add enough filling for flavor but not so much that the sticks will be hard to roll or seal.
Step 5: Roll and bake
Carefully roll up the dough strips with the filling tucked inside, sealing the edges gently with your fingers. Lay them on a baking sheet and bake for 10 to 12 minutes. When the sticks turn that beautiful golden brown and the cheese is melted through, they’re ready to come out.
Step 6: Serve and enjoy
Serve your Cheesy Taco Sticks warm with a bowl of salsa for dipping. The contrast between the crispy dough, spicy meat, molten cheese, and fresh salsa makes each bite remarkably satisfying.
How to Serve Cheesy Taco Sticks: A Family Favorite Recipe
Garnishes
Top the hot taco sticks with a sprinkle of fresh cilantro or finely chopped green onions to add a pop of color and a hint of brightness. A dollop of sour cream or guacamole on the side elevates the flavors even more.
Side Dishes
These sticks pair beautifully with simple sides like a crisp garden salad, classic Mexican rice, or refried beans. The fresh or hearty nature of these sides balances the richness of the cheesy meat rolls perfectly.
Creative Ways to Present
For gatherings, arrange the sticks in a fan shape around colorful bowls of salsa, guacamole, and spicy queso. You can even turn them into mini skewers by inserting toothpicks before baking, making them easy to grab and dip at parties.
Make Ahead and Storage
Storing Leftovers
Leftover Cheesy Taco Sticks can be stored in an airtight container in the refrigerator for up to 3 days. Keep them on paper towels to absorb excess moisture and maintain their crispness.
Freezing
If you want to prepare these ahead of time, freeze the assembled sticks (before baking) on a tray. Once frozen solid, transfer them to a freezer bag for up to 2 months. When ready, bake directly from frozen, adding a few extra minutes to the baking time.
Reheating
Reheat refrigerated sticks in a preheated oven at 350°F (175°C) for 8–10 minutes until warmed through and crispy again. Avoid microwaving if possible as it can make the dough soggy and the cheese less appealing.
FAQs
Can I use other types of cheese instead of cheddar?
Absolutely! Mozzarella, Monterey Jack, or a Mexican blend cheese work wonderfully if you want a different flavor or melt texture. Just make sure it melts well for that gooey effect.
Is it possible to make this recipe vegetarian?
Yes, you can replace the meat with cooked beans, seasoned mushrooms, or your favorite plant-based ground “meat” to keep the chewy, savory filling while making the sticks vegetarian-friendly.
Can I prepare these in advance and bake later?
Definitely! Assemble the sticks and keep them wrapped tightly in the fridge for up to a day before baking. This makes them perfect for prepping ahead for busy weeknights or parties.
How spicy are the Cheesy Taco Sticks?
The spiciness depends mostly on your choice of taco seasoning and salsa. You can control the heat by selecting mild, medium, or hot seasoning blends, ensuring it suits your family’s taste.
What is the best way to prevent the dough from getting soggy?
Be sure not to overload the dough with filling or salsa inside. Also, baking them on a rack or parchment paper helps air circulate around the dough, keeping it crisp.
Final Thoughts
You really can’t go wrong with Cheesy Taco Sticks: A Family Favorite Recipe. They bring out those comforting, fun flavors that everyone loves, all wrapped up in an easy-to-make snack that feels special anytime you serve it. Whether it’s a casual night in or a get-together with friends, these sticks are sure to become a beloved staple. So, roll up your sleeves, grab the ingredients, and dive into this cheesy, savory delight—you’re going to love every single bite!
Print
Cheesy Taco Sticks: A Family Favorite Recipe
- Prep Time: 10 minutes
- Cook Time: 12 minutes
- Total Time: 22 minutes
- Yield: 6 servings
- Category: Snack
- Method: Baking
- Cuisine: Mexican-American
Description
Cheesy Taco Sticks are a delightful and easy-to-make family favorite snack. Made with seasoned ground beef or turkey, shredded cheddar cheese, and wrapped in soft pizza dough, these baked treats are perfect for game nights, parties, or a quick and satisfying meal. Served with salsa for dipping, they combine the flavors of tacos in a convenient finger food format.
Ingredients
Ingredients
- 1 package refrigerated pizza dough
- 1 cup cooked ground beef or turkey
- 1 tablespoon taco seasoning
- 1/2 cup shredded cheddar cheese
- 1/4 cup salsa (for serving)
Instructions
- Preheat Oven: Preheat your oven to 375°F (190°C) to ensure it reaches the perfect temperature for baking the taco sticks evenly.
- Prepare Dough: Roll out the refrigerated pizza dough on a flat surface and cut it into strips of about 1 to 1.5 inches wide, making it easy to wrap around the filling.
- Prepare Meat Mixture: In a bowl, combine the cooked ground beef or turkey with the taco seasoning, mixing well to evenly distribute the spices for a flavorful filling.
- Assemble Taco Sticks: Place a spoonful of the seasoned meat mixture and a sprinkle of shredded cheddar cheese onto each dough strip, ensuring you don’t overfill to make rolling easier.
- Roll and Bake: Carefully roll up each dough strip, enclosing the filling, and place them on a baking sheet. Bake in the preheated oven for 10-12 minutes, or until the dough is golden brown and cooked through.
- Serve: Remove the taco sticks from the oven and let them cool slightly. Serve warm with salsa on the side for dipping, enhancing their delicious taco flavor.
Notes
- You can substitute ground turkey with ground beef for a richer flavor.
- For a vegetarian version, replace meat with cooked beans or seasoned vegetables.
- Make sure the dough strips are not too wide to avoid difficulty in rolling.
- Serve immediately for the best taste and texture.
- Leftovers can be reheated in the oven to maintain crispiness.


