
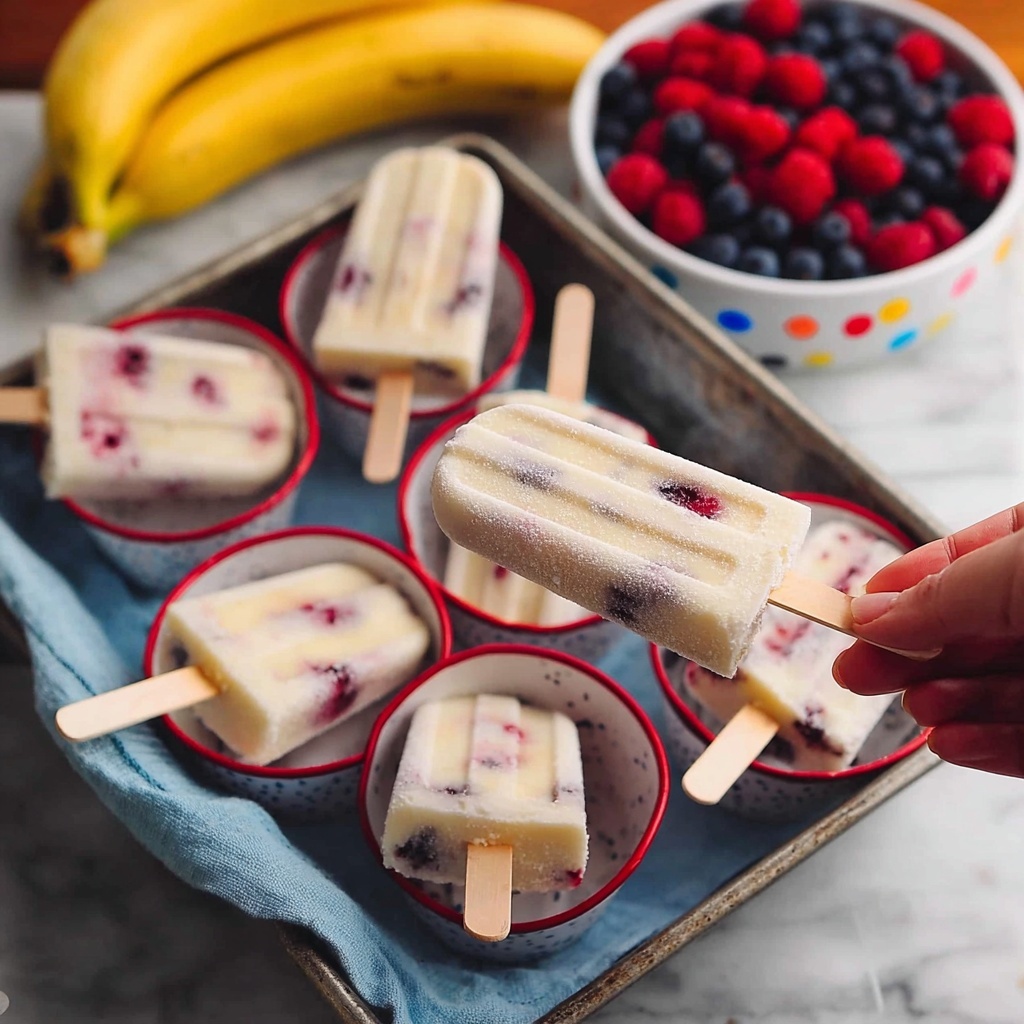
If you’re craving a refreshing, healthy, and utterly delightful summer treat, look no further than this Frozen Yogurt Pops: Homemade Fruit-Topped Frozen Treats Recipe. These popsicles brilliantly combine creamy Greek yogurt with vibrant fresh or frozen fruits, naturally sweetened with honey or maple syrup, and crowned with your favorite crunchy toppings. Each bite is a perfect balance of tart, sweet, and cool, making them an irresistible snack that feels indulgent without any guilt. Whether you want an easy dessert for a warm afternoon or a fun way to sneak some probiotics and fruit into your day, these frozen yogurt pops are about to become your new go-to recipe.
Ingredients You’ll Need
Getting started with this recipe is a breeze because the ingredients are both simple and essential, each bringing its own magic to the final pops. From creamy Greek yogurt lending richness and protein, to the fresh fruit providing natural sweetness and color, every component counts towards that perfect homemade frozen treat.
- 4 cups plain Greek yogurt (full-fat or non-fat): The creamy base that gives these pops a luscious texture and plenty of protein.
- 1 cup fresh or frozen fruit (berries, mango, peaches, etc.): Adds natural sweetness and vibrant colors—choose your favorites or mix it up!
- ½ cup honey or maple syrup (adjust to taste): A natural sweetener that blends beautifully without overpowering the flavors.
- 1 teaspoon vanilla extract (optional): Adds a subtle warmth and depth to the yogurt mixture.
- ¼ cup milk or yogurt (if needed, to thin the mixture): Helps achieve the perfect pourable consistency when the mixture is too thick.
- Pinch of salt: Enhances the natural sweetness and balances the flavors.
- Optional toppings: granola, chocolate chips, shredded coconut, chopped nuts: These provide delightful textures and extra bursts of flavor on top of each pop.
How to Make Frozen Yogurt Pops: Homemade Fruit-Topped Frozen Treats Recipe
Step 1: Prepare the Fruit
Start by washing and chopping any fresh fruit into small, manageable pieces. If you’re using frozen fruit, there’s no need to thaw it—just use it straight from the freezer. For a smoother texture, try pureeing half of the fruit before mixing it in. Then, combine all your prepared fruit in a bowl so they’re ready to mingle with the creamy yogurt base.
Step 2: Make the Yogurt Mixture
In a large bowl, add the Greek yogurt, honey (or maple syrup), and vanilla extract if you’re using it. Mix everything together until the ingredients become smoothly blended. This mixture is the core of the frozen treat, and getting it nice and smooth ensures every pop tastes decadent.
Step 3: Adjust Sweetness
Taste your yogurt mixture to see if it needs a little more sweetness. The level of sweetness will depend on your fruit choice and personal preference, so adjust by adding more honey or maple syrup gradually until it’s just right.
Step 4: Thin the Mixture (If Needed)
If your yogurt mixture feels too thick to pour easily into the molds, gradually add milk or a bit more yogurt—about a tablespoon at a time—until it reaches a pourable consistency that isn’t too runny. This makes filling the popsicle molds easier and helps with even freezing.
Step 5: Add Salt
Sprinkle in a small pinch of salt to enhance the sweetness of the ingredients and bring all the flavors to life. Salt in small amounts is a secret trick to deepen the taste experience without making it savory.
Step 6: Combine Fruit and Yogurt
Gently fold the prepared fruit into the yogurt mixture. This step is about evenly distributing those juicy pieces of fruit so every pop delivers an exciting burst of natural flavor and vivid color.
Step 7: Fill Popsicle Molds
Pour the yogurt and fruit mix carefully into your popsicle molds, leaving a little space at the top for expansion during freezing. This step sets the stage for perfectly shaped frozen treats.
Step 8: Add Toppings (Optional)
If you love a little extra texture, sprinkle toppings like granola, chocolate chips, shredded coconut, or chopped nuts over the top of each filled mold before inserting the sticks. These optional garnishes add crunch and another layer of fun to your pops.
Step 9: Insert Popsicle Sticks
Place popsicle sticks in the center of each mold. This simple step turns your frozen yogurt into convenient, handheld treats perfect for snacking anywhere.
Step 10: Freeze
Pop the molds into the freezer for at least 4 to 6 hours, but for best results, leave them overnight until thoroughly frozen solid. Patience here guarantees the ideal icy yet creamy texture.
Step 11: Remove from Molds
To take the popsicles out easily, briefly run the molds under warm water for a few seconds to loosen them up. Then gently pull on the sticks, and your homemade frozen treasures will slide right out without a fuss.
Step 12: Enjoy
Serve your Frozen Yogurt Pops: Homemade Fruit-Topped Frozen Treats Recipe right away on a sunny day, or store them in the freezer to enjoy anytime you want a cool, fruity pick-me-up.
How to Serve Frozen Yogurt Pops: Homemade Fruit-Topped Frozen Treats Recipe

Garnishes
Enhance your frozen pops with fresh garnishes such as mint leaves, a sprinkle of chia seeds, or even a light drizzle of dark chocolate for a touch of elegance. These toppings not only add visual appeal but also contribute extra flavor dimensions that make your treat truly special.
Side Dishes
These frozen yogurt pops pair beautifully with light side dishes like a crisp summer salad, fresh fruit salad, or even a handful of roasted nuts. The pops act as a perfect refreshing finish following a meal or midday snack.
Creative Ways to Present
Presentation is all about fun! Try serving your pops in a colorful flowerpot with crushed ice, or nestle them upright in a shallow bowl filled with frozen berries. Wrapping the sticks in washi tape or tying a small ribbon around them adds a charming homemade touch—perfect for parties or gift-giving.
Make Ahead and Storage
Storing Leftovers
Leftover frozen yogurt pops can be stored in an airtight container or a resealable freezer bag to protect them from freezer burn and odors. Make sure to separate layers with parchment paper if stacking to keep their shape intact.
Freezing
These pops freeze wonderfully, maintaining their creamy texture without crystallizing when kept properly sealed. If making in advance for a party, freezing up to one month ahead works great and gives you ready-to-go treats whenever desired.
Reheating
There’s no need to reheat frozen yogurt pops since they are best enjoyed cold and refreshing. Simply allow them to sit at room temperature for a few minutes if they’re too hard to bite into for a softer, creamier feel.
FAQs
Can I use flavored yogurt instead of plain Greek yogurt?
Absolutely! Using flavored yogurt can add an extra layer of taste, but be mindful of added sugars that could make the pops overly sweet. Plain Greek yogurt gives you more control over the flavor balance.
How can I make these pops vegan?
To keep the recipe vegan, substitute Greek yogurt with a plant-based yogurt like coconut or almond milk yogurt, and use maple syrup instead of honey. This keeps all the creaminess and sweetness intact.
What if I don’t have popsicle molds?
No popsicle molds? No problem! You can use small paper cups with wooden craft sticks or even ice cube trays, though smaller popsicles will have a different shape and size.
Can I add other mix-ins like chocolate chips inside the pops?
Definitely! Mixing in chocolate chips, nuts, or small bits of dried fruit directly into the yogurt mixture before freezing adds delightful surprises in every pop and makes them even more exciting to eat.
How long do Frozen Yogurt Pops: Homemade Fruit-Topped Frozen Treats Recipe last in the freezer?
Stored properly, these pops can last up to a month in the freezer without losing their flavor or texture, making them a perfect make-ahead option during busy weeks or for spontaneous treats.
Final Thoughts
I can’t recommend trying the Frozen Yogurt Pops: Homemade Fruit-Topped Frozen Treats Recipe enough. It’s a fun, easy, and healthy way to beat the heat while enjoying flavors you love. Plus, the endless customization options mean each batch can be uniquely yours. Once you make these, they’ll quickly become a favorite snack or dessert—trust me, your family and friends will thank you!
Print
Frozen Yogurt Pops: Homemade Fruit-Topped Frozen Treats Recipe
- Prep Time: 15 minutes
- Cook Time: 4 hours
- Total Time: 4 hours 15 minutes
- Yield: 8 servings
- Category: Dessert
- Method: Freezing
- Cuisine: American
- Diet: Vegetarian
Description
Delicious and refreshing Frozen Yogurt Pops made with creamy Greek yogurt, fresh or frozen fruits, and natural sweeteners. These homemade treats are easy to prepare, customizable with your favorite toppings, and perfect for a healthy snack or dessert.
Ingredients
Main Ingredients
- 4 cups plain Greek yogurt (full-fat or non-fat)
- 1 cup fresh or frozen fruit (berries, mango, peaches, etc.)
- ½ cup honey or maple syrup (adjust to taste)
- 1 teaspoon vanilla extract (optional)
- ¼ cup milk or yogurt (if needed, to thin the mixture)
- Pinch of salt
Optional Toppings
- Granola
- Chocolate chips
- Shredded coconut
- Chopped nuts
Instructions
- Prepare the Fruit: Wash and chop fresh fruit into small pieces. If using frozen fruit, use directly from frozen. Puree half of the fruit for a smoother texture (optional). Combine all prepared fruit in a bowl.
- Make the Yogurt Mixture: In a large bowl, combine Greek yogurt, honey or maple syrup, and vanilla extract if using. Mix until the mixture is smooth and well combined.
- Adjust Sweetness: Taste the mixture and add more honey or maple syrup as needed to reach your desired sweetness level.
- Thin the Mixture (if needed): If the yogurt mixture is too thick for pouring, add milk or additional yogurt one tablespoon at a time until the mixture is pourable.
- Add Salt: Add a pinch of salt to the yogurt mixture to enhance the flavors and sweetness.
- Combine Fruit and Yogurt: Gently fold the prepared fruit into the yogurt mixture until the fruit is evenly distributed without breaking the pieces.
- Fill Popsicle Molds: Pour the combined yogurt and fruit mixture into popsicle molds, leaving a small amount of space at the top for expansion.
- Add Toppings (optional): Sprinkle toppings such as granola, chocolate chips, shredded coconut, or chopped nuts onto the filled molds for texture and flavor.
- Insert Popsicle Sticks: Place popsicle sticks into the center of each filled mold to serve as handles once frozen.
- Freeze: Place the molds in the freezer and allow them to freeze for at least 4-6 hours, preferably overnight, until completely solid.
- Remove from Molds: To remove, run the popsicle molds under warm water for a few seconds to loosen the frozen pops. Gently pull on the sticks to release the popsicles.
- Enjoy: Serve the frozen yogurt pops immediately or store them in the freezer for later enjoyment.
Notes
- Use full-fat Greek yogurt for creamier texture or non-fat for lower calories.
- Pureeing half the fruit helps achieve a smoother consistency, but leaving chunks adds texture.
- Adjust sweetness based on the natural sweetness of your fruit and personal preference.
- Optional toppings add flavor and texture—feel free to customize.
- Make sure to leave some space in the molds to allow for expansion as the mixture freezes.
- Storing the popsicles in an airtight container prevents freezer burn and maintains freshness.

