
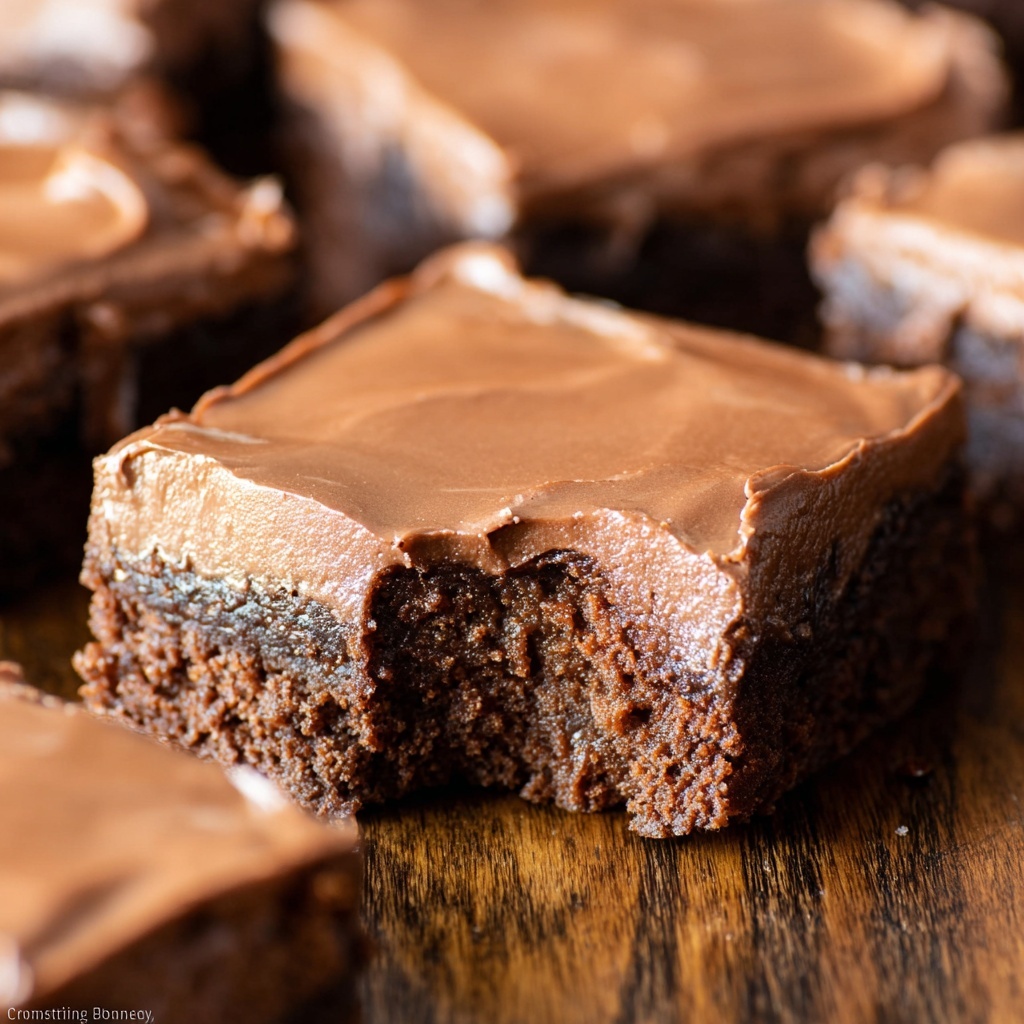
If you grew up loving the iconic brownies served up in school cafeterias, you’re about to rediscover a true classic with the Lunch Lady Brownies Recipe. This recipe brings back that nostalgic, rich, fudgy brownie experience topped with a perfectly smooth chocolate frosting that melts in your mouth. It’s the kind of treat that feels both homemade and timeless, guaranteed to make anyone smile with every bite. Trust me, these brownies hold a special place in my heart, and I can’t wait for you to enjoy them just as much.
Ingredients You’ll Need
The beauty of this Lunch Lady Brownies Recipe is how straightforward the ingredients are, yet each plays a vital role in creating that perfect texture, rich chocolate flavor, and creamy frosting. From simple cocoa powder to creamy butter and just the right touch of vanilla, these pantry staples come together beautifully.
- 1 cup salted butter (melted): Provides a rich, buttery base that keeps the brownies moist and tender.
- 1/2 cup unsweetened cocoa powder: Adds deep chocolate flavor without any added sweetness.
- 2 cups all-purpose flour: Gives structure to the brownies while keeping them soft.
- 2 cups granulated sugar: Sweetens the batter to balance the cocoa’s bitterness perfectly.
- 4 large eggs: Bind the ingredients and add richness and moisture.
- 4 teaspoons vanilla extract: Enhances the chocolate flavor and adds warmth.
- 1/4 cup salted butter (softened): Essential for a creamy and smooth frosting texture.
- 1/4 cup 2% milk: Lightens the frosting and makes it spreadable.
- 3 cups powdered sugar: Sweetens and thickens the frosting for that classic finish.
- 1/4 cup unsweetened cocoa powder (for frosting): Deepens the frosting’s chocolate flavor without extra sweetness.
How to Make Lunch Lady Brownies Recipe
Step 1: Prepare Your Baking Dish
Begin by preheating your oven to 350°F (175°C). Line a 9×13-inch baking dish with parchment paper and spray it lightly with non-stick spray. This step ensures your brownies will slide right out without sticking, making cleanup a breeze and keeping every piece intact.
Step 2: Mix the Brownie Batter
In a large mixing bowl or the bowl of a stand mixer, combine the melted butter and 1/2 cup of unsweetened cocoa powder. Use the paddle attachment to blend them until the mixture is smooth and velvety. Next, add the flour and granulated sugar, beating them in gently. Crack in the eggs, then pour the vanilla extract in. Mix just until everything comes together—overmixing can make the brownies tough, so keep it light. Your batter should be thick and luscious, promising rich brownies ahead.
Step 3: Bake the Brownies
Pour the thick batter into your prepared baking dish and spread it out evenly with a spatula. Slide the pan into the oven and bake for 25 to 30 minutes. The key to perfect brownies is to check doneness by inserting a toothpick into the center—if it comes out clean or with just a few moist crumbs, you’re set. Once baked, remove the brownies and let them rest for 15 minutes. This waiting period is crucial because the brownies should still be warm when you spread the frosting on top, helping it set beautifully.
Step 4: Whip Up the Chocolate Frosting
While your brownies rest, prepare the irresistible frosting. Beat together the softened butter, milk, powdered sugar, and cocoa powder until the mixture is smooth and creamy. This frosting is rich but fluffy enough to spread easily over the warm brownies. Pour it on and gently spread with a spatula, coating every square inch. Allow the brownies to cool completely so the frosting can firm up a bit before slicing into those perfect squares.
How to Serve Lunch Lady Brownies Recipe

Garnishes
For an extra special touch, sprinkle a little coarse sea salt or chocolate shavings on top of the frosting. It contrasts wonderfully with the sweetness and highlights the chocolate flavor. You can also add chopped nuts like walnuts or pecans if you enjoy a bit of crunch with your fudgy brownies.
Side Dishes
These brownies stand out on their own but can be paired beautifully with a scoop of vanilla ice cream or a dollop of whipped cream. A cup of cold milk or your favorite hot coffee or tea is also the perfect companion, making it a thoughtful snack or dessert.
Creative Ways to Present
Want to impress guests or make these brownies a festive treat? Cut them into bite-sized squares and arrange on a decorative platter with fresh berries or mint leaves. You can even drizzle melted white or caramel chocolate over the frosting for added flair. Wrapping individual portions in parchment paper tied with ribbon creates charming, homemade gift sets that everyone will love.
Make Ahead and Storage
Storing Leftovers
You can store any leftover Lunch Lady Brownies in an airtight container at room temperature for up to 3 days. Keeping them covered is important to maintain their moist and tender texture while preventing the frosting from drying out.
Freezing
If you want to keep these brownies fresh for longer, wrap individual pieces tightly in plastic wrap and place them in a freezer-safe container or bag. Frozen brownies maintain their flavor and texture for up to 3 months, so you can enjoy this classic treat anytime.
Reheating
To bring frozen or leftover brownies back to life, simply warm them in the microwave for about 15-20 seconds. This reheating softens the brownie and slightly melts the frosting, giving you that just-baked feel and taste again.
FAQs
Can I use unsalted butter instead of salted butter?
Absolutely! If you use unsalted butter, just add a pinch of salt to the batter and frosting to balance the flavors, as salted butter adds a subtle but important seasoning to these brownies.
What if I don’t have 2% milk for the frosting?
You can substitute whole milk or even a non-dairy milk like almond or oat milk. The frosting might have a slightly different texture but will still taste delicious and spread nicely.
How do I know when the brownies are done baking?
The best test is the toothpick method: insert a toothpick in the center, and if it comes out clean or with just a few moist crumbs, the brownies are perfectly baked. Avoid waiting until it’s completely dry to prevent overbaking.
Can I add nuts or chocolate chips to the batter?
Yes! Adding a cup of chopped nuts or chocolate chips can make these brownies even more decadent and add wonderful texture. Just fold them in gently before pouring the batter into the pan.
Is it okay if I frost the brownies when they are completely cool?
Frosting warm brownies helps the chocolate frosting spread smoothly and sets nicely. If you frost when fully cooled, the frosting might be thicker and harder to spread but will still taste great.
Final Thoughts
I hope this Lunch Lady Brownies Recipe brings back fond memories or sparks a new love for classic brownies in your kitchen. It’s straightforward, nostalgic, and endlessly comforting—a perfect way to satisfy any chocolate craving. Grab your ingredients and share this delicious treat with your loved ones; you might just start a new family favorite.
Print
Lunch Lady Brownies Recipe
- Prep Time: 15 minutes
- Cook Time: 30 minutes
- Total Time: 1 hour
- Yield: 16 servings
- Category: Dessert
- Method: Baking
- Cuisine: American
Description
These Lunch Lady Brownies are a rich and fudgy chocolate treat featuring a decadent homemade chocolate frosting. Made with melted butter, cocoa powder, eggs, and a perfect balance of sugar and vanilla, these brownies bake up moist and tender. The buttery chocolate frosting is poured over the warm brownies to create a luscious finish. Perfect for dessert or an indulgent snack, this classic recipe yields 16 generous servings.
Ingredients
Brownies
- 1 cup salted butter, melted
- 1/2 cup unsweetened cocoa powder
- 2 cups all-purpose flour
- 2 cups granulated sugar
- 4 large eggs
- 4 teaspoons vanilla extract
Chocolate Frosting
- 1/4 cup salted butter, softened
- 1/4 cup 2% milk
- 1/4 cup unsweetened cocoa powder
- 3 cups powdered sugar
- 1 cup salted butter, melted
Instructions
- Preheat and Prepare: Preheat your oven to 350°F (175°C). Line a 9×13-inch baking dish with parchment paper and spray the paper with non-stick spray to ensure easy removal and prevent sticking.
- Mix Butter and Cocoa: In the bowl of an electric stand mixer fitted with the paddle attachment, combine the melted butter and 1/2 cup cocoa powder. Blend until smooth to create a chocolate base.
- Add Dry Ingredients: Add the flour and granulated sugar to the butter-cocoa mixture. Beat together just until combined.
- Incorporate Eggs and Vanilla: Add the four eggs and vanilla extract to the batter. Mix gently and just until fully combined; avoid overmixing as the batter should remain thick.
- Bake the Brownies: Pour the brownie batter evenly into the prepared baking dish. Bake in the preheated oven for 25 to 30 minutes, or until a toothpick inserted into the center comes out clean. Once done, remove from oven and allow to stand for 15 minutes. The brownies should still be warm when frosting is applied.
- Prepare the Frosting: In a mixing bowl, beat together the softened butter, melted butter, milk, cocoa powder, and powdered sugar until smooth and creamy. This luscious frosting will complement the warm brownies perfectly.
- Frost and Cool: Pour and spread the frosting evenly over the warm brownies. Allow the brownies to cool completely before cutting into 16 squares and serving to ensure the frosting sets properly.
Notes
- Be careful not to overmix the batter to maintain a fudgy texture.
- Using salted butter adds a subtle savory contrast to the sweetness.
- Frost the brownies while they are still warm to help the frosting melt slightly into the brownie for a rich finish.
- Make sure to cool completely before cutting to avoid messy slices.
- This recipe can be stored at room temperature in an airtight container for up to 3 days or refrigerated for longer freshness.


