
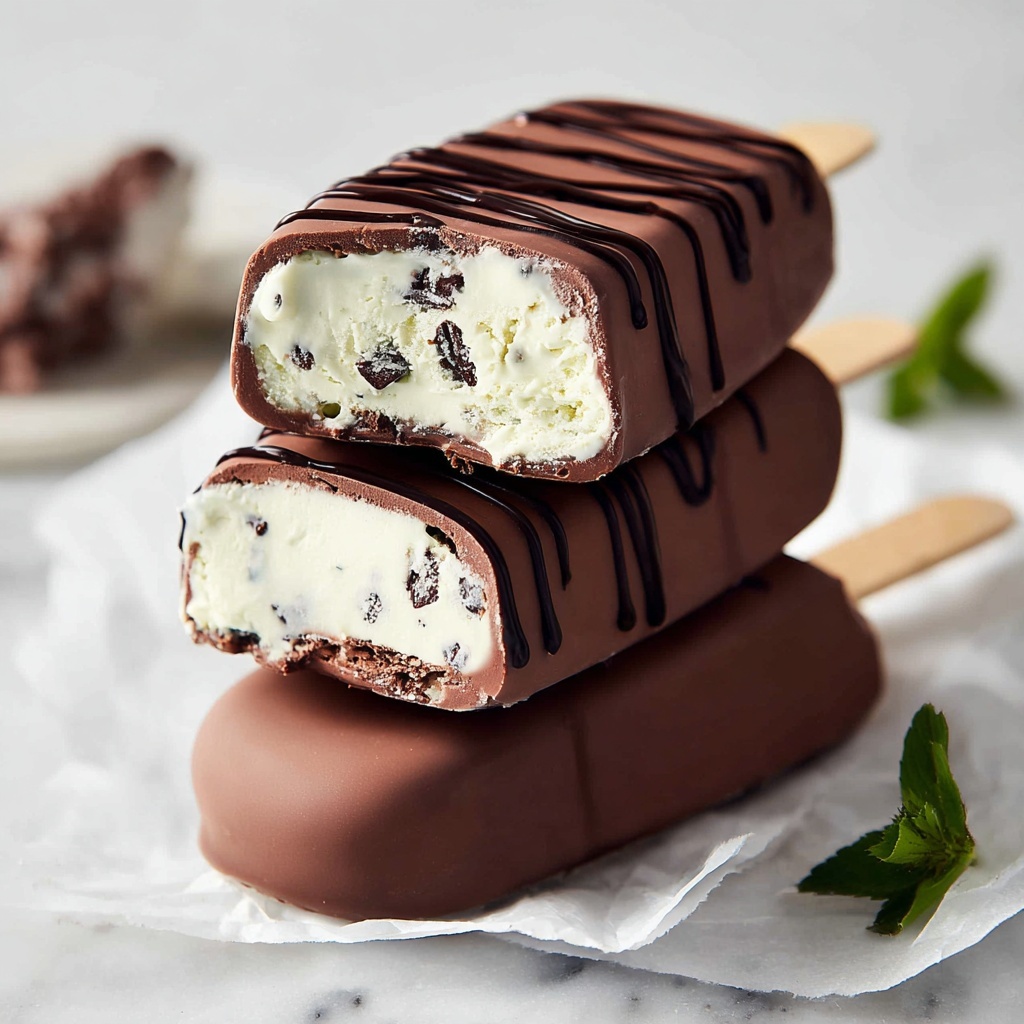
If you are craving a vibrant and refreshing dessert that combines tropical creaminess with the invigorating flavor of mint, the Mint Coconut Ice Cream Bars Recipe is your new best friend. These bars are luxuriously smooth, dairy-free, and perfect for warm days when you want something cool, indulgent, and utterly satisfying. The blend of coconut cream and fresh mint leaves creates an irresistible harmony, while the rich dark chocolate coating adds just the right amount of decadence. Trust me, once you try this recipe, you’ll find a delicious excuse to cool off anytime!

Ingredients You’ll Need
The magic of the Mint Coconut Ice Cream Bars Recipe lies in its simple yet thoughtfully chosen ingredients. Each one plays a vital role in creating the perfect balance of texture, flavor, and richness that makes this treat unforgettable.
- ½ cup cashews (soaked): Soaking softens the cashews for a creamy, silky texture in your ice cream base.
- 5.3 oz sweetened condensed coconut milk: Adds natural sweetness and a lovely caramel undertone without dairy.
- 7 oz coconut cream or canned full-fat coconut milk: The foundation of that rich, coconut flavor and smooth mouthfeel.
- 1 teaspoon vanilla extract: Enhances flavor depth and balances the mint’s freshness.
- 15 fresh mint leaves (or peppermint extract to taste): Gives the ice cream bars their signature, refreshing minty burst.
- 1.1 oz vegan dark chocolate (finely chopped): Mixed into the ice cream for delightful chocolate morsels in every bite.
- 7 oz vegan dark chocolate: For coating the bars with a crisp, glossy shell that contrasts wonderfully with the creamy inside.
How to Make Mint Coconut Ice Cream Bars Recipe
Step 1: Blend the Creamy Base
Start by placing your soaked cashews, sweetened condensed coconut milk, coconut cream, vanilla extract, and fresh mint leaves into a high-speed blender. Blitz everything for a few minutes until the mixture is completely smooth and creamy—no chunks here! This step is crucial for creating that velvety texture that defines these ice cream bars.
Step 2: Add Chocolate Chunks
Transfer your luscious, mint-infused cream to a large bowl. Gently fold in the finely chopped vegan dark chocolate with a spatula. This way, you get bursts of rich chocolate scattered throughout the creamy base, adding texture and a touch of indulgence.
Step 3: Freeze in Molds
Pour the ice cream mixture into your chosen molds, inserting an ice cream stick into each one. Place the molds in the freezer for at least 6 hours, allowing the bars to set firmly so they’ll hold their shape during the next steps.
Step 4: Remove & Ready for Chocolate Coating
Once your ice cream bars are fully frozen, carefully pop them out of the molds. Lay them on a parchment-lined tray and return them to the freezer to stay firm while you prepare the chocolate coating.
Step 5: Dip in Melted Chocolate
Melt the 7 oz of vegan dark chocolate using a bain-marie (double boiler) method for gentle, even heating. Pour the melted chocolate into a tall, slim glass and dip each frozen ice cream bar in to coat it completely. Place the coated bars back onto the parchment paper quickly so they don’t melt. Doing this one at a time helps maintain their perfect shape and temperature.
Step 6: Final Chocolate Touches
After the chocolate coating hardens in a couple of minutes, feel free to drizzle extra melted chocolate on top for an elegant finish. Serve these immediately for the best texture, or stash any extras in an airtight container in the freezer for later enjoyment.
How to Serve Mint Coconut Ice Cream Bars Recipe
Garnishes
Simple garnishes such as fresh mint sprigs, a sprinkle of toasted coconut flakes, or a light dusting of cocoa powder elevate the experience. They add a bit of flair and hint at the flavors inside without overpowering the bars’ natural charm.
Side Dishes
Pair these ice cream bars with fresh berries or tropical fruit slices like mango and pineapple to complement the coconut base and mint freshness. A small bowl of vegan whipped cream or a drizzle of berry coulis can also brighten the plate without stealing the spotlight.
Creative Ways to Present
For a show-stopping dessert, serve the bars on a slate board with scattered edible flowers or crushed nuts. Try placing each bar in a mini cupcake liner or wrapping them with parchment paper tied with twine for a rustic, charming touch that’s perfect for parties or gifting.
Make Ahead and Storage
Storing Leftovers
Leftover bars should be stored in an airtight container in the freezer to maintain freshness and prevent freezer burn. Layer them with parchment paper if stacking to keep the chocolate shells pristine.
Freezing
This recipe freezes exceptionally well, so go ahead and make a batch ahead of time. Just remember to keep them well-covered to avoid absorbing any odors or moisture that can affect their texture and flavor.
Reheating
Unlike many desserts, these ice cream bars aren’t meant to be reheated. To enjoy them at peak form, allow them to sit at room temperature for a few minutes before serving to soften slightly, ensuring the perfect balance between creamy ice cream and crisp chocolate shell.
FAQs
Can I use peppermint extract instead of fresh mint?
Absolutely! Peppermint extract is a great alternative if fresh mint leaves aren’t available. Just use it sparingly and to taste, as it is much more concentrated than fresh leaves.
What if I don’t have vegan dark chocolate?
You can substitute any high-quality dark chocolate you prefer, but ensure it’s dairy-free to keep this recipe vegan-friendly. Milk chocolate or chocolate with added milk won’t set properly and alters the flavor.
Do the cashews have to be soaked?
Yes, soaking the cashews softens them, making it easier to blend into a smooth and creamy base. If you skip soaking, you might get a grainy texture instead of that silky smoothness we want.
Is this recipe suitable for those with nut allergies?
Since soaked cashews are a key ingredient, this recipe is not safe for people with nut allergies. However, you might experiment with coconut cream or avocado for creaminess, though the texture will differ.
How long do these bars keep in the freezer?
Properly stored in an airtight container, these Mint Coconut Ice Cream Bars can last up to 2 weeks. Beyond that, flavor and texture may start to degrade, so enjoy them sooner rather than later!
Final Thoughts
Making the Mint Coconut Ice Cream Bars Recipe at home is such a joyful treat—fresh, indulgent, and uniquely satisfying. It’s an easy recipe that turns simple ingredients into something special, perfect for sharing or savoring solo. I can’t wait for you to try it and experience this bright, creamy delight that’s easy on the eyes and even easier on the palate.
Print
Mint Coconut Ice Cream Bars Recipe
- Prep Time: 30 minutes
- Cook Time: 10 minutes
- Total Time: 6 hours 40 minutes
- Yield: 4 servings
- Category: Dessert
- Method: Blending
- Cuisine: Vegan
- Diet: Vegan
Description
Refreshing and creamy vegan Mint Coconut Ice Cream Bars made with soaked cashews, coconut cream, and fresh mint leaves, coated in rich vegan dark chocolate. These dairy-free frozen treats are perfect for a cool summer dessert or anytime you crave a minty chocolate delight.
Ingredients
Main Ingredients
- ½ cup cashews (soaked for at least 4 hours or overnight)
- 5.3 oz sweetened condensed coconut milk
- 7 oz coconut cream (or canned full fat coconut milk)
- 1 teaspoon vanilla extract
- 15 fresh mint leaves (or peppermint extract to taste)
- 1.1 oz vegan dark chocolate (finely chopped)
- 7 oz vegan dark chocolate (for coating)
Instructions
- Blend the Base: Add the soaked cashews, sweetened condensed coconut milk, coconut cream, vanilla extract, and fresh mint leaves to your high-speed blender. Blend for a few minutes until the mixture is completely smooth and creamy, ensuring all the ingredients are fully incorporated.
- Fold in Chocolate Pieces: Transfer the creamy ice cream base to a large bowl. Gently fold in the finely chopped dark chocolate using a spatula to evenly distribute the chocolate bits throughout the mixture.
- Fill Ice Cream Molds: Pour the ice cream mixture into ice cream molds, inserting an ice cream stick into each mold. Place the molds in the freezer to set for a minimum of 6 hours, allowing the bars to fully freeze and firm up.
- Remove and Refreeze: Once completely frozen, carefully remove the ice cream bars from their molds. Place the bars on a tray lined with parchment paper and return them to the freezer to keep them very cold before coating.
- Melt Chocolate Coating: Melt the 7 oz of vegan dark chocolate using a bain-marie (double boiler) method until smooth and glossy. Transfer the melted chocolate to a tall slim glass for easy dipping.
- Coat Ice Cream Bars: One at a time, dip each frozen ice cream bar into the melted chocolate to fully coat it. Place the coated bars back onto parchment paper. Work quickly to prevent melting and repeat for all bars.
- Set Chocolate and Serve: Allow the chocolate coating to set for a minute or two at room temperature. Optionally, drizzle extra melted chocolate on top for decoration. Serve immediately or store the remaining bars in an airtight container in the freezer.
Notes
- Soak cashews for at least 4 hours or overnight to ensure a creamy texture.
- If using canned full fat coconut milk instead of coconut cream, chill the can and scoop the thick cream from the top.
- You can substitute fresh mint leaves with peppermint extract, but adjust to taste as it is more concentrated.
- Work with the ice cream bars one at a time when coating with chocolate to prevent melting.
- Store coated bars in an airtight container in the freezer for up to 2 weeks.


