
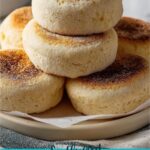
If you have ever wished for a breakfast staple that combines lightness, a tender crumb, and a delightful chew, you’re in for a treat with the Perfectly Fluffy Gluten Free English Muffins You’ll Love Recipe. This recipe takes the often tricky world of gluten-free baking and turns it into an effortlessly delicious experience, delivering muffins that boast a golden crust, airy centers, and that classic nooks-and-crannies texture everyone craves. Whether you’re gluten-free out of necessity or simply looking to explore new fluffy delights, these English muffins will quickly become your go-to morning indulgence.
Ingredients You’ll Need
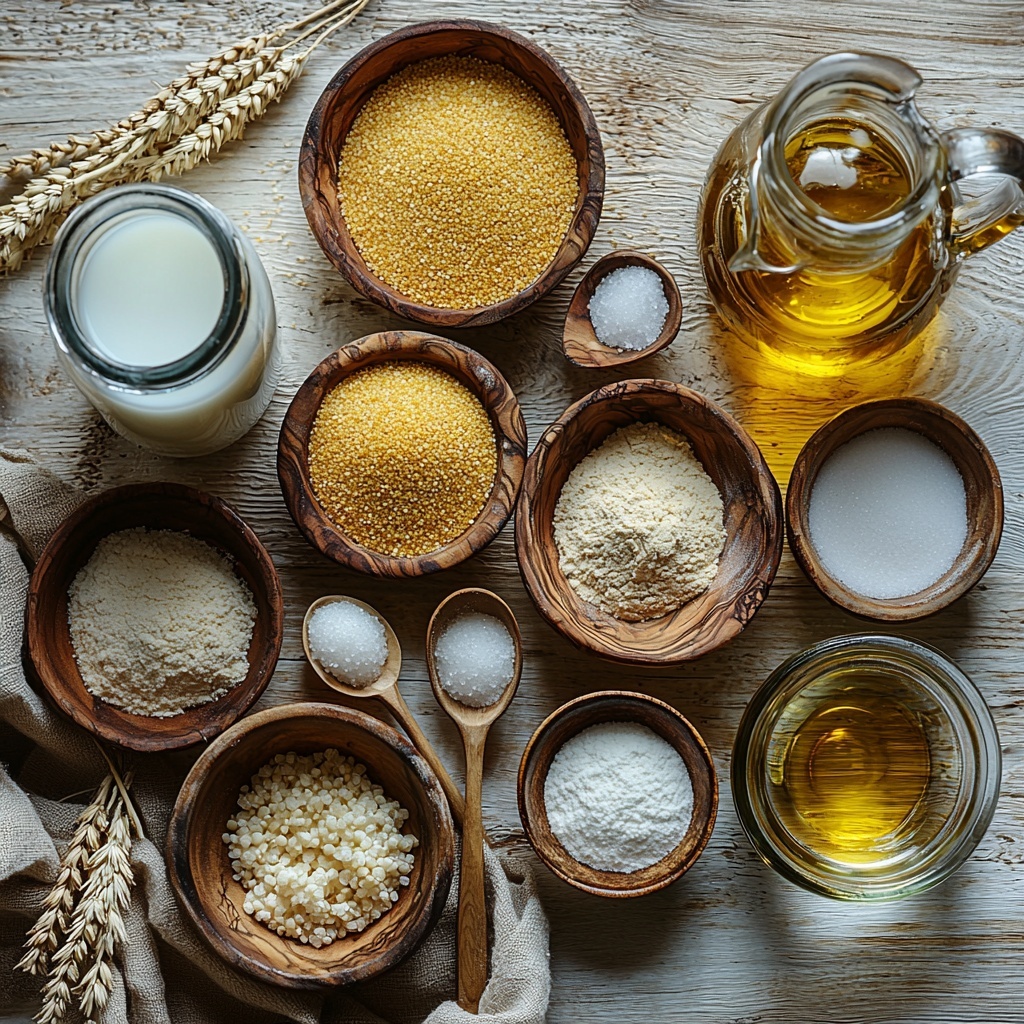
The magic of this recipe lies in its straightforward yet carefully selected ingredients, each playing a vital role in creating the perfect muffin texture, flavor, and appearance. From natural binders to wholesome flours, you’ll see how simple components come together beautifully.
- Psyllium husk: Helps bind the dough and adds fluffiness, creating structure without gluten.
- Lukewarm water: Activates the psyllium husk and yeast, essential for that perfect rise.
- Tapioca starch: Provides chewiness and lightens the texture for a soft bite.
- Millet flour: Adds mild flavor and nutrients, enhancing the wholesome profile of the muffins.
- Sorghum flour: Lends slight sweetness and moisture, balancing the flours beautifully.
- Caster sugar: Adds just the right hint of sweetness to complement the tangy notes.
- Instant yeast: Ensures muffins rise beautifully, giving that classic airy crumb.
- Salt: Enhances all the flavors and balances the sweetness.
- Whole milk: Adds richness and tenderizes the crumb for a luscious texture.
- Sunflower oil: Keeps muffins tender and moist without heaviness.
- Apple cider vinegar: Adds tanginess and reacts with the baking process to improve texture.
- Cornmeal: Prevents sticking and gives the muffins that traditional rustic finish.
How to Make Perfectly Fluffy Gluten Free English Muffins You’ll Love Recipe
Step 1: Prepare the Psyllium Gel
Start by combining the psyllium husk with lukewarm water in a bowl. Stir it thoroughly and allow the mixture to thicken into a gel-like consistency. This gel is your gluten-free binder helping to create fluffiness and hold the dough together beautifully throughout the process.
Step 2: Mix the Dry Ingredients
In a large bowl, whisk together the tapioca starch, millet flour, sorghum flour, caster sugar, instant yeast, and salt. This thorough mixing ensures that every bite has a consistent flavor and texture, setting the foundation for perfectly risen muffins.
Step 3: Combine Wet Ingredients
Add the lukewarm whole milk, sunflower oil, and apple cider vinegar to the psyllium gel you prepared earlier. Mixing these wet ingredients well integrates richness and a touch of tang, contributing to the final muffins’ tender crumb and subtle flavor.
Step 4: Form the Dough
Make a well in the center of your dry ingredients, then pour in the wet mixture. Stir until everything comes together into a cohesive dough. This step is where that satisfying dough texture begins to form, testifying to the harmony between gluten-free flours and binders.
Step 5: Knead the Dough
Turn the dough out onto a lightly floured surface and knead for about 5 minutes until smooth. This kneading step helps develop the structure and elasticity, essential for those perfectly fluffy muffins you’ll love.
Step 6: Shape and Proof the Muffins
Sprinkle a baking sheet generously with cornmeal. Divide the dough into eight equal parts and roll each into a ball. Place them on the cornmeal, flatten slightly, then sprinkle a bit more cornmeal on top. Cover with plastic wrap and let them proof for about 1 hour until puffy and ready to cook.
Step 7: Cook the Muffins
Preheat a skillet over low heat. Transfer the muffins carefully to the heated pan and cook uncovered for 11 to 12 minutes on one side until they’re golden brown. Flip and repeat on the other side. This gentle, slow cooking ensures an even crust and tender interior.
Step 8: Cool Before Serving
Once cooked, move the muffins to a wire rack and let them cool completely. Cooling helps set their fluffy texture and makes them easier to slice, revealing those charming craggy nooks that are perfect for holding your favorite toppings.
How to Serve Perfectly Fluffy Gluten Free English Muffins You’ll Love Recipe
Garnishes
These muffins are a blank canvas begging for your favorite garnishes. Classic options like melting a pat of butter, spreading rich clotted cream, or drizzling local honey all work beautifully. For something savory, try avocado slices or a spread of herb cream cheese for a fresh twist.
Side Dishes
Pair these muffins with a variety of sides such as scrambled eggs, crispy bacon, or fresh fruit for a balanced breakfast plate. Their lightness and chew make them the perfect companion to both hearty and delicate dishes, elevating the whole meal experience.
Creative Ways to Present
For brunch gatherings, slice the muffins horizontally and toast them lightly before layering with smoked salmon, cream cheese, and capers. You can also cut into smaller rounds to make mini sandwiches with your favorite fillings, perfect for entertaining or snacking.
Make Ahead and Storage
Storing Leftovers
After they have cooled completely, store your muffins in an airtight container at room temperature for up to 2 days. Their delicate fluffiness holds up well, making them easy to enjoy fresh even a day or two later.
Freezing
To keep your muffins for longer, freeze them individually wrapped in plastic wrap and placed in a freezer-safe bag. They freeze beautifully without losing their soft texture and can be stored for up to 3 months, ready for whenever you want a quick homemade treat.
Reheating
Reheat frozen or stored muffins by toasting them lightly or warming them in a skillet over low heat. This restores the crisp exterior while maintaining their wonderful fluffy interior. Avoid microwaving as it can make them gummy or chewy.
FAQs
Can I use a different gluten-free flour blend instead of millet and sorghum?
Absolutely! While millet and sorghum give these muffins their unique flavor and texture, feel free to experiment with your favorite gluten-free flour blend. Just keep in mind that texture and taste might vary slightly.
Is psyllium husk necessary for the fluffiness?
Yes, psyllium husk plays a crucial role in binding and mimicking gluten’s elasticity, making the muffins fluffy and cohesive. Without it, the muffins might be denser or crumbly.
Can I substitute the apple cider vinegar with another acid?
You can substitute apple cider vinegar with lemon juice or white vinegar in equal parts. The acidity helps react with the baking process to tenderize the crumb and enhance flavor.
How do I know when the muffins are done cooking in the skillet?
Look for a golden brown crust on both sides and that the muffins feel springy but cooked through when pressed gently. Cooking them low and slow prevents burning while ensuring fluffy insides.
Can I double this recipe for a larger batch?
Definitely! This recipe scales well; just be sure to give yourself enough time for proper kneading and proofing when working with a larger amount of dough.
Final Thoughts
Making the Perfectly Fluffy Gluten Free English Muffins You’ll Love Recipe is such a rewarding experience, especially when you bite into those tender, airy nooks fresh from the skillet. The combination of simple, wholesome ingredients with thoughtful technique transforms breakfast into a joyous occasion. I encourage you to try making these muffins at home; once you do, they will surely earn a beloved spot on your table and in your heart.
Print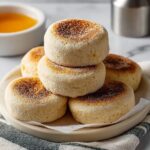
Perfectly Fluffy Gluten Free English Muffins You’ll Love Recipe
- Prep Time: 15 minutes
- Cook Time: 24 minutes
- Total Time: 1 hour 39 minutes
- Yield: 8 servings
- Category: Breakfast
- Method: Stovetop
- Cuisine: Gluten Free, American
- Diet: Gluten Free
Description
These Perfectly Fluffy Gluten Free English Muffins are a delightful homemade treat featuring a blend of millet, sorghum, and tapioca starches, combined with psyllium husk for extra fluffiness and binding. Lightly sweetened and tender, they are cooked on a skillet to golden perfection and boast a chewy texture with a slightly tangy flavor from apple cider vinegar. Ideal for gluten-free diets, these muffins make a great breakfast or snack option that pairs wonderfully with butter, jam, or your favorite toppings.
Ingredients
Dry Ingredients
- 160 g Tapioca starch
- 140 g Millet flour
- 120 g Sorghum flour
- 25 g Caster sugar
- 8 g Instant yeast
- 8 g Salt
- 1 cup Cornmeal (for dusting)
Wet Ingredients
- 20 g Psyllium husk
- 360 g Lukewarm water
- 120 g Whole milk (lukewarm)
- 20 g Sunflower oil
- 10 g Apple cider vinegar
Instructions
- Prepare Psyllium Gel: In a bowl, combine psyllium husk with lukewarm water and stir until it thickens into a gel-like consistency to act as a binder and add fluffiness to the dough.
- Mix Dry Ingredients: In a large bowl, whisk together tapioca starch, millet flour, sorghum flour, caster sugar, instant yeast, and salt to evenly distribute the leavening agents and flavors.
- Combine Wet Ingredients: Add lukewarm whole milk, sunflower oil, and apple cider vinegar to the psyllium gel and mix well to form a uniform liquid mixture.
- Form the Dough: Make a well in the dry ingredients and pour in the psyllium gel and milk mixture. Stir thoroughly until a cohesive dough forms.
- Knead the Dough: Transfer the dough to a floured surface and knead gently for about 5 minutes until it becomes smooth and pliable.
- Prepare Baking Sheet: Sprinkle a baking sheet generously with cornmeal to prevent sticking and set it aside.
- Shape the Muffins: Turn the dough onto a floured surface again, knead gently, shape into a large ball, then divide into eight equal pieces. Roll each piece into a ball and flatten slightly.
- Proof the Dough: Place the dough balls on the cornmeal-covered baking sheet, sprinkle tops with cornmeal, cover with plastic wrap, and let them proof for about 1 hour until slightly puffed.
- Preheat Skillet: Warm a large skillet or griddle over low heat to ensure even cooking without burning.
- Cook Muffins – Side One: Transfer the proofed muffins to the hot skillet and cook uncovered for 11-12 minutes until the bottoms turn golden brown.
- Cook Muffins – Side Two: Carefully flip the muffins and cook the other side for another 11-12 minutes until golden and cooked through.
- Cool and Serve: Transfer the muffins to a wire rack and allow to cool completely before slicing and serving with your favorite toppings.
Notes
- Use lukewarm liquids to activate the yeast and psyllium husk properly without killing the yeast.
- Kneading is brief to avoid overworking gluten-free dough which can become tough.
- The apple cider vinegar adds a subtle tang and helps with dough rising and texture.
- Cooking over low heat is crucial to cook muffins through without burning the outsides.
- Allow muffins to cool completely to set their structure for best slicing results.
- Store muffins in an airtight container and toast before serving if desired.