“`html
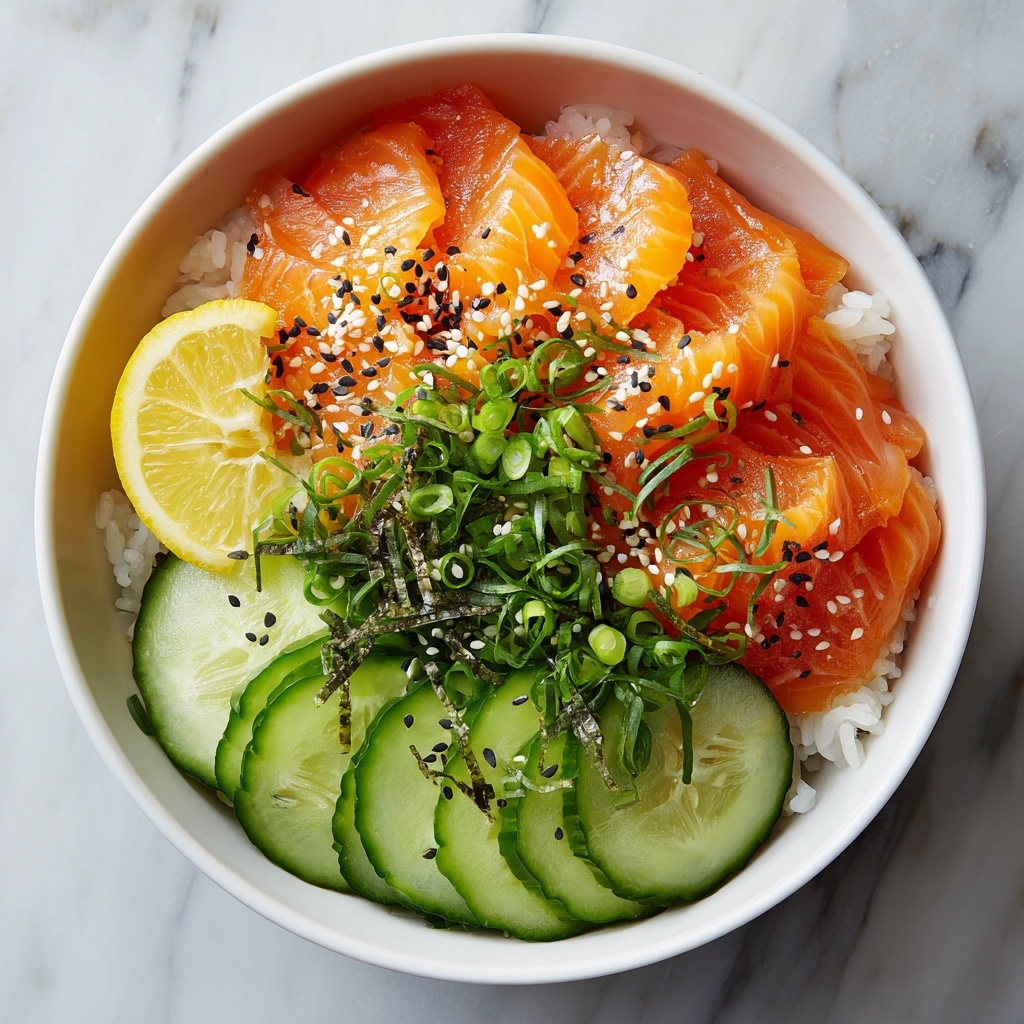
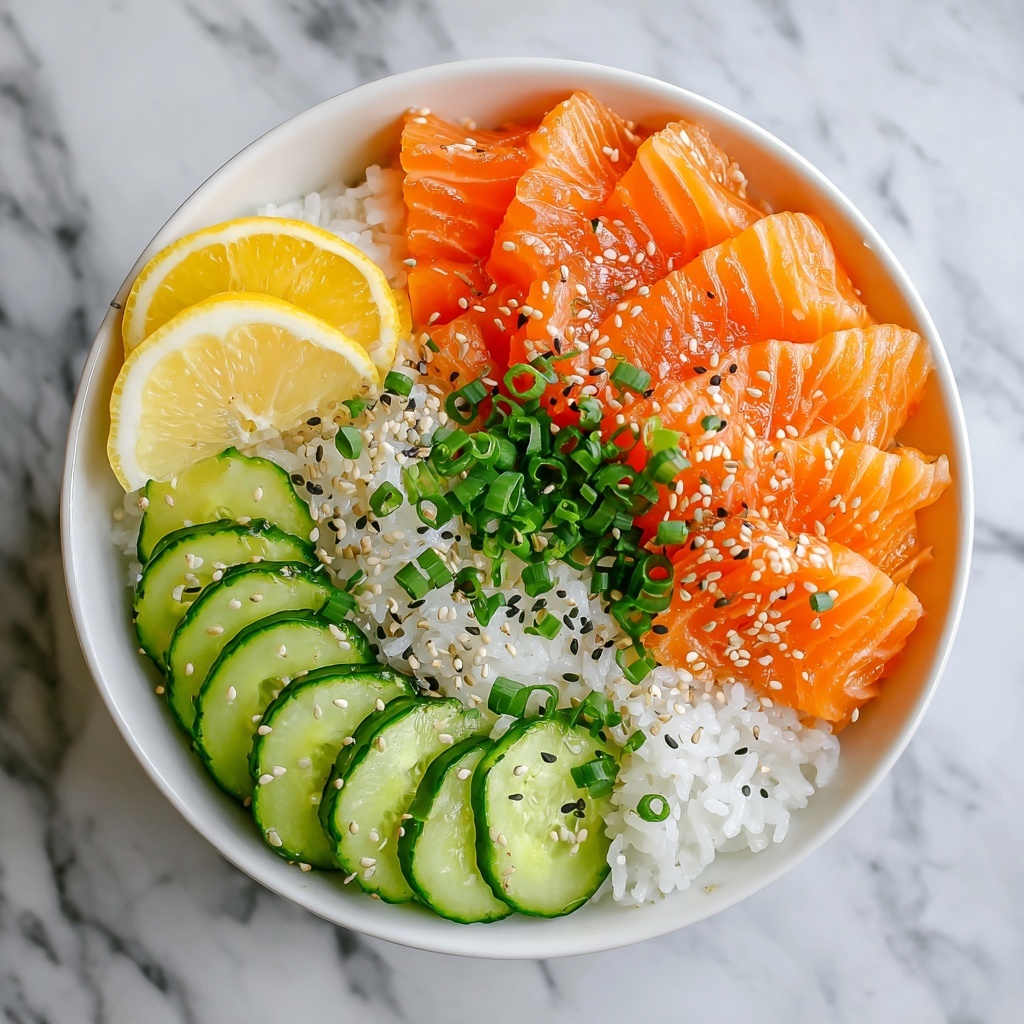
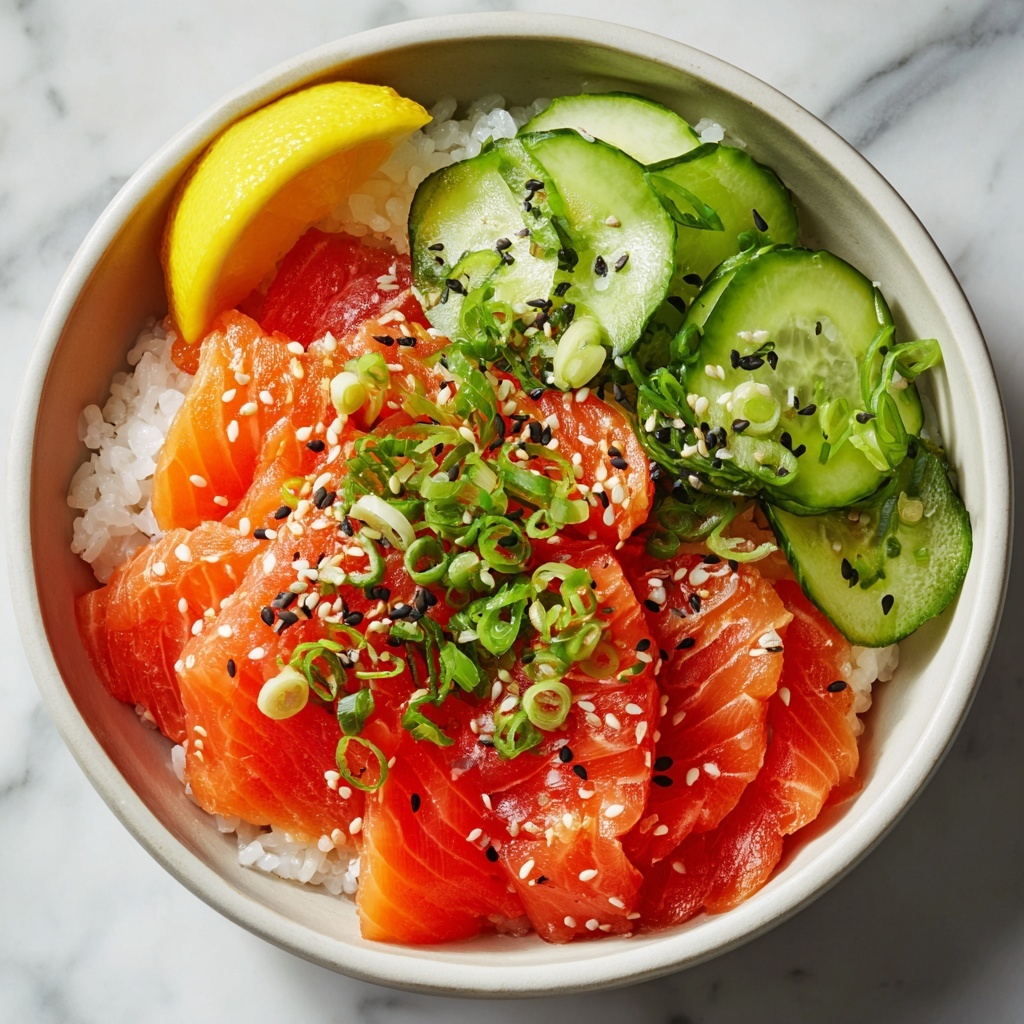
If you are craving a dish that bursts with vibrant flavors and feels like a gourmet treat but comes together in a flash, then you are going to absolutely love this Quick Miso Soy Salmon Sashimi Bowl Recipe. It combines the delicate, buttery texture of sushi-grade salmon with a luscious miso-soy dressing that balances salty, sweet, and tangy notes effortlessly. This bowl is a perfect harmony of fresh ingredients, making it ideal for a light lunch or an impressive yet simple dinner that feels indulgent without any fuss.
Ingredients You’ll Need
Each ingredient in this recipe plays a distinct role, crafting a bowl that delights with every bite. Although the list might look sophisticated, the ingredients are simple, pantry-friendly, and incredibly accessible. They come together to provide a balance of textures and flavors from creamy salmon to crunchy cucumber and umami-rich miso soy dressing.
- Sushi-Grade Salmon (8 ounces): The star of the dish, it must be fresh and sushi-grade to ensure safety and melt-in-your-mouth texture.
- Capers (1 tablespoon): Add a briny pop that cuts through the richness of the salmon wonderfully.
- Red Onion (1/4 medium): Offers a gentle sharpness; swapping with green onions will give a milder, fresher note.
- Cucumber (1 medium): A crisp, cooling element that adds refreshing crunch and color.
- Sesame Seeds (1 tablespoon): Toasted to bring a subtle nutty flavor and a bit of crunch; poppy seeds can create a unique twist if you’re feeling adventurous.
- Chives (1 tablespoon): Fresh and herbaceous, chives brighten the bowl, but parsley or other fresh herbs work beautifully too.
- Olive Oil (2 tablespoons): Extra-virgin olive oil enriches the dressing with a fruity, smooth base.
- Sesame Oil (1 teaspoon, optional): Adds a warm, nutty aroma that deepens the flavor of the miso soy sauce blend.
- Soy Sauce (2 tablespoons): Provides the classic umami punch; tamari is a great gluten-free alternative.
- White Miso (2 tablespoons): Creates the savory backbone with its distinct fermented depth; red miso offers a stronger flavor for those who prefer a bolder taste.
- Lemon Juice (1 tablespoon): Brings brightness and a tangy lift that balances the richness perfectly; lime juice can be an equally zesty substitute.
- Brown Sugar (1 teaspoon): Just a touch adds warmth and rounds out the savory notes, and honey works just as well.
- Flaky Salt (to taste): Sprinkle to heighten textures and amplify the flavors naturally.
- Black Pepper (to taste): Adds subtle heat and complexity.
- Sushi Rice (1 cup, optional): Use as a base to turn your sashimi bowl into a satisfying meal that feels substantial.
How to Make Quick Miso Soy Salmon Sashimi Bowl Recipe
Step 1: Prepare the Dressing
Start by whisking together the olive oil, optional sesame oil, soy sauce, white miso, lemon juice, and brown sugar in a small bowl. This mixture is the heart and soul of your Quick Miso Soy Salmon Sashimi Bowl Recipe. Whisk until the dressing is fully blended and smooth, ensuring each flavor shines through with perfect harmony.
Step 2: Slice the Salmon
Using a very sharp knife, slice the sushi-grade salmon thinly against the grain. The thin slices make the salmon tender in every bite and allow the dressing to coat each piece beautifully. Taking your time here ensures that the texture remains delicate and that your sashimi pieces look gorgeous.
Step 3: Prepare the Veggies and Seeds
Thinly slice the cucumber and red onion, aiming for uniform pieces. Scatter the sesame seeds and chop the chives finely. These small steps add layers of texture and fresh flavors that complement the silky salmon without overshadowing it.
Step 4: Assemble the Bowl
Arrange the salmon slices in a serving bowl by slightly overlapping them in an artful manner. Add the cucumber and red onion nearby or nestled in between slices. Sprinkle the sesame seeds and chopped chives generously over the top. This is where your bowl starts to look irresistible.
Step 5: Dress and Season
Drizzle the miso soy dressing over the arranged salmon and vegetables. Finish by seasoning with flaky salt and freshly ground black pepper to your liking. The seasoning enhances the natural flavors and adds a slight crunch that’s very satisfying.
Step 6: Final Touches
Garnish with capers to add that extra burst of salty tang. Serve immediately to enjoy the freshness, or place the bowl over a bed of sushi rice to create a filling, polished meal.
How to Serve Quick Miso Soy Salmon Sashimi Bowl Recipe
Garnishes
Garnishing is the art that elevates this dish visually and flavor-wise. Capers provide a wonderful briny contrast, chives offer a fresh herbal note, and a sprinkle of sesame seeds adds texture and a subtle roasted flavor. A few extra lemon wedges on the side invite guests to customize the brightness according to their taste.
Side Dishes
This bowl pairs beautifully with dishes that keep the meal balanced and refreshing. Consider chilled edamame sprinkled with sea salt for a protein boost, a simple seaweed salad for some umami depth, or even light pickled vegetables to contrast the richness of the salmon. These sides complement the flavors wonderfully without stealing the spotlight.
Creative Ways to Present
You can personalize your presentation by serving the sashimi bowl in rustic wooden bowls for a natural look or sleek white porcelain to emphasize the vibrant colors. For a trendier approach, try layering your ingredients in a glass jar for an Instagram-worthy effect. Adding edible flowers or finely sliced radish can also heighten the visual appeal and make this simple dish feel even more special.
Make Ahead and Storage
Storing Leftovers
Because this Quick Miso Soy Salmon Sashimi Bowl Recipe features raw fish, leftovers should be stored carefully to preserve freshness. Place any uneaten salmon and components in an airtight container and refrigerate immediately. It is best to consume within 24 hours to enjoy the optimal texture and flavor.
Freezing
Freezing is not recommended for this recipe since the delicate texture of raw salmon sashimi and fresh vegetables will degrade significantly after thawing. To keep enjoying top quality, prepare just enough to serve fresh each time.
Reheating
Since the dish is served cold or at room temperature, reheating is unnecessary and not advised. The fresh raw salmon and crisp veggies are best enjoyed as is, fresh from the fridge or at room temperature shortly after making.
FAQs
Can I substitute the salmon with another fish?
Yes, you can! Tuna or yellowtail of sushi-grade quality are fantastic alternatives that will maintain the sashimi bowl’s fresh and delicate spirit. Just be sure always to use sushi-grade fish for safety.
Is white miso necessary, or can I use red miso instead?
White miso provides a milder, sweeter flavor that blends seamlessly with salmon. Red miso is stronger and saltier, so it’s fine to use if you prefer a more intense umami taste—just use it sparingly to avoid overpowering the dish.
Can this recipe be made vegan or vegetarian?
This recipe relies on raw salmon for its signature flavor and texture, but you can create a vegan version by swapping the fish with marinated tofu or sliced avocado and using tamari instead of soy sauce for gluten sensitivity.
What type of rice is best for this bowl?
Sushi rice is the ideal base because it is slightly sticky, which helps hold the bowl together, and has a mild sweetness that pairs perfectly with the savory miso soy dressing. You can also use jasmine or basmati rice if sushi rice isn’t available.
How long does it take to prepare this recipe?
Remarkably, this Quick Miso Soy Salmon Sashimi Bowl Recipe takes just about 15 minutes from start to finish, making it a fantastic go-to when you want something flavorful and fresh without spending hours in the kitchen.
Final Thoughts
There is something truly special about the Quick Miso Soy Salmon Sashimi Bowl Recipe that makes it a standout meal you will find yourself craving again and again. It’s fresh, flavorful, and frankly, quite beautiful on the plate. Whether you’re looking for a quick lunch or an effortless dinner to impress friends, this bowl ticks every box. Give it a try soon, and enjoy the delightful blend of textures and tastes that make sashimi bowls such a beloved comfort food with a sophisticated twist.
“`
Print
Quick Miso Soy Salmon Sashimi Bowl Recipe
- Prep Time: 10 minutes
- Cook Time: 0 minutes
- Total Time: 15 minutes
- Yield: 2 servings
- Category: Main Course
- Method: No-Cook
- Cuisine: Japanese
- Diet: Low Fat
Description
This Quick Miso Soy Salmon Sashimi Bowl is a fresh, vibrant, and easy-to-make dish featuring thinly sliced sushi-grade salmon dressed in a flavorful miso-soy dressing, complemented by crisp cucumber, red onion, and garnished with sesame seeds and capers. Perfect for a light, healthy meal that you can whip up in just 15 minutes, this bowl is an ideal choice for salmon lovers craving a restaurant-quality sashimi experience at home.
Ingredients
Salmon and Vegetables
- 8 ounces Sushi-Grade Salmon (Always ensure you use sushi-grade for safety in raw dishes.)
- 1/4 medium Red Onion (For a milder taste, swap with green onions.)
- 1 medium Cucumber (Choose any firm variety for the best results.)
- 1 tablespoon Capers
- 1 tablespoon Sesame Seeds (Poppy seeds can be used for a twist.)
- 1 tablespoon Chives (Fresh herbs like parsley can work instead.)
- 1 cup Sushi Rice (Optional base for a heartier meal.)
Dressing
- 2 tablespoons Olive Oil (Opt for extra-virgin for the best flavor.)
- 1 teaspoon Sesame Oil (Optional, adds a nutty aroma.)
- 2 tablespoons Soy Sauce (Use tamari for gluten-free option.)
- 2 tablespoons White Miso (Red miso can be a great substitute.)
- 1 tablespoon Lemon Juice (Lime juice can also serve as an alternative.)
- 1 teaspoon Brown Sugar (Honey can be used for a warmer sweetness.)
- To taste Flaky Salt
- To taste Black Pepper
Instructions
- Preparation: Gather all ingredients and ensure sushi-grade salmon is properly thawed and fresh. Make sure your knife is very sharp for clean slicing.
- Make the Dressing: In a small bowl, whisk together olive oil, sesame oil, soy sauce, white miso, lemon juice, and brown sugar until smooth and well combined to create a balanced, flavorful dressing.
- Slice the Salmon: Using a sharp knife, slice the sushi-grade salmon against the grain into very thin, delicate slices that will be tender to eat and nicely showcase the fish.
- Arrange the Bowl: On a serving plate or bowl, artfully arrange your salmon slices, slightly overlapping them for an attractive presentation. Add sliced cucumber, sprinkle sesame seeds, chopped chives, and thinly sliced red onion on and around the salmon.
- Add Dressing and Season: Drizzle the prepared miso dressing evenly over the salmon and vegetables, then season the bowl with flaky salt and freshly ground black pepper to taste for enhanced flavor.
- Garnish and Serve: Top the bowl with capers for an extra burst of flavor and serve immediately. Optionally, serve over sushi rice for a more filling meal.
Notes
- Always use sushi-grade salmon to ensure safety since the fish is served raw.
- If you prefer a gluten-free version, substitute soy sauce with tamari.
- Feel free to adjust the sweetness of the dressing by varying the brown sugar amount or using honey.
- For a different flavor profile, red miso can be used instead of white miso.
- This dish is best enjoyed fresh and not stored, as the texture of raw fish and fresh vegetables is optimal immediately after preparation.
- Sushi rice is optional but recommended if you want a more substantial bowl.


