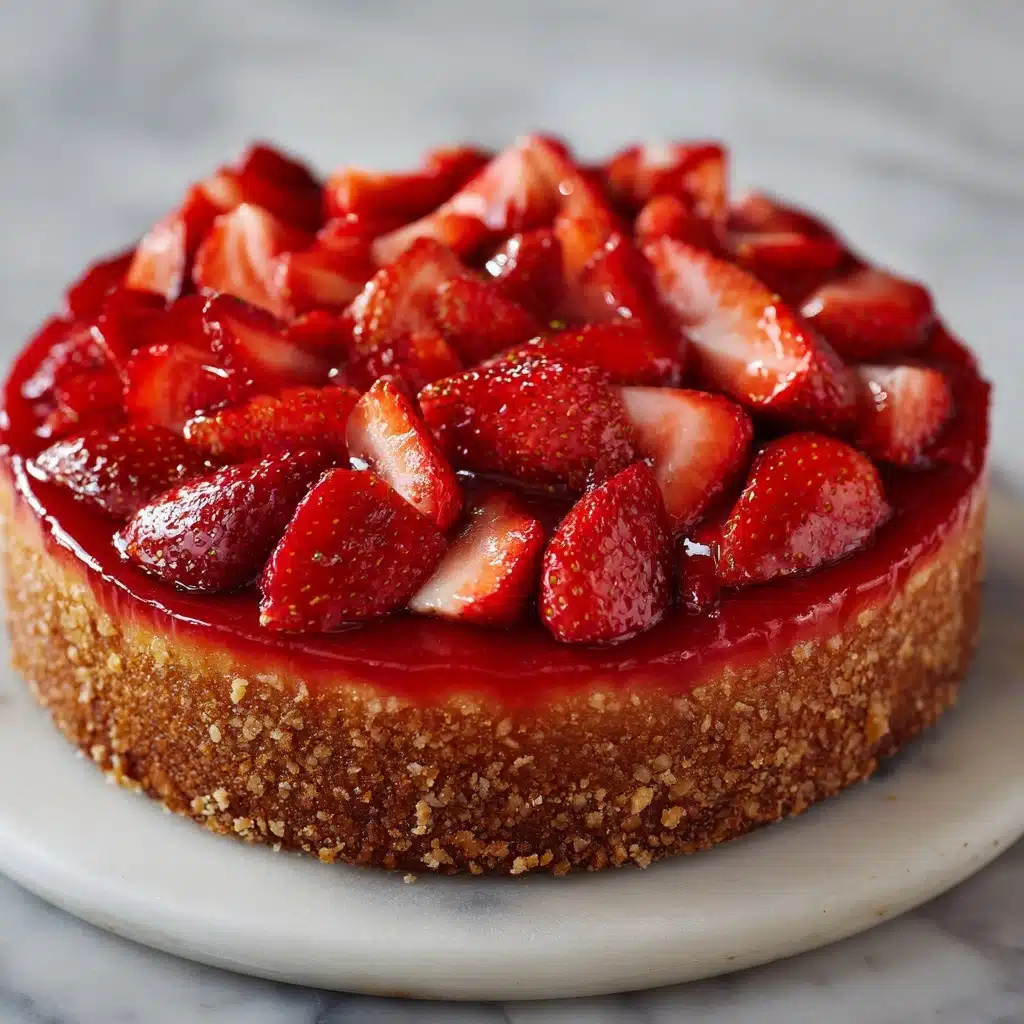
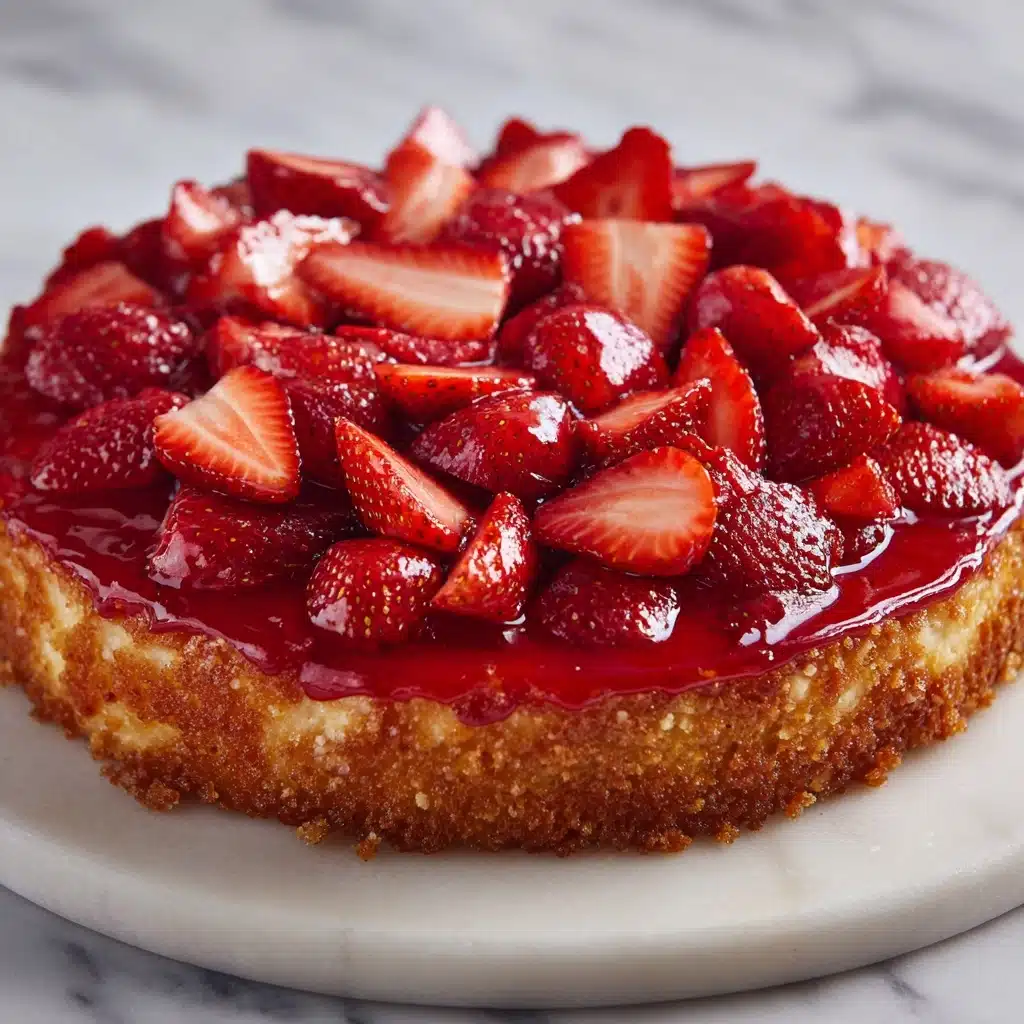
Strawberry Upside-Down Cake Recipe
If you’ve ever wished for a dessert that’s effortlessly gorgeous and bursting with fresh, sunny flavor, let me introduce you to Strawberry Upside-Down Cake. This beauty flips the script on a traditional cake, layering juicy strawberries and caramelized brown sugar beneath a fluffy vanilla crumb—then inverts everything for that show-stopping finish. It’s the type Dessert. If you’re ready for a cake that is equal parts comforting and impressive, you’re in the right place!
Ingredients You’ll Need
These ingredients come together simply, yet each one is essential for the Strawberry Upside-Down Cake’s dreamy taste, lush texture, and cheerful color. Don’t skip the details—every component has a delicious role to play in this baking adventure!
- Fresh Strawberries: Sliced and layered at the bottom, they become sweet and jammy during baking—use the ripest you can find!
- Unsalted Butter (melted): This forms the luscious base and helps caramelize the brown sugar for that sticky, golden top.
- Brown Sugar: Lends warmth and rich flavor, creating that irresistible gooey layer with the strawberries.
- All-Purpose Flour: The backbone of the cake, giving you just the right structure without heaviness.
- Baking Powder & Baking Soda: These leaveners work together for a high rise and tender crumb in every bite.
- Salt: Just a pinch balances the sweetness and enhances the fresh berry flavor.
- Unsalted Butter (softened): Creamed with sugar, it creates that soft, rich cake texture we all crave.
- Granulated Sugar: For lightness and just enough sweetness in the vanilla cake layer.
- Large Eggs: Bind and add richness, making the cake lush and golden.
- Vanilla Extract: A splash brings classic bakery aroma and lovely depth of flavor.
- Sour Cream: Makes for a moist, plush crumb and subtle tang that really complements the berries.
- Milk: Loosens the batter, ensuring it’s perfectly spreadable and bakes up soft.
How to Make Strawberry Upside-Down Cake
Step 1: Prepare the Pan and Strawberries
Start by preheating your oven to 350°F (175°C). Grease a 9-inch round cake pan—this step is crucial for getting that gorgeous upside-down finish! Pour the melted butter into the bottom of your pan, then sprinkle the brown sugar evenly over it. Now, lay out your strawberry halves cut-side down, covering the whole surface. This layer is going to transform into a shiny, ruby-red topping for your Strawberry Upside-Down Cake.
Step 2: Mix the Dry Ingredients
In a medium bowl, whisk together the flour, baking powder, baking soda, and salt. This quick step evenly distributes the leaveners and salt, giving you a consistent rise and balanced flavor in every slice of cake.
Step 3: Cream the Butter and Sugar
In a large mixing bowl, beat the softened butter with the granulated sugar until the mixture is light and fluffy. This traps air in the batter, ensuring your Strawberry Upside-Down Cake bakes up tender and thick. Take your time with this step—a hand mixer or stand mixer will make it easy.
Step 4: Add Eggs and Vanilla
Beating in the eggs one at a time keeps the batter smooth and cohesive. Mix in the vanilla extract as well, which instantly smells like cake-shop heaven.
Step 5: Combine Wet and Dry Mixtures
Next, add the dry ingredients to the butter mixture in three parts, alternating with sour cream and milk. Begin and end with the dry mix. This gentle method prevents overmixing and keeps your crumb extra soft and moist. Stir just until everything is incorporated.
Step 6: Layer and Bake
Gently spoon the batter over your perfectly arranged strawberries and smooth it out, covering the fruit completely. Bake for 35 to 40 minutes, or until a toothpick poked in the center comes out clean. Your kitchen will smell divine, I promise!
Step 7: Cool and Invert
Let the cake cool in its pan for 10 minutes—this helps everything set while still making inversion easy. Carefully run a knife along the edge, then place a serving plate on top and flip the cake swiftly. The strawberry layer will be on top, glistening and beautiful. Serve warm or at room temperature.
How to Serve Strawberry Upside-Down Cake
Garnishes
A Strawberry Upside-Down Cake shines all on its own, but a few thoughtful touches can make it even more inviting! I love a generous dollop of fresh whipped cream on each slice, or a scoop of vanilla ice cream gently melting over the warm berry topping. A sprinkle of lemon zest or a few fresh mint leaves add a stunning pop of color and freshness.
Side Dishes
Pair your cake with lightly sweetened iced tea, lemonade, or sparkling water for a refreshing contrast. If you’re hosting a brunch, try serving with sliced stone fruit or a creamy yogurt parfait—these lighter sides complement the cake’s buttery richness beautifully.
Creative Ways to Present
For a fun twist at gatherings, try baking mini Strawberry Upside-Down Cakes in muffin tins—everyone gets their own little masterpiece! You can also use a rectangular pan and cut the cake into squares for an easy serve-at-a-party dessert. Individual ramekins work for a more elegant plated presentation, too.
Make Ahead and Storage
Storing Leftovers
Keep your Strawberry Upside-Down Cake fresh by covering any leftovers tightly and storing them in the refrigerator. The juicy topping helps keep the cake moist for up to 3 days—just bring slices to room temperature or gently rewarm for best flavor and texture.
Freezing
If you’d like to freeze your cake, let it cool completely, then wrap slices individually in plastic wrap and foil. Freeze for up to one month. For best texture, thaw overnight in the refrigerator before serving. The strawberries may soften a little more, but the taste will still be wonderful!
Reheating
To gently warm leftovers, place individual slices in the microwave for about 10–15 seconds, or briefly in a low oven (300°F/150°C) until just heated through. This simple step brings back that bakery-fresh aroma and softness.
FAQs
Can I use frozen strawberries for Strawberry Upside-Down Cake?
Absolutely! Just thaw and drain them thoroughly before layering in the pan. Frozen berries may release more juice, but the cake will still bake up deliciously with a slightly saucier topping.
What is the best way to invert the cake?
Let the cake cool for 10 minutes after baking, then run a thin knife around the edges. Place a plate over the pan and flip it quickly but carefully—gravity and a little steam will help release the strawberry topping. If any berries stick, just gently nudge them back into place.
Why alternate adding dry and wet ingredients to the batter?
Alternating helps keep the batter smooth and prevents overmixing, which is the key to a soft, tender Strawberry Upside-Down Cake. It ensures the flour is evenly moistened and the cake doesn’t turn out dense.
Can I make the cake ahead of time?
Yes, you can bake Strawberry Upside-Down Cake a day in advance. Store it covered in the fridge, then bring to room temperature or lightly reheat before serving for the best flavor and texture.
How can I add extra flavor?
Try tossing the strawberries with a teaspoon of lemon zest before layering, or add a dash of almond extract to the batter for a subtle, fragrant note. You can even swap out half the strawberries for other berries, like raspberries, for a fun twist!
Final Thoughts
It’s hard to resist the sweet charm and effortless appeal of Strawberry Upside-Down Cake. Whether you’re baking for family, friends, or just for yourself on a sunny afternoon, this cake is guaranteed to bring a smile. Give it a try—your kitchen will smell incredible, and your taste buds will thank you!
Print
Strawberry Upside-Down Cake Recipe
- Total Time: 55 minutes
- Yield: 8 servings 1x
- Diet: Vegetarian
Description
Indulge in the delightful sweetness of this Strawberry Upside-Down Cake, where luscious strawberries sit atop a moist, buttery cake base, creating a perfect harmony of flavors. This easy-to-make dessert is a showstopper for any occasion, whether it’s a casual family gathering or a summer soirée.
Ingredients
For the Strawberry Layer:
- 2 cups fresh strawberries (hulled and halved)
- 1/4 cup unsalted butter (melted)
- 1/2 cup brown sugar
For the Cake:
- 1 1/2 cups all-purpose flour
- 1 1/2 teaspoons baking powder
- 1/4 teaspoon baking soda
- 1/4 teaspoon salt
- 1/2 cup unsalted butter (softened)
- 3/4 cup granulated sugar
- 2 large eggs
- 1 teaspoon vanilla extract
- 1/2 cup sour cream
- 1/2 cup milk
Instructions
- Preheat the Oven: Preheat oven to 350°F (175°C). Grease a 9-inch round cake pan.
- Prepare the Strawberry Layer: Pour melted butter into the pan. Sprinkle brown sugar over the butter, then arrange strawberry halves cut-side down over the sugar.
- Make the Cake Batter: Whisk together flour, baking powder, baking soda, and salt. In a separate bowl, cream softened butter and granulated sugar. Add eggs one at a time, then mix in vanilla. Alternate adding dry ingredients and sour cream/milk to the wet mixture.
- Assemble and Bake: Spoon the batter over the strawberries. Bake for 35–40 minutes until a toothpick comes out clean. Cool for 10 minutes, then invert onto a plate.
- Serve: Enjoy warm or at room temperature.
Notes
- For enhanced flavor, add 1 teaspoon of lemon zest to the strawberries.
- This recipe can also be made with thawed and drained frozen strawberries.
- Serve with whipped cream or vanilla ice cream for a delicious treat.
- Prep Time: 15 minutes
- Cook Time: 40 minutes
- Category: Dessert
- Method: Baking
- Cuisine: American
Nutrition
- Serving Size: 1 slice (1/8 of cake)
- Calories: 310
- Sugar: 31 g
- Sodium: 160 mg
- Fat: 15 g
- Saturated Fat: 9 g
- Unsaturated Fat: 5 g
- Trans Fat: 0 g
- Carbohydrates: 42 g
- Fiber: 2 g
- Protein: 4 g
- Cholesterol: 70 mg


